
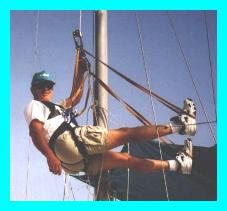
In January 1999 I had the mast
unsteped. The insert in the base was so corroded to the step socket
that when it finally released, it sprung up 3 feet (with myself and a yard
hand hanging on to the bottom.) I brought the mast home and took detailed
measurements in the event spar replacement was necessary (actually, I took
a lot of measurements because I didn't know what else to do.)
I inspected every inch of the
mast and rigging to determine what can be refinished and what must be replace.
Some items (mast step, heel insert, upper's and fore stay) I intend to
replace regardless so time was not wasted on those parts.
The
Good - The Bad - The Ugly
The Good: Mast head,
jumpers, back stay, uppers, spreaders and tangs appear in good condition
and oddly enough, after the insert was removed from the bottom of the mast,
the inside of the mast look very good. It appears that aluminum casting
corrodes much faster than the 6062 T-6 aluminum extrusion.
In all, I spent approximately
5 hours removing components from the mast and another 3 hours cleaning
and inspecting those parts.
The Bad: Where on earth
did all those parts come from and how do they go back together? I
guess what doesn't go back will save weight aloft, right?
;-)
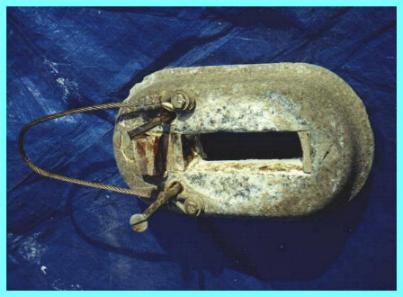
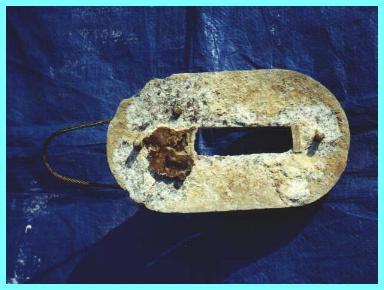
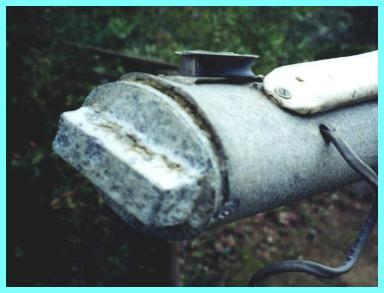
The Ugly: About 3/4
of an inch had to be cut from the heel of the mast in order to remove the
insert (the widget that fits between the heel of the mast and the step.)
The insert was worse than the step however, but both were scheduled to
be replaced anyway.
Additional trimming was not
done until I discuss installing a hinged step with Ballenger
Spar System's in Santa Cruz, California. The folks at Ballenger's are
not only very friendly and helpful, they understand best what I wanted
to accomplish. More on Triton mast lowering/raising later.
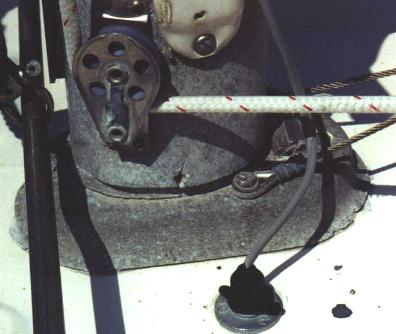
Photos: Mast Step -Top, Mast
Step - Bottom, Infamous Insert
Painting
A Very Old And Weathered Spar
I wrote
earlier that nothing was more perplexing to me than marine heads.
Well, I must sadly report that I found a subject that easily matches (for
me) the complexity of marine heads; Painting very old, weathered
and anodized spar's. I have rebuilt several cars and boats and painted
all but one of them myself but, painting aluminum that is worn by
weather, salt, halyards then left alone to alter its own form by expansive
corrosion is a "little" more involved. It seems as though spars are
either anodized or painted and once anodized, "remove and replace" or "throw
away" concept is the process of acceptance. Consequently I could
not find a lot written on how to proceed.
I started
my spar renovation research by gathering the technical publications from
each major marine paint manufacture. I found it interesting that
people generally assume that if your painting a spar, it must have been
painted before. Only one bothered to address (very briefly) the process
for an anodized spar. I also talked to the manager of a local airport
paint shop where just about every plane painted is aluminum and, they are
all older than Pegasus.
I learned
from painting cars that a paint job that looks good after completion does
not mean much. Its the paint job that looks good after 5 or more
years is more of a sign that you did everything right. So, with this
in mind, I chose to follow the basic process that U.S. Paint Corp
(AWLGRIP) refers to as their Aluminum System II (which simply stated is
grind, sand, etch, chromate, anti-corrosive epoxy primer, high build epoxy
primer, fair, epoxy primer seal and paint.) I'm sure it will look
nice when completed but check back in a few years and I'll let you know
if I'm still satisfied with the results.
The top
coat I selected was Interlux Interthane Plus; not because I think
it is any better than the others, it just happens to be a stock item at
our local West Marine (the only discount marine supply in the area.)
First
impression with The AWLGRIP prep: Easier than the instruction would
lead you to believe.
First
impression with Interlux: Not user friendly to brush.
Since I flunked brushing-101
with the boom I decided to try rolling the mast. I moved the mast
so that half was inside the garage where I could control the wx.
After going to several paint stores looking for epoxy/urithaine tolerant
rollers, I found them at Home Depot. They turned out to be heaven
sent. Who'd a thunk it. They are: Quali-Tech, Ultrafine roller
foam for the smoothest finish, 4" long. Rolling went much better than my
brushing. If the paint starts to sag a little, you can go over it
again and correct the error quickly. After applying 1 coat, I let
it set for 24 hours then applied a second coat. I applied 1 more
coat to the entire mast.
Rolling AWLGRIP 545 is fast,
easy and only minimal sanding required between coats to remove the light
orange peal texture. My success with foam rollers encouraged me to continue.
I applied a top coat it turned out much like the primer. A light
sag or two here and there until you get accustom to the viscosity after
which it was reasonably easy to control.
After all my research and procrastinating,
the process used to paint an old, weathered, anodized and scared spar was
not that difficult and future painting should be much easier.
1. Cleaned then sanded
with 60 grit using an electric random orbital sander;
2. Etched and converted
the aluminum with chemicals purchased at an automotive paint store for
half the price of a marine supply store (ingredients were the same);
3. 1 wet coat of AWLGRIP
30-Y-94 Epoxy Primer anti corrosive for aluminum (sprayed);
4. 4 coats AWLGRIP High
Build Epoxy Primer (sprayed);
5. Filled & faired
with thickened epoxy then sanded smooth with 80 and 150 grit on a long
board;
6. Sealed with 4 coats
of AWLGRIP 545 Anti-Corrosive Epoxy Primer (rolled and sanded between coats
with 220 grit) and;
7. Top coated with 3
coats of Interlux, Interthane Plus (rolled and wet sanded between coats
with 320 wet.)
Total cost: about $250
+/- some change.
Installing
a Hinged Mast Step
My search
for a hinged mast step started in 1998 while visiting several firms specializing
in rigging. The response I got was generally the same; they
brought out a catalog of rigging fixtures, asked me how long my boat was
then showed me a step you might find on a Catalina 25. Then one day
while driving down the coast I stopped at Ballenger
Spar System's, Inc., in Santa Cruz, California.
The minute I walked into the shop I knew my step was here. Buzz Ballenger
walked me through what was available (he builds several styles)
that would handle the job without fear of marginal capabilities.
The step I selected comes pre drilled for a mast insert which you
fabricate yourself from aluminum to match your extrusion. The step
comes with no pre drilled holes for attaching it to the deck; You
determine where you want the step to be placed then drill and counter sink
these holes yourself.
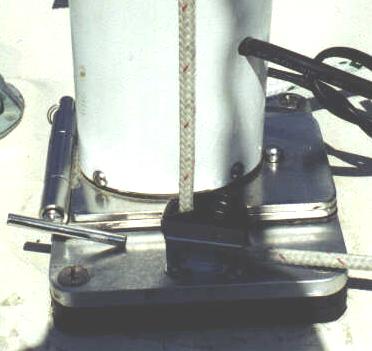
Pictures
- Building & Assembling New Step:&nbbsp; Hinged
Mast Step, Building The Insert, New
Mast Step, Securing
to Deck
Once the components
were assembled, I attached the deck section to the cabin top so the mast
would set in its original orientation. Two SS 3/8-16, flathead, bolts
were used to attach the step to the primary beam. At the time, I
thought it would look nice if I used the same size bolts at each corner
although the size was an overkill. In retrospect, 1/4" or even 5/6"
would have looked nicer than the large 3/8" bolt heads used.
After aligning the step and
pre drilling all the holes, I surrounded the step with 3M blue masking
tape then removed the step and covered the entire area with a very thick
coating of 3M 5200. The step was replaced, bolts inserted with 3M
Marine Silicone added under each head prior to setting. Nuts were
installed but not strongly tightened. The step was allowed to set
for a week after then trimmed, removed the tape and tighten all nuts from
below.
My intent was to rig the mast
then jury rig a hoisting system so I could raise it myself but that was
not to be. When it came time to raise the mast, Delta winds at 25
MPH with gusts to 35 came up and lasted a week. I returned home to
wait out the blow only to be met by another wind storm. While
waiting out this storm I began to check and recheck all fittings and worry
about just about everything. One thing in particular was the sloping
cabin top of the Triton. I had noticed this about half way through
my mast project and wondered if it was a design flaw or a design feature.
I started walking the docks and as strange as it seems, all the Tritons
I could locate were stepped on the slope. I then thought the old
step must have been cast at an angle - its was not; Next I thought
the mast insert was cast at an angle - its was not; In fact, it is
cast with a 5" flat surface that would not even allow the mast to rock
fore and aft on the step (however it would slide fore and aft for positioning.)
I decided to go ahead and step it the same way it was and if problems occur
in tuning, I'd drop it and insert a wedge of Delrin under the deck plate.
The Admiral reminded me that
there are professional riggers, which I was not one of and, I should call
one I trusted and get their opinion then go back to sleep. I called a Bay
area rigger that I had confidence in who walked me through what I should
have done 2 months earlier. I explained that I had a sloping cabin
top which turns out to be approximately 3/8" drop off level for the length
of the step. At 35 feet, I calculated that my masthead would be raked
forward approximately 13". Bruce agreed that was too much even for
a Triton and suggested I cut the base of the mast at an angle of approximately
1/4". This would provide about a 4 inch forward rake which should
tune out very well. He explained that I just wanted enough slope
so that when the mast is tuned, any load would be carried by the heel of
the mast base and not the toe. Also, I must be careful not to place
too much load on the heel (this is when I got all that technical stuff
that Bruce knows so well.) A quarter inch should help my weather
helm and satisfy our sailing life style (He already knew it was a Triton
and I told him I'm a cruiser, not a racer.) He also recommended that
I NOT put a pre bend in the upper part of the mast with the jumpers.
He recommended the jumpers be tight but, without pre bend. Then,
after the uppers are tuned, leave the backstay just tight enough to hold
the mast then hand tighten the forestay to eliminate any sag. Once
the forestay is tight and without sag, bring the main halyard to plumb
or, slightly raked forward (1"-2" max.) The remainder of the tuning
should be performed while sailing. (This is basically the Triton tuning
procedure identified in one of the old Triton Improvement Bulletins.)
Without further ado, I drove
to the hardware store where I purchased a hacksaw then returned to modify
my mast base while the winds continued to blow. 2 days later, I awoke
to a brief calm and immediately motored across the slough to the boat yard
and had them hoist the mast while I ran around connection the wires.
I returned to the slip in 20 minutes but it took me another 2 hours to
complete the static tuning. Now I have the time to design and build
a proper hoisting system.