Flattops has moved to:
GeoCities will be closing, so this move is necessary and it's important to update your bookmark(s) and link(s). All the same
content is on the new site.
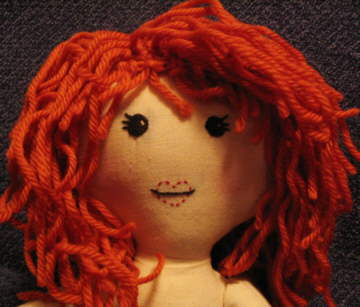
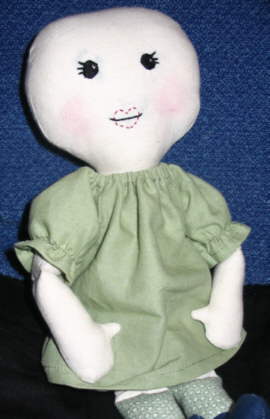
Grace, the Official Flattops Rag Doll
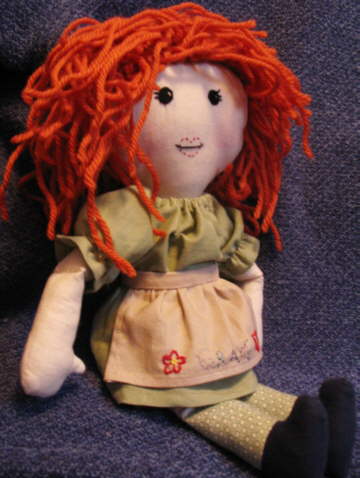 ~ A pretty little 12" rag doll with so much love,
she has a heart for her mouth! ~
~
"Grace . . . be yours in abundance"
(1 Peter 1:2, NIV).
~
Contents
What You'll Need for the Doll
Embroidering the Face
Sewing the Doll
Crocheted Chemo Cap
Wigs
Pantaloons
Dress
Nightgown
Embroidered ("Grace") Apron
Notes
(Does Grace look familiar? She should! She's the Flattops logo.)
For many women, there's something about a rag doll that brings back fond memories and perhaps is comforting in a way. I wanted to take a doll for my mastectomies surgery, but was informed that people at the hospital would think it strange--so self-consciousness set in and I didn't. And guess what? Once there, I wished I had. For a subsequent surgery, I did take along a rag doll. From across the room, I could see her and she reminded me of the comforts of home.
Even though I've always collected and liked dolls, one thing that helped me feel normal after my surgeries was noticing they were as flat-chested as I was, and yet still wore smiles. Grace is the special doll I created for women to make for other women; especially for women with upcoming surgeries, chemotherapy, radiation, or other medical treatments. There's something special about having something made for you, a special "bosom buddy" that someone lovingly made.
Grace is a simple, old-fashioned cloth doll with "little girl" proportions (an oversized head and hands that can't touch above it). You can make her look like your friend (or yourself). Please don't make her in pink just because of the symbolism . . . unless your friend loves pink.
A note on printing: Make sure your printer is not scaling the images up or down. Print them exactly as they appear.
What You'll Need for the Doll
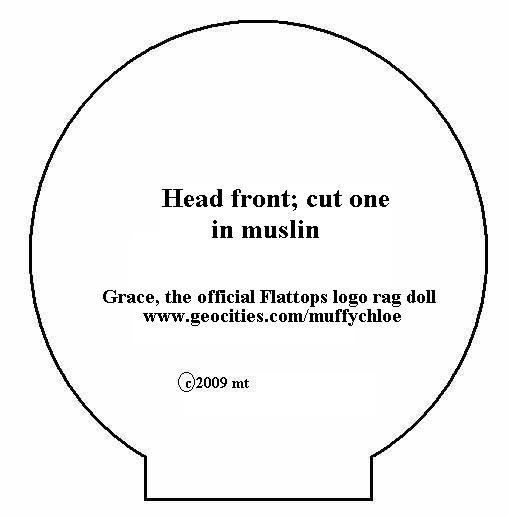
Pattern Pieces
Print out these pages, making sure that your printer is not increasing or decreasing the graphics.
Arms Pattern Piece
Front of Head Pattern Piece
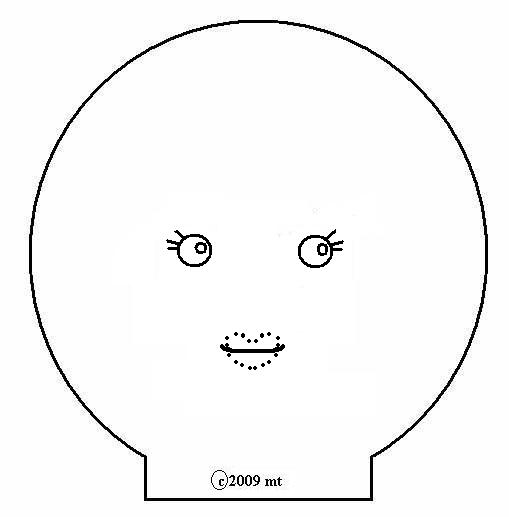
Face Template
Back of Head Pattern Piece
Legs Pattern Pieces
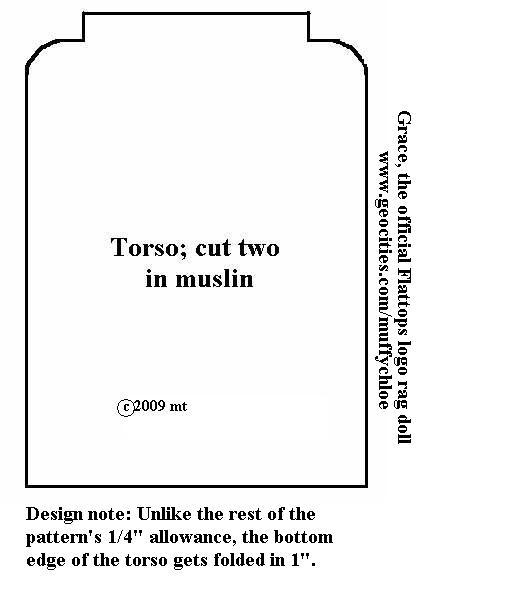
Torso Pattern Piece
These instructions--you may wish to print them. Click in this frame (so your printer knows not to print the frame at right). Printing on "landscape" sometimes works better than "portrait" for websites.
Supplies
If you are an avid crafter, you may already have all of the supplies needed for Grace in your scrap box (I did!).
1/4 yard cotton muslin (You can use skintone-colored cotton in place of the muslin)
A scrap of solid colored cotton fabric for shoes
A scrap of a fun/striped/vintage cotton print for "socks"
Pencil
Embroidery thread for face in red (498 DMC), black, and off-white (25 DMC is what I used)
Fiber fill (or wool+)
Sewing machine (or needle*)
Thread**
Optional tools that are helpful for turning and stuffing: tweezers, crochet hooks, knitting needles
* A note on hand-stitching: I have hand-stitched more than one doll (okay, let's be honest, that means two). It's not as bad as you might think. The main thing is to remember to use tiny stitches, like a backstitch or use a small running stitch, go back, and do another running stitch catching the areas missed, or another small stitch that you feel comfortable with. Perhaps if you are having cancer treatments and your doctor says it's okay, you could work on Grace while in the waiting room.
** A note on thread: I used to always wonder, why oh why after I finish sewing something does the cloth automatically rip out? What frustration! I was advised to use polyester thread because polyester thread is strong. There's the problem! It was not until many years later that I read the tip: if you use cotton (as you should with this pattern), then you must use cotton thread as well. Polyester thread is so strong that it can break your cotton fabric.
Embroidering the Face
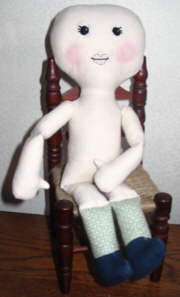
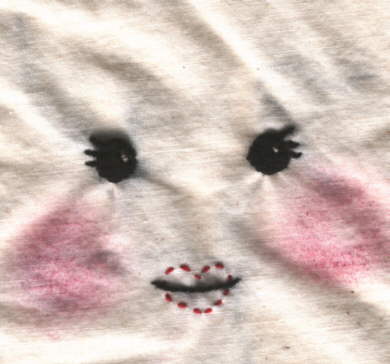 Embroider the face first, keeping in mind the seam allowance. The template can be used easily by printing it out, holding it up in a window, and tracing it with a pencil. If the doll is meant to be bald, it is highly recommended that the face be completed in full before sewing the doll together, so that all stitches are hidden on the inside of the doll.
The stiches used to make Grace are:
Eyes: Satin stitch, using three sections/threads of floss, the entire eye in black, skipping the small inner circle. Then go over the small circle with three threads of off-white in a satin stitch
Eyelashes: Stem stitch in black with two threads.
Mouth (heart area): Running stitch, with two threads, in red. Be careful to follow the lines so as to keep this a heart shape.
Mouth (line area): Stem stitch in black with two threads.
Finally, use blush (just normal people blush) to color the cheeks. This may be touched up after completing Grace.
Sewing the Doll
 Seam allowance is not shown on the pattern pieces, but is the typical 1/4". If you are sewing by hand or your sewing machine does not properly differentiate seam allowances, you can draw them on with pencil on the wrong side of the fabric.
1) Cut out all the pieces, following the quantity needed and fabric recommended on the pattern piece.
2) Sew center back seam of center back head. This more rounded back head (a bit different than the traditional rag doll) allows for wigs and chemo caps and is important for Grace. Although it may look a little intimidating compared to the traditional rag doll, it's just one extra step and is not difficult to do.
3) Sew head neck seam to torso neck seam for front and back of doll.
4) Beginning on one bottom edge of torso and leaving entire bottom of torso open, sew torso/head front to torso/head back.
5) Sew arms together, leaving top straight edge open.
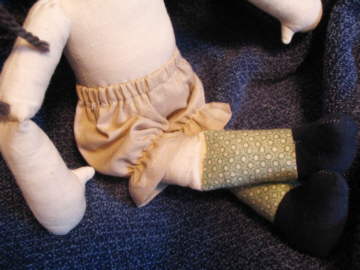
6) For all four leg sets, sew foot to sock, and then sock to leg. Be careful to sew two pairs--two pieces should have the feet going one way, two the other.
7) Leaving top straight edge open, sew legs together.
8) Clip corners (not to stitching--muslin frays easily) and turn all pieces right side out. Stuff legs up to seam of sock. Manipulate the leg so that the seam runs down the middle front, and (by hand) sew (with doubled thread) leg front to leg back to make leg "knee" to make leg flop at the knee.
9) Do the same for the arms at about mid-point--be sure to factor in the seam allowance (you may wish to turn in 1/4" first before measuring the mid-point). Drawing on (with pencil) the mid-point before stuffing the arm makes it easier to see where it is after stuffing is added.
10) Finish stuffing all pieces. I have made dolls from professional patterns only to be disappointed as the neck weakened and ultimately became floppy. It's important to stuff the neck as well as possible. If you're at all in doubt about your ability to do this, many people like to insert reinforcement for the neck in rag dolls. This could be a craft stick or wood dowel, and is optional and not recommended for play dolls. Stuff the tops of arms and legs lightly so that they are more floppy than the rest of the doll (this is important to remember so the doll can be moved).
11) Turn in 1/4" the top of legs. The torso bottom gets folded in a full 1".
12) Hand-sew, using doubled thread, legs on using a whipstitch. When sewing on the legs, hold torso upside down, put legs with toes pointing toward face, and sew through all layers, helping to make a "crease" in this area so Grace will sit easily. This is easier to do if you pin the legs and torso closed first.
13) On each arm, turn in 1/4" seam allowance and, keeping the arm open, use a running stitch all the way around and cinch it up.
14) Hand-sew arms on with doubled thread, using a ladder stitch and going around just the very tip. Arms are sewn with the thumbs pointing down, and should be sewn in a way that they are floppy at the shoulder area. This is why they are gathered, rather than being sewn directly on.
Grace is all done! Although she would likely like some clothing.
Crocheted Chemo Cap
 Size G crochet hook
Yarn in a normal/average gauge
Small scrap of yarn in another color (knot on both ends and use as a stitch marker)
Size G crochet hook
Yarn in a normal/average gauge
Small scrap of yarn in another color (knot on both ends and use as a stitch marker)
Chain 4. Join with slip stitch, creating a ring.
You will be crocheting "in the round." It helps to mark your current row with a homemade yarn marker.
Round 1: Into the center of the ring, double crochet 9 stitches.
Round 2: 2DC (double crochet two stitches) into the first stitch, 1DC in next 2; repeat around. (12 stitches total.)
Round 3: 2DC around. (24 stitches total.)
Round 4: DC around. (24 stitches total.)
Round 5: 2DC into first stitch, DC in next 2; repeat. (32 stitches total.)
Round 6: DC around. (32 stitches total.)
Round 7: DC in next 3 stitches, 2DC in next 1; repeat around.
Round 8: DC around.
Round 9: SC (single crochet) in first 3 stitches, SC2tog (decrease); repeat to end.
Round 10 (adds scallops): SC5 in first stitch, skip 1, repeat around.
Cut yarn, loop through, and weave in ends.
Wigs
Make one . . . or a ton!
Note: All the following wigs can be affixed permanently for a doll with attached hair. Use the yarn and a sharp tapestry needle, going around the outside circumference and sewing it to the doll's head. It also helps to tack it down in a few random places.
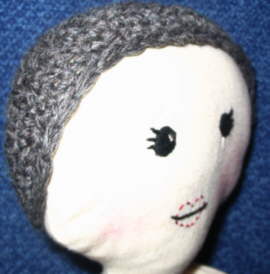
Short Wig/Wig Cap
 Size G crochet hook
Yarn in a normal/average gauge in a hair color (or something fun, like blue)
Small scrap of yarn in another color (knot at both ends and use it to mark the rounds)
Size G crochet hook
Yarn in a normal/average gauge in a hair color (or something fun, like blue)
Small scrap of yarn in another color (knot at both ends and use it to mark the rounds)
Chain 4. Join with slip stitch, creating a ring.
You will be crocheting "in the round." It helps to mark your current row with a homemade yarn marker.
Round 1: Into the center of the ring, double crochet 9 stitches.
Round 2: 2DC (double crochet two stitches) into the first stitch, DC1 in next 2; repeat around. (12 stitches total.)
Round 3: 2DC around. (24 stitches total.)
Round 4: DC around. (24 stitches total.)
Round 5: 2DC into first stitch, DC in next 2; repeat. (32 stitches total.)
Round 6: DC around. (32 stitches total.)
Round 7: DC in next 3 stitches, 2DC in next 1; repeat around.
Round 8: SC (single crochet) around.
Round 9: SC in first 3 stitches, SC2tog (decrease); repeat to end.
Round 10: SC around.
Cut yarn, loop through, and weave in ends.
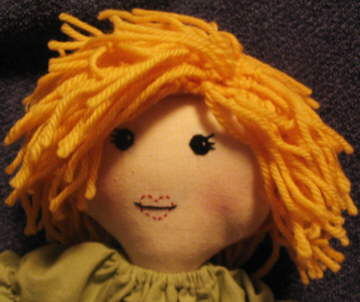
You can keep it like this for a short wig or to represent hair just growing in. However, it's fun to create other styles as well. Below are a couple of ideas to get you started.
Full Wig
 It's easier to add long "hair" to the wig if it's on the doll's head, so you may wish to begin by putting the wig cap on (the doll's head!).
 Making a doll wig is easy. All you do is "rug loops" (see image at right)--with the desired length of yarn--through the various holes left in the crocheted wig cap. A crochet hook helps. You can put hair in sparsely since this is a rag doll. After getting as much yarn on as desired, you can trim the hair to a specific style . . . although the tousled various-length look fits nicely with a rag doll. The wig pictured here only had bangs cut. This style can have so many different looks! Here is another one:
Ponytails Wig
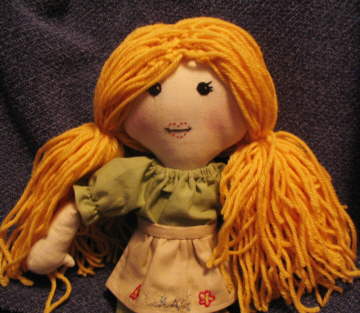
Make the wig cap as above. With a ponytail wig, yarn is added strategically. Put very long strands of yarn all along the outside stitches around the circumference of the wig (with the "stitch" outlined above) and a line about 2" wide down the entire direct center. Do this more densely than with the wig style above.
Divide the "hair" down the center, drawing half over to one side and toward the neck. Right by the neck, pull hair straight and then tie it all together with a piece of like-colored yarn.
Do the same for the other side. Clip pieces to be somewhat even; but clip only up to about three pieces at a time (otherwise, the yarn looks too bluntly cut).
If desired, add some decorative ribbons, which you can change to match the outfit.
Pantaloons
 You'll Need:
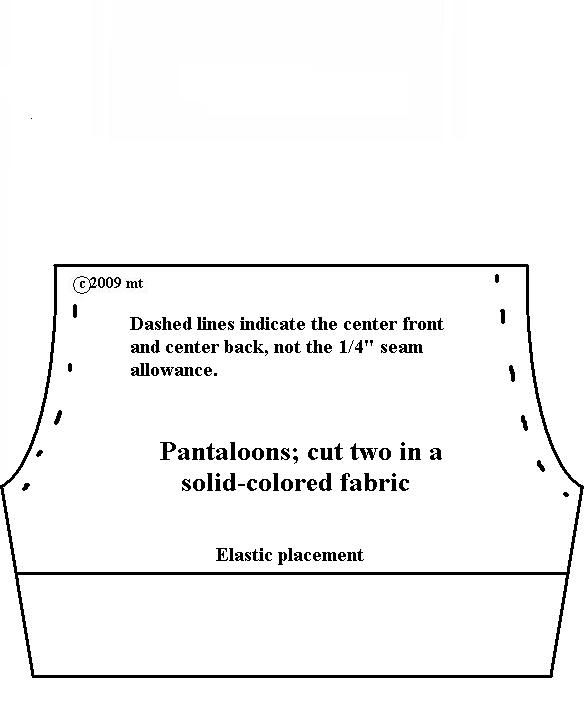
Pantaloons Pattern Piece
Pencil
1/4 yard fabric
Iron
1/4" elastic
Safety pin
Thread
Sewing machine or needle
1) Draw on lines for elastic on lower legs. Then, sew center front.
2) Open pantaloons and press seam open with an iron.
3) To create waistband, iron in 1/8", then a bit over 1/4".
4) Sew close to first fold to create an elastic casing.
5) Hem legs by ironing up 1/8" and then 1/4" and sewing close to first fold.
6) Sew elastic directly to legs on the elastic placement lines (on the wrong side of the fabric, of course). Pull elastic as you stitch.
7) Attach 6" of elastic to a safety pin and use the safety pin to guide the elastic through the waistband. Sew each edge of the casing to hold elastic in place.
8) Sew center back.
9) Re-fold pantaloons and sew leg/crotch seam.
Dress
 You'll Need:
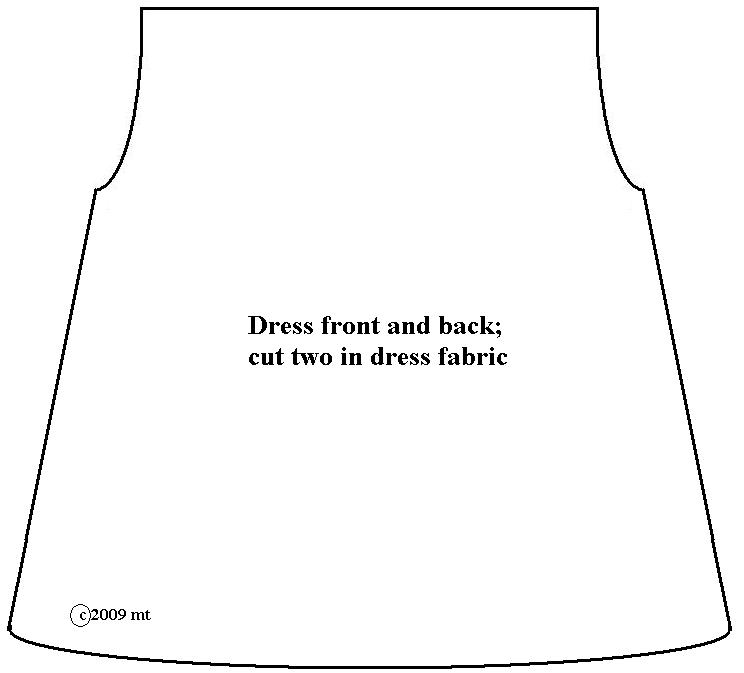
Dress Pattern Piece
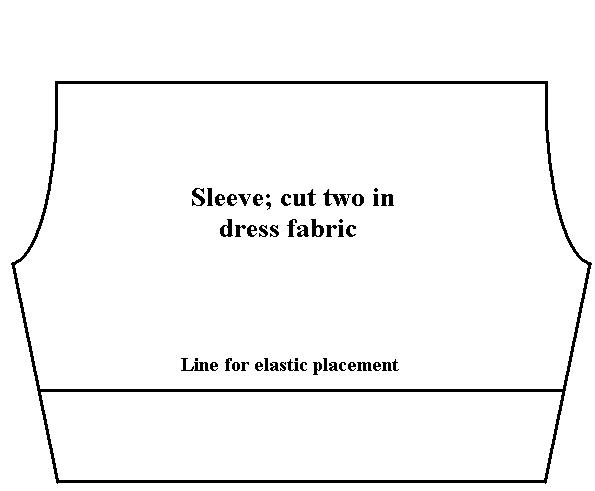
Sleeve Pattern Piece
Pencil
1/4 yard fabric that coordinates nicely with the doll's "socks" (a vintage print would be fun)
Iron
1/4" elastic
Safety pin
Thread
Sewing machine or needle
This very simple dress design is especially for people (like me) who don't like making buttonholes! It's very easy to make.
1) Begin by preparing the sleeves. Draw on the line for elastic (for step 2). On bottom of sleeve, turn up 1/8" and then 1/4", iron, and sew close to first fold.
2) Sew elastic directly to wrong side of sleeves, stretching as you go.
3) You will now make a long line: sleeve curve to dress curve to sleeve curve to dress curve. Do not connect all of these--keep them as a long line.
4) On neck edge, turn in 1/8" and then a bit more than 1/4", and sew, creating a casing for elastic.
5) Cut 4 1/2" of elastic. Attach a safety pin and use it to guide the elastic through the casing. Tack on both edges to secure the elastic.
6) Sew last sleeve curve to dress curve.
7) Fold dress, wrong sides out, together, and sew one arm and one side seam. Leave other side unsewn for now.
7) For bottom hem, fold up 1/8" and then 1/4". Iron.
8) Unfold hem and sew second arm/side seam.
9) Fold hem back up, and stitch by machine or by hand.
The dress goes on the doll feet first.
Nightgown
Use off-white flannel, and use the dress patterns and instructions. You may wish to lengthen the main dress pattern piece by up to 2" for a warmer look. After modifying the dress piece (if desired), move on to the dress instructions.
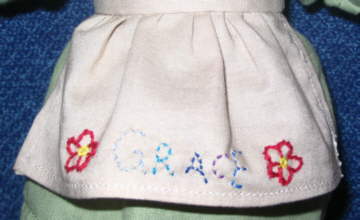
Embroidered ("Grace") Apron
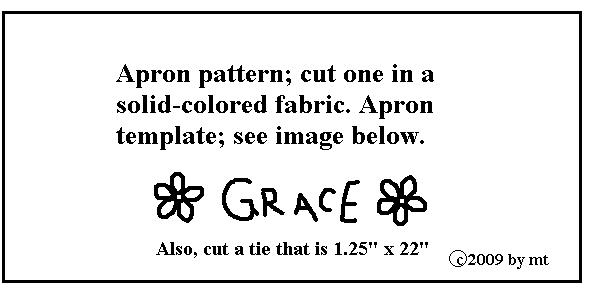
 Apron Pattern Piece/Embroidery Template
Pencil
1/4 yard solid-colored fabric (you may use a print fabric if you don't wish to embroider the apron)
Iron
Thread
Sewing machine or needle
Embroidery thread in cheery colors
Apron Pattern Piece/Embroidery Template
Pencil
1/4 yard solid-colored fabric (you may use a print fabric if you don't wish to embroider the apron)
Iron
Thread
Sewing machine or needle
Embroidery thread in cheery colors
1) After cutting out the apron piece, transfer the embroidery guide markings ("Grace" and the flowers) with a pencil.
2) You will also need an apron tie. Cut a piece of fabric that measures 1 1/4" x 22".
3) On bottom of apron, turn under 1/8" and then 1/8". Iron. Do the same on the sides of apron.
4) Sew over the turned in edges (do not sew the top of the apron).
5) Gather the top raw edge of the apron piece until it measures 3" across.
 6) Center the apron on the tie piece. The tie works as seen in the image at right. Sew right side to right side (front of apron) with a 1/4" seam allowance.
7) Fold the apron tie in half the long way so that the right sides face one another, and sew both ends and the raw edge of the tie (right sides together), except for the area where the apron piece is. This will be hand sewn next.
8) Clip corners. Turn the apron tie right side out and iron it flat, ironing in the seam allowance where the apron piece is.
9) Sandwiching the apron top edge inside of the tie, hand ladder stitch the back part of the apron to the tie.
10) Using hand stitches, add the embroidered design to Grace's apron. Two threads are used; the flowers are a stem stitch, and the letters in the word "GRACE" are a small running stitch. You may, of course, change this to a favorite saying, Bible verse, or other message of love.
Notes
These patterns are free online to make for specific people . . . so . . .
Who can make Grace?
Moms who want their kids to have a little confidante like Mom
Older children whose Moms have/had cancer and/or mastectomies
Friends who want to give a loving gift to a friend who has cancer
Ladies who want a project when going through cancer/chemo (with doctors' permission)
Members of the Flattops group/mailing list who would like a little mascot friend
And yes, even if you and your loved ones are in perfect health and you just ran across the doll and like her, you're also welcome to make one! But please bookmark the page and consider, now or in the future, making one for someone who really needs one.
Note: Dolls may only be given away (or kept). The patterns and dolls cannot be sold. Because of construction, this doll is not for small children.
+ To make an extra special doll, you may wish to use all natural materials. The doll featured here was made completely with cotton (thread, fabric, embroidery floss) and wool (hair and stuffing). However, be sure to inquire first, because some people are allergic to wool.
Please share how Grace has "graced" your life, or the life of a loved one. You can use the following page: www.geocities.com/muffychloe/contact.html to send your stories in. If you wish to send a photo, include your e-mail address (double-check it!) and I will e-mail you with information on how to submit a photo. We also share photos on the mailing list (www.geocities.com/muffychloe/mailing.html).
Copyright 2009 by mt. This original design and patterns, first created in February of 2009 by Flattops founder Melissa, are online at www.geocities.com/muffychloe specifically for ladies dealing with cancer and/or mastectomies, from this page: http://www.geocities.com/muffychloe/ragdoll.html. Dolls and accessories made from the patterns may not be sold. They are to keep or give away.
| 