Home
Articles
Awaiting Surgery
Chat
Crafts
Current Events
Fashion
Friends and Family
Fun Stuff
Mailing List
Polls
Profiles
Prostheses
Search
http://flattops.webs.com/"Drain Caddy Belt" Pattern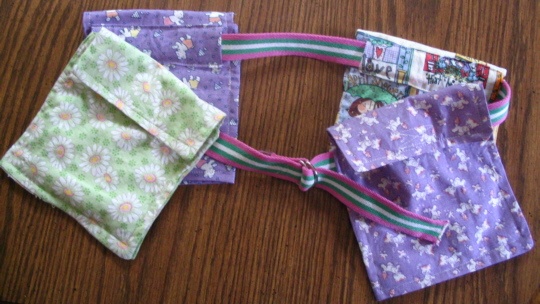 It's recommended that you make two belts, just in case one gets dirty during emptying. Be sure to show the finished product to your doctors, and ask if it will be suitable for use following your surgery. Typically, drains are just clipped inside hospital gowns, etc. so there are few "tips" on how to support them, but it's still a good idea to ask an expert! You'll Need: - Thread and a sewing machine. - Hook and loop closure tape (such as Velcro brand). Don't get the adhesive backed kind--it can jam up sewing machines. - Wide, colorful, strong woven fabric "ribbon." This is called "webbing" in fabric stores (even though it looks nothing like webbing), and can be found in with the ribbons or belt supplies. It's used to make the belt. - Belt buckle. Purchase metal D-rings that hook onto one end of the belt, not the kind of belt buckle with two pieces where one goes on each side. This makes it easy to remove the drain pockets as your drains are removed. Be sure to get four D-rings that are compatible in size with the belt material you choose to use. If you need help, just ask the craft store, letting them know you're making a belt. - Thin/normal weight fabric(s) in fun print(s). To find out how much you will need, multiply the number of pockets you're making by 11" (be sure to purchase fabric on a bolt that is at least 28" wide). For example, if you are making five pockets, you'll need 55" of fabric. Divide this figure by 36 to get the yardage needed (a bit over 1 1/2 yards). If you wish to make each pocket from a different fabric, get about 1/3 of a yard of each fabric. - Large safety pin. Pockets To estimate the number of pockets to sew, use this formula: 2 (the number of belts, so that one can be cleaned) X the number of drains you have been informed you will have For me, the formula worked this way: 2 X 4 = 8. The pockets are removable and can be removed as drains are removed, so you may wish to make more than you think you'll need. Here's how to make each pocket. Wash/preshrink fabric. Cut a piece of fabric so that it measures 10" x 27". Fold the fabric in half, right sides together, so that it measures 10" x 13 1/2". Press (iron) along the folded edge. Fold in half again so that it measures 10" x 6 3/4". Press (iron) along the folded edge. Open this most recent fold.
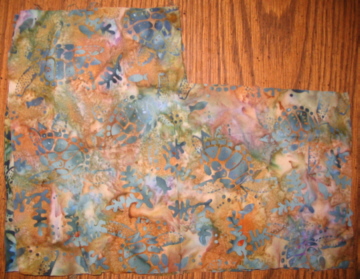
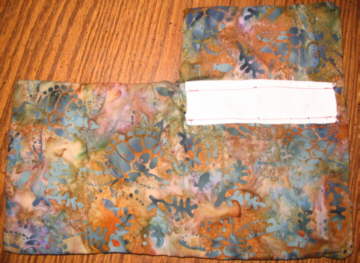
Using the most recent fold line as a guide for width, cut a rectangle out that is 6 3/4" wide x 3" high. One piece of this fabric will be used
later.
Cut the original, first fold. The photo at right shows what the fabric will look like when all of these steps have been completed. You should now have two pieces of fabric that are shaped as in the photo, stacked on top of one another. Right sides together and using 1/4" seam allowance, sew all the way around these two pieces. Leave a small space unsewn (anywhere you want) for turning. Snip the curve where the two halves meet almost up to the seam (this finishes off the closing flap more nicely). Turn to the right side and press pieces so that they lay flat. When you fold this back in half, you'll see the shape of the pocket forming! (Open it back up for the next step, though.)
For the belt loop attachment, use one spare piece of fabric from the cut you made. Cut this material to be
taller than your belt band by 1", but no wider than the back half of the pocket (you don't want it to catch in
the seams when the bag is pieced together.)
Fold in all of the edges of the belt loop by a tad over 1/4" and sew this strip along only the bottom and top to the back side of the pocket, with an 1/8" or less seam allowance. See photo at right for help in placement. (It will look a lot less sloppy on yours--I used contrast stitching and fabric so that it would show up in the photo!) This is the easiest time to add Velcro, if you are able to figure out the placement. If not, it's okay to wait until later. Now, fold the pocket back in half with the belt loop on the outside, and sew along all the edges (1/4" seam allowance), including the top, attaching the front panel to the back one. Be very careful not to catch the belt loop in the seams. The pocket is already right side out; do not turn.
Ta-da! Here's what a pocket looks like when you're all done: 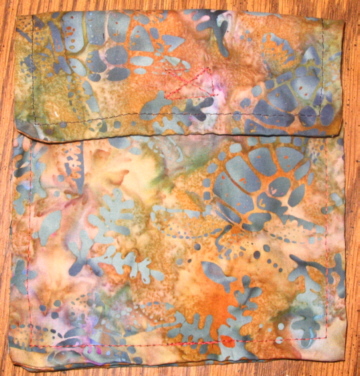 Belt Measure around your waist. Add 6" to this measurement. Multiply number by 2 (to make two belts). Divide by 36 and your final number will be the number of yards of woven fabric ribbon or nylon to purchase. Cut the purchased ribbon in half. Each half will be used to make a separate belt. The instructions below will make two belts at the same time, since they're such a cinch!
Using a zig-zag stitch, sew back and forth repeatedly along the edge to finish one end of each ribbon so that it won't fray.
On the other end, string on two D-rings per belt. Loop the ribbon through, overlapping (wrong sides together) by about 2", and sew the belt/ribbon back onto itself along this 2" space. (It makes strong stitching if you sew a rectangular shape with an X inside of it; see diagram at right.) Piecing Together The belts are almost finished! Take the end of the belt with no D-rings on it. Put a safety pin on this end, and use the pin to help string the pockets on the belt. Remember to put on one pocket per drain, and have the pockets all facing the same direction. Remove the safety pin after adding the pockets. (The pockets slip off very easily when needed--they're just hard to put on!)
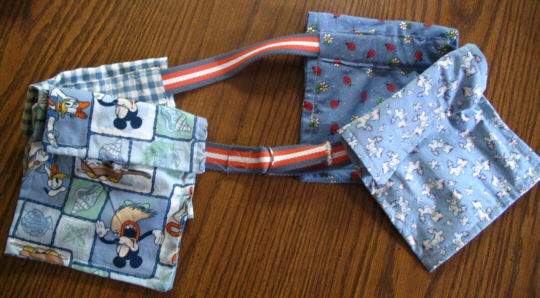
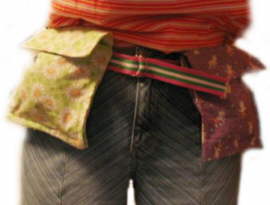
Put the belt on before having drains, and get used to how to adjust the belt. In order to put it on, place the belt around your waist so that the pockets are facing with the flap on the outside. Run the belt end with no D-rings on it through both D-rings on the other end. Fold the webbing back over the first D-ring and under/through the D-ring farthest away from the fold. The pockets are adjustable and can be moved to where they need to be. They can also be gathered (scrunched up) along their loops in order to allow more "give." Testimonials/Adaptations "My six-year old and eight-year old girls selected personalized fabric for each drain holder and made the simple stitches. All the nurses went nuts when they saw them at the hospital. The belt kept the tubes out of the way and made the drainage process less gross for all of us! We used snuggle flannel from Jo-Ann Fabrics. It is so soft after it is washed. We are thinking of adding a strap and turning the drain pouches into purses for my daughters" (Anna). "The hospital nurses refused to look at the drain belt because they wanted to follow their system. Instead, they hooked the drains to the hospital gown with pins, and kept my back-opening hospital gown undone except for at the neck. When they wanted to check on them or empty them, I had to brace myself up on my elbows so they could get the gown out from under me in order to check the drains. When using the restroom, I had to hold everything out in front of me. It hurt my arms a lot--I didn't realize my upper arms would be immobile and so sore following surgery, and I doubt the nurses realized how much pain they were putting me through. What a relief it was when they were ready to discharge me. I got on my bright cotton-print fabric drain belt and a shirt that buttoned up the front. It felt much more normal not having to hold the tubes and drains up. Having drains was one of the worst aspects of surgery, but having the cheery belt made it more tolerable. And at a follow-up appointment, my doctor gave them his endorsement" (Creator, Melissa). If you have made and used the drain caddy belt, please share your experience, and any helpful tips or modifications you may have for others.
This pattern was created/copyrighted 2006, by Flattops at www.geocities.com/muffychloe. Please don't redistribute it, but it's encouraged to print out the instructions for use or to link to the page. (The pattern needs to stay here so that it can remain 100% free and modifications can be made if needed.) Belts from this pattern can be made if given away or made for your own use, but not for profit. You'll likely need to print these instructions in order to make the belt. On most printers, the instructions will print well as is. If you have a problem printing these intructions, use the "landscape" printer option to print sideways on paper. You have permission to print one copy, used for non-commercial purposes, and discarded of after use. A special note for crafters: You may make as many belts as you'd like for donation purposes. Before donating the belts--if making many not for friends--you might wish to print out the instructions and check with local hospitals to see if they'll accept them. The belts should be made long enough to accommodate different sizes and from washable materials. Thank you so much for sharing your talent and love!
|
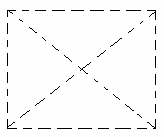 Add a square of Velcro or other hook and loop closure to the top flap, and one to the bottom flap. (It makes strong stitching if you sew a rectangular shape around the outer edges of the Velcro, with an X inside of it. See diagram at left.) Be sure to
leave ample space for the drainage tubes.
Add a square of Velcro or other hook and loop closure to the top flap, and one to the bottom flap. (It makes strong stitching if you sew a rectangular shape around the outer edges of the Velcro, with an X inside of it. See diagram at left.) Be sure to
leave ample space for the drainage tubes.
 Wearing