Home
Articles
Awaiting Surgery
Chat
Crafts
Current Events
Fashion
Friends and Family
Fun Stuff
Mailing List
Polls
Profiles
Prostheses
Search
http://flattops.webs.com/Heirloom Gardening Tool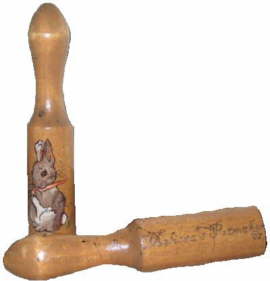 This heirloom gardening tool takes a while to make (two days by a diligent crafter), but it is something that will ultimately save oodles of money when starting seeds.
The tool we'll be making is called a "seed starter," "seed forcer," or "pot maker." Whatever you decide to call it, the finished gardening tool is used along with newspaper to make free (!) miniature paper pots for starting/forcing seed indoors.
Items needed:
Rolling Pin Explanation
A rolling pin? Believe it or not, this craft requires a rolling pin. As you can see above, the craft results in two halves of a rolling pin! The kind you want is an unfinished craft rolling pin, which doesn't have handles that move (in essence, it is one solid piece) and is about 1 1/2" in diameter (If you plan on varnishing the piece, be sure to look for a rolling pin that has a nice wood grain.). This may possibly be found in the "wood turnings" section of a large craft store. It should run around $2 (U.S.), and craft stores love to offer coupons, so it's possible to get one for much less. Since I had all the other materials needed and because this craft makes two, this craft cost around 50 cents each for two heirloom seed starters.
Let's Begin The most important part of the craft happens here! Using a pencil and ruler, mark all the way around on the rolling pin where the "center" is. This is the line on which to saw all the way through, cutting the rolling pin in half. Try to saw as straight through as possible. After sawing, use sandpaper to flatten and smooth the sawed end of each piece, if needed. From here on out, treat each piece as a separate seed starter tool. You may decide to only make one, but it's just as easy to make two at a time and pass one along to a fellow gardening friend. If you're really savvy with a drill and want to be able to hang the gardening tool up (such as in the garage), now's a good time to drill a hole. This step is optional. From this point, you can veer the craft away from my instructions. That's fine! If you want to make the heirloom one pictured on the site, continue with the rest of the instructions, which are more geared toward adult gardeners. Otherwise, let your imagination be your guide in designing your seed starter!
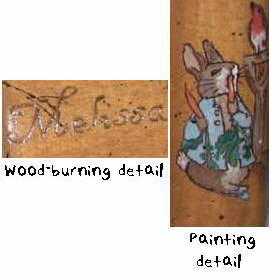
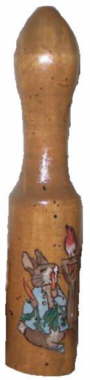
Heirloom Tool Instructions Wood-burning is a delicate process. I remember watching people do this professionally as they threw away their mistakes. Unlike with painting or other crafts, if you make a mistake . . . well, the whole thing is ruined. For that reason, I recommend wood burning text onto the piece before moving on to any other step. You may find out that it was a good idea to have two for the price of one! To make nicely readable text, look at a computer's fonts to find one that you like. Print out the text in the size you want it. Use carbon paper to "trace" this onto your seed starter. Important! Don't type the text out backwards! Unlike a stamp, what you see is what you get when you use carbon paper. I chose an old-fashioned, thin font that would translate well into handwriting. Stay away from text that has varying widths. Suggested text: The date, the owner's name, the name of the tool. Back in the 1800s, according to writer/historian Eric Sloane, people who were proud of the tools they made would sign their name and the date. Why not do the same? Once the wood burning has turned out perfectly (think positively and confidently!), it's time to move on to staining the piece. This will bring out the wood grain's appearance, and also make your wood burning look pretty snazzy. This will also take the longest to dry of any step, but be sure not to skip letting it fully dry. Once the stain has dried, it's time to add a fun gardening motif. You may skip this step if you don't want a painting. However, it's fun to add a vintage piece of clip art to your piece or a message of hope, and it's not that difficult if you "cheat" a bit! Using carbon paper, transfer a design to the wood. With a thin black permanent marker (instead of black paint--this is the trick!), outline the design. Next, use acrylic paints to fill in the design. If you go over any black lines, don't worry--they can be added back on with the marker, after the paint has fully dried. If at all possible, use black paint and a very thin brush instead of permanent marker. Black permanent marker sometimes has a way of leeching or even disappearing over time. (So much for "permanent!") All of the painting I did was done without ever using water to wash out the brush. I wanted an old-fashioned, "muddied" look. You may wish to experiment with painting techniques on a spare piece of wood first. If you like the images I used, they are little gardening illustrations by Beatrix Potter. Though I did not use it, Dover Publications (no connection) offers a book of her designs for use in craftmaking. An optional step is to "age" the piece by splattering it with black paint. This is a fun process done with a small paint brush. Put a bit of black paint on it, and then brush against it with your finger, splattering paint onto the piece (and just about everything else around you!). Let this dry for a long time (preferably overnight). You don't want it to smear when varnished. The following day, add two to three coats of clear varnish to the piece, letting each coat dry in between (if you begin in the morning, it may be possible to finish varnishing an entire piece by the end of the day; check the instructions). It's not possible to varnish the entire piece at once; it has to be done in two sections. Varnish will help protect your designs, the wood, and also make the tool smoother, and thus easier to use. Once all the varnishing is done, an additional optional decorating step is to bang the piece with a manual/hammer-type meat cleaver--carefully, of course! This further antiques the piece. Don't do too much of this, or it looks planned. A bang here or there in one to three places makes it look incidental. If you do this, be careful! You don't want to break your new gardening tool after all the work that has gone into it. (You may also wish to avoid the area with decorative painting.) If you're giving one for a gift--or just want to gussy up your own--you can tie a fabric ribbon to the handle for a decorative touch.
To use the tool, cut a strip of newspaper going the short way (horizontal/parallel to the text), only a few inches high, and unfold the strip of newspaper to its longest length. Place the tool on top of the paper with an inch or so of paper extending below the bottom edge of the tool. Now, roll the tool on the table or the newspaper around the tool, whichever feels more comfortable. Once the whole piece of paper has been rolled onto the tool, fold the bottom, overhanging edge as if you are gift-wrapping. Use a small piece of masking tape to secure the bottom (you may also wish to use a small piece on the side, as well). Then, slip your new paper pot off the seed starter. Fill the new pot to the top with a seed starting mix, and then follow the instructions for seed starting on the packet(s) of vegetable and/or flower seeds. You can quickly make plenty of little paper pots that will disintigrate in the soil when you plant your new little flower or veggie seedlings. Best of all, this cute seed starter will be your friend for many seasons to come. It has been for me! Happy gardening!
Copyright 2007 by mt. This original design and pattern, first created in February of 2007 by Flattops founder Melissa, are online at www.geocities.com/muffychloe specifically for ladies dealing with cancer and/or mastectomies, from this page: http://www.geocities.com/muffychloe/ragdoll.html. Garden tools made from the pattern may not be sold. They are to keep or give away. |
 How to Use