Home
Articles
Awaiting Surgery
Chat
Crafts
Current Events
Fashion
Friends and Family
Fun Stuff
Mailing List
Polls
Profiles
Prostheses
Search
http://flattops.webs.com/Felted PursesThese purses can be made in pink, made witha subtle pink ribbon embellishment, or made just to warm the heart of a friend.
These two simple purse patterns (they look complicated--but they're not!) are amazingly versatile. They can be used to make an obvious breast cancer awareness purse (how about a dark pink purse with a light pink awareness ribbon embellishment?) or subtle (maybe a gray purse with a pink awareness ribbon embellishment?). Or a purse can be made without any pink, just as a heartwarming gift. Remember that if you decide to make something pink for a friend who is a breast cancer survivor or has breast cancer, it's always nice to ask first. Not all ladies like the pink look, and may prefer something in their favorite colors instead. Still others are allergic to wool, so it never hurts to sneak in some silly questions to your friend, such as, "Do you like pink? Are you allergic to wool? What does 'smorgasbord' mean?"
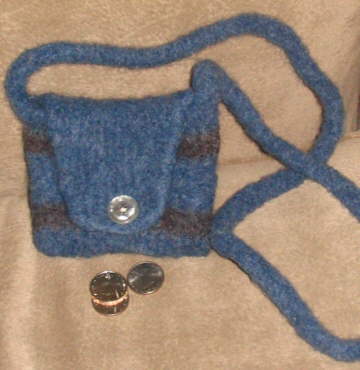
Mini Felted Coin Pursewith Optional Pink Ribbon EmebellishmentYou'll need
Main Purse Piece1) Using the loom, cast on every peg.2) Knit "in the round" until the piece measures 7". (Stripe variation, as pictured: 1" color A, 1" color B, 3" A, 1" B, 1" A.) 3) Bind off 20 stitches. (Bind of all the stitches if making a purse without a flap, and move to step #6 in this section.) 4) Now, if making a purse with a flap, work on the remaining stitches. Knit three rows and decrease one stitch on both sides on every fourth row. Repeat until only 9 stitches remain. 5) Bind off remaining stitches. 6) Purse now off the loom, weave yarn ends into piece.
Handle/Strap1) Cast on 4 stitches.2) Knit back and forth until the handle reaches desired length. Remember that it will shrink in length and be only 1/2 to 2/3 of the original size. (The one pictured, with a shoulder strap, was 50" before felting. To make a hand tote with a handle, make it much shorter.) 3) Cast/bind off stitches. 4) Weave yarn ends into piece. The strap will form into a cord/tube when felted.
Optional Pink Ribbon1) Cast on 2 stitches in pink yarn.2) Knit back and forth until the "ribbon" is a few inches long. You can make it long or short, depending on your personal taste. 3) Cast/bind off stitches. 4) Weave yarn ends into piece. 5) Turn into a "pink ribbon" shape, and use pink yarn to sew onto the bag anywhere you want. A couple ideas are the purse flap or the bottom right-hand corner of the bag.
Piecing the Purse Together1) Using like yarn, sew the purse bottom ends together, making sure that they're centered correctly. Don't sew tightly--try to match the gauge of the knitting.2) Find the center of the flap, locating where a button-hole should be. Find a "gap" in the knitting there, and whipstitch the gap open in a button hole shape (-) with cotton yarn in a contrasting color, forcing a button-hole. This cotton yarn will be removed after felting. (White is good to use, so that it won't "run" during the felting process.) 3) Fold the flap down onto the purse to find where the button should be placed, and sew a machine washable button to the main purse piece. Does the purse look floppy, useless, and as if it were a coin purse for a giant? Good . . . it's perfect, and ready for the next step!
FeltingFelting can be done by hand or machine. If your machine is uncooperative, you may felt by hand. But it's easier to do by machine, so it's worth a try first.1) Set the washer to its hot water setting. 2) Add soap. 3) Open the bag, and place it inside a pillow slip and then into the washing machine. Check after the agitation is finished to see if the bag is felted "enough" (which is totally up to you, but will probably take two tries). If it is not felted to your wishes, run this part of the cycle again, and repeat as desired. Complete the entire wash cycle once the purse is as felted as you'd like. 4) Place the bag in the dryer on its coolest setting until dry, or let air dry. 5) Remove the cotton blanket-stitching from the button-hole, and your purse is all done!
Flapped Felted PurseYou'll need
Main Purse Pieces1) Using the loom, cast on every peg. Do not put any yarn connecting the first peg to the last. Rather than knitting in the round, knit back and forth, always taking care not to connect the first peg to the last. (This will create a flat piece, rather than a tube.)2) Knit back and forth until the piece measures 14". 3) Bind off all stitches. 4) Create a second piece similar to the one above, but knit until the piece measures approximately 25". 5) Bind off all stitches. 6) Pieces now off the loom, weave yarn ends into pieces. Note: If comfortable with how the purse is shaped, instead of making two pieces, you can make one main purse piece that is 39". Fold the bottom edge up 14" and attach for 14" along each side.
Handle/Strap1) Cast on 4 stitches.2) Knit back and forth until the handle reaches desired length. Remember that it will shrink in length and be only 1/2 to 2/3 of the original size. 3) Cast/bind off stitches. 4) Weave yarn ends into piece. The strap will form into a cord/tube when felted.
Optional Pink Ribbon1) Cast on 2 stitches in pink yarn.2) Knit back and forth until the "ribbon" is a few inches long. You can make it long or short, depending on your personal taste. 3) Cast/bind off stitches. 4) Weave yarn ends into piece. 5) Turn into a "pink ribbon" shape, and use pink yarn to sew onto the bag anywhere you want. A couple ideas are the purse flap or the bottom right-hand corner of the bag.
Piecing the Purse Together1) Using like yarn, sew the two purse pieces together along the bottom and either side. Don't sew tightly--try to match the gauge of the knitting.2) Sew the purse strap on in between the flap and purse, on either side. Does the purse look floppy, useless, and as if it were a coin purse for a giant? Good . . . it's perfect, and ready for the next step!
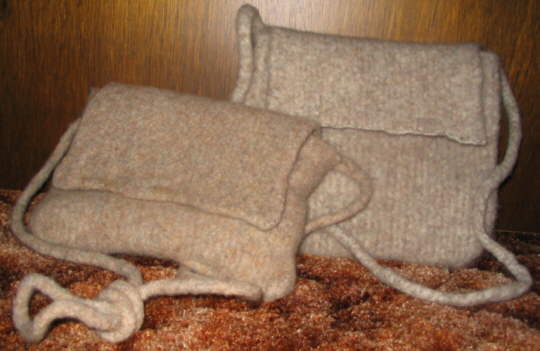
FeltingFelting can be done by hand or machine. If your machine is uncooperative, you may felt by hand. But it's easier to do by machine, so it's worth a try first.1) Set the washer to its hot water setting. 2) Add soap. 3) Open the bag, and place it inside a pillow slip and then into the washing machine. Check after the agitation is finished to see if the bag is felted "enough" (which is totally up to you, but will probably take two tries). If it is not felted to your wishes, run this part of the cycle again, and repeat as desired. Complete the entire wash cycle once the purse is as felted as you'd like. Because this is a large project, be careful to check that the purse isn't felting where it's not supposed to. 4) Let the bag air dry while blocking it. Check periodically to make sure the process is working correctly. 5) Within a day or two, the bag will be all done! Some Quick Felting TipsPossible Purse Problems and Fixes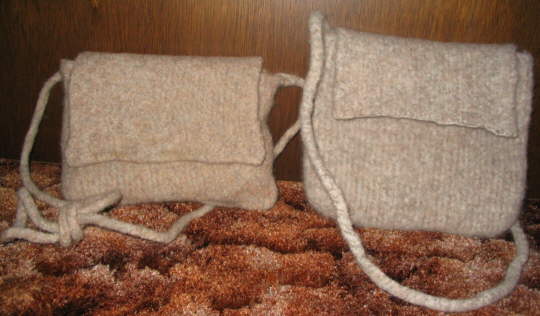 Believe it or not, these two purses have the same story: knit using the same pattern (on this page), knit by
the same person, knit with the same brand yarn, and both felted the same way (two hot cycles in a washing machine). Yet they turned out
looking pretty different!
Believe it or not, these two purses have the same story: knit using the same pattern (on this page), knit by
the same person, knit with the same brand yarn, and both felted the same way (two hot cycles in a washing machine). Yet they turned out
looking pretty different!
Unfortunately, the washing machine can wreak havoc with a knitted project. Yet the washing machine is the easiest way to felt a project, so it's kind of a necessary evil. Here are some ideas for how to fix problems that might occur during the machine felting process for the large purses (the little purse easily turns out well due to its small beginning size). Elongated Handle If the handle gets wrapped around the agitator, good luck! It pulls for all it's worth, and the handle ends up longer than what you started with, and much, much too long to be practical (unless you like purses down to your knees!). There are a couple ways to solve this problem. Felted to itself The purse on the left is an example of one that felted to itself. This means that parts that weren't supposed to felt to each other did. In this instance, it folded over a bit (by a couple millimeters or so) during the felting process. This can be solved in a couple ways: Flap warped The purse flap can end up very warped due to getting pulled in the washing machine. Both of these purses had warped flaps, where the ends were pulled from left to right. Two different remedies are possible. Purse warped The purse on the left is warped. As you can see in the photo, it kind of points toward the righthand side of the picture. It's difficult to fix this once it has already happened. You can re-wet the purse and then try to reshape it, but it's best to observe the shaping process while the purse is felting so that any problems can be fixed during the process. Each purse is an individual work of art, so minor imperfections can be seen as enhancing the homemade nature of the project. At least, that's what we can say to ourselves to feel better about boo-boos!
Do you have ideas for articles you'd like to see on the site? Did you write an article you'd like to submit? Be sure to send them in. Thank you! This pattern was made by Melissa, October 2006, for Flattops. It cannot be redistributed, though you are welcome to link to this craft page. Flattops is not responsible for anything occuring as a result of using this pattern or the resulting product. Resulting product can only be made to keep or give away--it may not be sold. |