| Okay, take a break and have a snack! And if you have a cat, remember they go by old saying, "shuffle your feet, loose your seat". |  Told you! Shoo the cat off your sewing chair then get set to sew the last
seam in your triangle section.
Told you! Shoo the cat off your sewing chair then get set to sew the last
seam in your triangle section. |
And you are done with one section! Pin it to your master pattern and then do the next one. Easy as can be, right? Can you imagine trying to sew these sections together without the freezer paper pattern to follow? Or the master pattern to pin them too? |
This is all one step: Next
put the two sewn together triangles on the table right side up. Take
the loose one that you just sewed one seam on, and kind of "fold it over"
in half until you can line up the remaining seam.
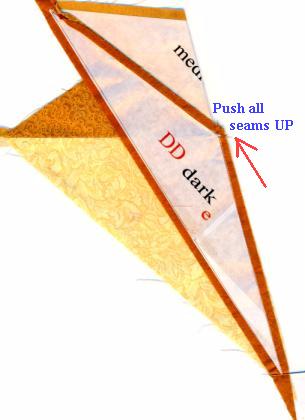
Line up the pieces. Put a pin exactly where the stitching stops at the bottom on the top diamond section, and put it through the marked 1/4th inch corner of the freezer paper triangle underneath. Just like you did before! Pull the fabrics tight against each other and flip pin to side, then pin in place. Be careful you don't shift your fabrics when you secure the straight pin. Depending on the size of your star, put as many pins in between as you feel you need to hold the pieces in place as you sew. Push the seams in the center, top and underside of the piece (indicated by red arrow) UP and out of the way of the stitching. If necessary, take your fingers and squiggle it all in place, push and shove a little to make the whole area lie flat. You don't need a pin here. All that previous stitching holds it in place. Start sewing from the center out, exactly where the stitching stopped from the previous seam. You can do that "lock stitch" or backstitch once. Don't catch the seams from the center in the stitching! Be careful about not catching the freezer paper underneath in the stitching. Pull the pin out as you get to the narrow end and hold carefully as you sew to the tip. |
|
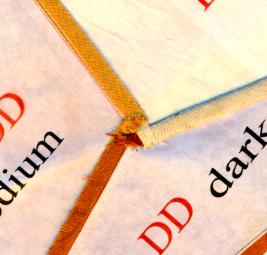
PRESS
all the seams counterclockwise on all
sections. The real beauty of setting in seams and not sewing in the seam allowances, is that you can "twirl" your seams and you don't ever get a big lump there. Keep all seams loose and you twirl whichever way you want to. Now do all your triangles. |
| Decide on the best way to assemble all the
triangles. You will assemble the whole top with set in seams just
like we did all the smaller triangles.
Assemble several triangle "sections" together and then sew the sections together to make a third or a half, etc. If you drew any straight lines across your whole pattern to draft, that would be a good place to start! |

Granddaughter Tory holding my first finished triangle. |