| Mary Ann's theory below... |
|
|
1:
MAB thinks:
Okay, now we have to divide our triangles into the light, medium, and dark area's. You can: If you chose to trace each triangle as at the left, you will now trace one triangle and cut out it out. You will find a spot to start your dividing (we will get to that!) If you chose to just make another full drawing, you can sub-divide each triangle as it is on the whole paper. Then cut it apart later as you go. (That is what I did!) ta...da...da...da...ta...ta...ta...taa...daaa (sing jeopardy music here!) I am waiting! ... do what you are going to do then go on...
|
2:
PAT sez:
Take your Freezer paper out, and this time WITH THE SHINY SIDE UP, you are going to Trace Triangle A. You must Rip off a new sheet of FP to trace the triangle on. My method of Tracing is to hold with one hand, and trace the < of the three angles, and then connect them using a ruler. That way I do not have wavy lines. Cut it out using a rotary ruler/cutter. You will then transfer all the markings to the DULL side of this tracing. CHECK the markings when you lay it back on the triangle.... SHINY SIDE Up ... that the LIGHT edge is marked.. and the MEDIUM edge is marked.. and the DARK edge is marked.. Put the triangle NAME "A" in a circle, on each edge. IF ANY TRIANGLES WILL INTERSECT ALONG THE SIDE... it is a good idea to transfer that information in the form of a small hash mark on the dull side... (I usually write it on the shiny side, and then flip over and trace it on to the dull side... When the Triangle is on the paper the shiny side is up. When the dull side is up, the triangle probably will not fit in the space ... You can then do triangle B... Triangle C... do a few... not all of them.!!!!
|
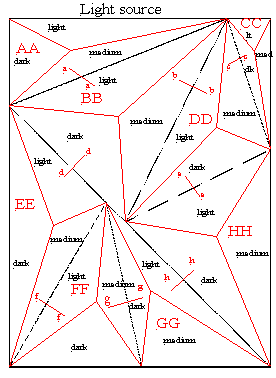 |
3:
MAB wonders: Okay, is this a
mess or what??? lol...lol...
Actually, when it is larger it isn't such a jumble! The black lines are the lines I will cut it all apart on. They are the original lines from the first drawing. The red lines are the lines I drew to **sub-divide** the triangles.
|
4:
MAB divides and conquers: |
5: PAT sez:
Sub Cutting If you have a few triangles done, you can pick a random CENTER of the triangle, at least an INCH in from each side, and put a DOT (on the dull side is fine). Then draw a line to each tip of the triangle from that dot. IT NEED NOT BE IN THE CENTER. Now be sure that each sub triangle is labeled... A Light A Medium A Dark, B Light, B Medium B D C L C M C D, etc. |
| 6:
MAB sez look what I did above: Okay,
so what Pat said to do is exactly what I did. You see my AA block.
I picked a point, any point, it doesn't have to be in the center... and
I drew a line from that point to each corner.
That is it! That is all there is to it! Now you will divide into three, each of the triangles you drew in black. ooppssss... good tip... use a different color pen for the sub-divides! Oh, and you know what I forgot? I need to now mark each triangle section with the EE (or whatever) so I don't goof them up and try to sew the wrong one to the wrong one... been there, done that? |
|
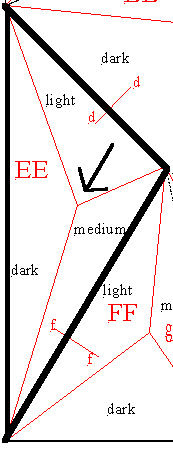 |
7)
Here is another sample. I think you get the idea... this isn't too
hard. I did have to move some of my light, medium and dark words to fit
into the sections. Just remember to keep the dark on the lower left
and the medium on the lower right (or wherever you choose to put those
two colors if you changed the light source. Remember, I used a light
source from ABOVE.
I just picked a spot somewhere in the triangle and drew the three lines out to the points on all the triangles. I did end up making that triangle in the upper right of my drawing larger. Don't be afraid to change things! |