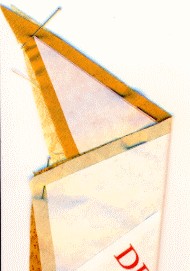
If those real thin freezer paper tips have a tendency to come loose (they will!) use a little glue stick to stick them all down again. It won't hurt your fabric. You really need them to be exactly in place when you start to sew. 1: Okay, I am ready to pin! I use really fine pins, not those big quilters things. These are very small pleating pins. (I get them at JoAnn fabrics). Less bulk. Put a pin through the very tip at the top of the freezer paper triangle and make sure it comes out at the very tip of the bottom triangle. Don't flip the pin to the side and re-pin yet. Just let the pin dangle. Do the same for the bottom tip on the same edge. When you get those lined up, tighten up the pins so the fabric is tight to each other and then pin in the fabric. Then take a pin or two, depending on long the seam is, and insert it midway between the top and bottom against the freezer paper in the seam allowance. The pin should automatically come out right on the edge of the paper underneath. If not, slip the triangle around until it does. Pin this pin in along the vertical length of the seam, not horizontal. When it comes through the top triangle again, make sure you are just at the very edge of the freezer paper on the top again. |
||
|
||
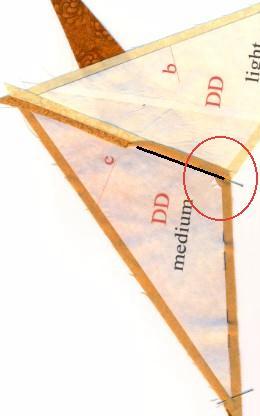
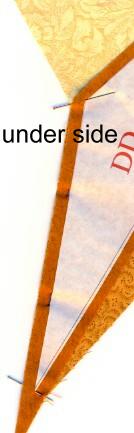
2: The black line I drew in is supposed to be the stitching. Now, here is the "set in seam" part. It's not hard, honest, no matter what kind of stories they have told you around the machine! Place the third triangle under the two sewn together ones, RIGHT SIDES FACING EACH OTHER. I pushed the seam UP, even though I did press it open earlier. (I pushed the paper out of the way of the stitching a little to sew the seam.) Put a pin through **EXACTLY** where the stitching
stops from the last seam on the top triangle and make it come out on the
bottom where the corner of the freezer paper is.
|
||
|
||
 2:
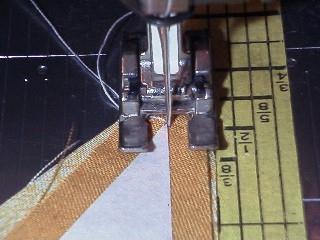
I
put the piece under the machine, then hold it in place and carefully
pull out the pin that is flipped on it's side. 2:
I
put the piece under the machine, then hold it in place and carefully
pull out the pin that is flipped on it's side.
Now put your machine needle down into the exact hole where you took the pin out of. I don't backstitch here, but I set my stitch length to O (zero) and then stitch in place a few times to knot the thread. 3: Then I gradually bring up my stitch length to normal * while still sewing * (lock knot) and continue to sew until I get close to the lower edge of the freezer paper where I do a "lock knot" in reverse. You sew right along the edge of the freezer paper. If you hear paper "crunching" underneath, you know you are sewing on the paper and not in the fabric of the seam allowance. Adjust your triangle. Sometimes I catch in the very edge of the paper on the back, it never hurt, but try not to do it. To , "lock knot" in reverse, gradually
shorten the stitch length as you approach the end of the seam, then when
you get to the very end of the freezer paper, set the stitch length to
0 (zero) again and stitch in place a few times. That replaces
any backstitching you might otherwise do.
|
||
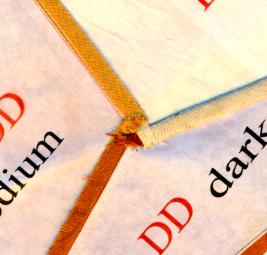
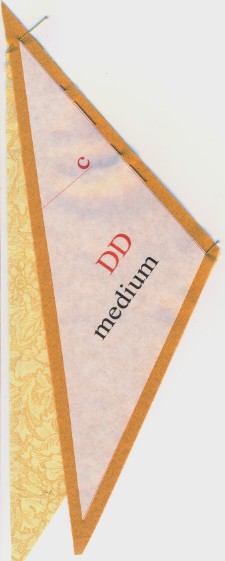
I press the seam TO ONE SIDE. Always press to the same side here, either left or right, but always to the same side on all pieces. That way, you can get all those seams to do a swirly thing and you will have nice flat centers and not lumps! |
Next step 7: Sewing it all together
| STEP 1: Introduction | Drawing options
Pre-Frenzy Tips |
STEP 2: Determining your light source and labeling the triangles | STEP 3: Making freezer paper templates from your triangles and sub-dividing the triangles. |
| Step 4: Sub-dividing your triangles | Step 5: How to use freezer paper for a quilt pattern | Step 6: How to set in seams | Step 7: More how to set in seams |
| Step 8: Sewing it all together |
Step 9: More sewing it together with more pictures |
Back to the Main One Day Quilt Frenzy Page |