|
|
|
1: MAB is thinking here: (oh no!)
Okay, I have to admit that this next step at
the right just fuzzed out in my brain every time I read it ... say what??
The dull side of the freezer paper you are looking at now is the way you want your quilt to look. BUT, if you just cut this pattern apart and made templates from it, when you are done with your quilt it will be a mirror image of your original because you will be ironing the templates to the WRONG side of the fabric. It is kind of like foundation piecing. The printed drawing you see on the paper is opposite of the finished foundation pattern with fabric because you sew on the wrong side. GOT IT? Well, I think I have two choices... The EX-tremely easy way is just say I don't care if my finished quilt is the opposite way and just make another EXACT copy of my 1st drawing and go from there. Remember though that my quilt will be opposite of my drawing when you are done! The more complex way but more to keeping of Pat's class, will be to make another EXACT copy of your 1st pattern, only this time you tape your first copy to a window, dull paper side facing you. Now tape another piece of freezer paper to the window with the shiny side facing you and make a tracing of it on the shiny side. This way your quilt will be facing the same direction when it is done, not opposite. and my brain says... ta...da...da...da...ta...ta...ta...taa...daaa
(sing jeopardy music here!) I am waiting! ... do what you are
going to do then go on...
|
2:
PAT sez:
Take your Freezer paper out, and this time WITH THE SHINY SIDE UP, you are going to Trace Triangle A. You must Rip off a new sheet of FP to trace the triangle on. My method of Tracing is to hold with one hand, and trace the < of the three angles, and then connect them using a ruler. That way I do not have wavy lines. Cut it out using a rotary ruler/cutter. You will then transfer all the markings to the DULL side of this tracing. CHECK the markings when you lay it back on the triangle.... SHINY SIDE Up ... that the LIGHT edge is marked.. and the MEDIUM edge is marked.. and the DARK edge is marked.. Put the triangle NAME "A" in a circle, on each edge. IF ANY TRIANGLES WILL INTERSECT ALONG THE SIDE... it is a good idea to transfer that information in the form of a small hash mark on the dull side... (I usually write it on the shiny side, and then flip over and trace it on to the dull side... When the Triangle is on the paper the shiny side is up. When the dull side is up, the triangle probably will not fit in the space ... You can then do triangle B... Triangle C... do a few... not all of them.!!!!
 I
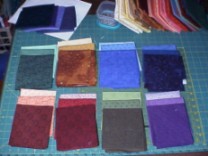
have my fabrics picked out and ready to go. I have one color set in light,
medium and dark for each triangle. I hope they work and if
not... I have more! I
have my fabrics picked out and ready to go. I have one color set in light,
medium and dark for each triangle. I hope they work and if
not... I have more! |
| 3:
MAB thinks: Okay, I don't know about
you, but I don't think I would be very good at tracing each triangle at
one time. If I get my corners just a little off, my whole quilt might
be off and then how will I get it to go together right? Since I am not
a good tracer, it would best serve me to make another whole copy of my
pattern on the shiny side of the freezer paper to use for my patterns and
cut it all apart rather then re-drawing each section.
You do what you think you can do best though. So, I can either trace each triangle one at a time, or make another tracing of the whole quilt I sketched and cut it all apart... ta...da...da...da...ta...ta...ta...taa...daaa (sing jeopardy music here!) I am waiting! ... do what you are going to do then go on... |
4:
MAB thinks she has ideas!: Okay, now
you are really going to get mad at me! I just realized that I can
flip over my CAD drawing and print it that way, and I don't have to make
a second copy by hand and it will be mirrored!
Well, then you gals get some "GOOD" drawing programs instead of spending all that money on that stuff for quilters that only makes little squares! Here is another idea if you have a 1) scanner, 2) a card making program like PrintMaster Gold or Print Shop that makes "posters". Make a small drawing, scan it, save it as a
bitmap.
Now, to make the mirrored copy, just tell the program to "mirror it". YES, it will!! You are ready to go. And oh yes, you can cut freezer paper to fit
into your printer. Do it ahead, and put something heavy on top of
it for a while to make it lay flat. It will want to roll from being rolled!
If you use the "page tiling" feature of a graphic program, your printer
will give you "marks" to line up the pages together. I just use a
glue stick. Sure is easier than all that hand drawing.
|