N2023W's PDF Archive with Beechcraft
(Please Go To New Site: www.CSOBeech.com)
CSOB* Operating & Ownership Tips
* "CSOB" (Cheap $on of a B)
"The Flight is the reason, the destination is just an excuse!"
![]() Denotes
Recently Added Content
Denotes
Recently Added Content
New Site Migration www.CSOBeech.com Completed - Check Out the New PDF Download Page
Take Me To the FREE PDF Downloads Sloppy Nose Steering Response
Baffle Seal Replacement Source When Is it Time for Brake Pads? (Waay before the grinding sounds!)
Landing Gear Rod Ends (Why You Need to Change Them) Low Cost AN & MS Hardware Source
Become a "Beech Lister" (Can You Handle It?) Low Cost XM Nexrad Weather for Your Cockpit (Anyone Flying Can Afford This)
Become an ABS Member (Yeah, you should!) Interior CSOB 1,500 Watt/110V Heater $20
Insurance, CFII Dual, A&P & Examiner Referrals Overhead Speaker Replacement
Useful FAA Links (Is that an oxymoron?) Getting Savvy About Maintenance
Overhauled Starter & Alternator Source Low Cost Hangar Tug
Low Cost Spark Plugs for IO-470/520 Jumpy JPI Oil Temp Readings
Bonanza Retractable Step Details (by Beech lister Doug G.) Long Range Power Settings (Get 15-25% Better Fuel Mileage)
Do I Really Need a Voltmeter in my Panel? JPI EDM-760 Engine Monitor
Do I Really Need Shoulder Harnesses (Yeah, you DO!) Green of Peak Engine Ops (formerly LOP) Saves Gas & Engines!
Portable DVD Player in Cockpit GAMI Injectors (~ 15% lower Fuel Consumption Running GOP)
Take Off Fuel Flow Settings & CHTs Better Overhead Light with CSOB LED Headlight
My 2023W Links Great CSOB FREE Flight Planning Tools
Beech Owner Pics on Frappr Main Landing Gear Actuation Videos Retraction & Extension
My Favorite Battery Charger/Maintainer My Favorite O-Rings
My Favorite Towbars or "The Viagra of Towbars" My Landing Gear Crank Handle Leaks Oil
HID Nose & Wing Light
Install (You Will Love Night
Ops) Redline
Towbars eBay Store ![]()
Simple Lean of Peak (Even a Caveman Can Do It!) Your Beechcraft Factory CHT Probe is TU
Hot Starting Your IO-470/520/550 HID PAR-36 & PAR-46 SPECIAL DEAL $280 Each!
Max Dead Sticks His V35 Bonanza 7 Miles (Way to go Max!) Where Did You Mount YOUR Oil Temp Probe
My Favorite CSOB ANR Headset BeechTalk: An Indexed and Searchable Beech Forum (No Massive Emails)
Don't Let a MILF into Your Beechcraft! CSOB FREE Wx Tools
My Favorite Salvage & NOS Parts Sources NARCO MK-12D Transmit Issues w/Garmin 340 Audio Panel
Brake Master Cylinder Disassembly & O-Rings Aircraft Supplier Directory (The "Yeller Pages" of GA)
CSOB Headrests Great New Door & Window Seals & Install Tips
Great Aircraft Hose Source CSOB FAA-PMA Tow Pin
Alternator Out Light Install (Early Baron & Maybe Bo) Fly Over Any Street Address with Lat/Lon Coordinates
Awesome Tampa Eye Doctor Referral Cygnet Dual Yoke, Control Wheels & B55 Air Boxes
Running 50F Rich of Peak? (Please Don't!) The "Pelican" - Accomplished Aviator & Engine Management Guru
Do You Have a CO Detector? (If not, check this out) Need Instrument Repair or Overhaul of Tough to Repair Gauges
TCM Oil Filter Mounting Stud SB (Don't Lose Your Engine) History of the T&B and Turn Coordinator (Stop the Turn & You Will Survive)
My Door Latch Cable Broke (I'd rather change a Fuel Bladder!) NTSB Links (Accident Stats, Reports, Accident Search Database, etc.)
Your Collins 251 & 351 Needs Digital Displays PROPOSED AD on Superior Cylinders (Millennium Engine Owners Please Read)
NEW: ABS Landing Gear Inspection Manual Spring Thing Baron Nose Baggage Hinge (Excellent Substitute for Factory Rod)
Hangar Helper (Makes Beech Projects Go Better) Starter Adapter Mystery Unveiled
Critical TCM SB 01-1 on Fuel Pump Seal Beech Elevator & Rudder Hinge SB (Brackets from 2/2001- 12/2006)
Late Model Main Gear Door Hits Airframe? Max Your B55 Fuel Economy / In Flight Pics of 162 KTAS on 16.4 Gallons/Hour
CSOB EFB (Just Add Cheap Tablet PC & $13 DVD) Dreading Your Upcoming Annual? Bring Savvy MX's "Bodyguards" with You!
Australian Airworthiness Bulletin on B58 Proposed FAA AC 23-27 on Aging Aircraft Part Substitution Guidance
Step by Step Nav Blades Install & Pictures Stay out of the RED BOX - Save Gas & Save Your Engine LOP FF Charts
Slick/Unison Magneto Mandatory Inspection SB3-08 Your Skyforce IIIC or Tracker IIIC Internal Memory Battery is Dead
![]() M2001
Voltmeter Documentation (Courtesy of Ron G. KADS)
M2001
Voltmeter Documentation (Courtesy of Ron G. KADS) ![]() FAA
AD 2008-13-17 on Beech Toggle Circuit Breaker Switches
FAA
AD 2008-13-17 on Beech Toggle Circuit Breaker Switches
![]() Beer2OSH:
Enhancing the Beech Lister's Margarita Party
Beer2OSH:
Enhancing the Beech Lister's Margarita Party ![]() NEWS
FLASH: Redline's Sidewinder Tug Video & Demo at KRFD and KOSH
NEWS
FLASH: Redline's Sidewinder Tug Video & Demo at KRFD and KOSH
![]() The
Real Story of 100LL and Why We Need GAMI PRISM Now
The
Real Story of 100LL and Why We Need GAMI PRISM Now
![]() My
B2OSH
2008 Picture Album
Glenn's B2OSH Photo
Album B2OSH
Pic Highlights
My
B2OSH
2008 Picture Album
Glenn's B2OSH Photo
Album B2OSH
Pic Highlights
![]() Compass
Correction Card Template (courtesy Ron G.)
Compass
Correction Card Template (courtesy Ron G.)
![]() Boston
Angel Flight ATC Audio Tape Bonanza G35 Prior to Crash
Boston
Angel Flight ATC Audio Tape Bonanza G35 Prior to Crash
![]() B2OSH
2008 Web Site
B2OSH
2008 Web Site
 B2OSH Photos
![]() CSOB
Pulse Oximeter $58 (No Excuse Not to Have One)
CSOB
Pulse Oximeter $58 (No Excuse Not to Have One)
![]() Airport
Directory for your Pocket PC/Crackberry/PDA
Airport
Directory for your Pocket PC/Crackberry/PDA
![]() CSOB
Window Tinting & Application Instructions (Looks Great)
CSOB
Window Tinting & Application Instructions (Looks Great)
![]() Sky
King Episodes - Childhood Hero of Many Aviators
Sky
King Episodes - Childhood Hero of Many Aviators
![]() ABS
Update 8/21/2008 on Circuit Breaker AD 2008-13-17
ABS
Update 8/21/2008 on Circuit Breaker AD 2008-13-17
![]() CSOBeech
Web Site Makeover Under Construction
CSOBeech
Web Site Makeover Under Construction
You are Visitor Number:
![]()
(Click the
![]() button anywhere on the page to return to the Topics Index area)
button anywhere on the page to return to the Topics Index area)
If you've found this content useful, please consider a secure PayPal donation by clicking the "Donate" button to defray my hosting and bandwidth expenses.
![]()
![]()
![]()
Try NavMonster's Single Airport Weather
Quick access to METAR, TAF, Radar images, and 23 other maps for any US airport.
|
|
Weather courtesy of NavMonster.com |
|
Enter Airport ID, Airport Name, or City. |
Site Feedback, Comments & Questions:
This page has been created especially for Beech List Subscribers in appreciation for everything that they have shared with me over the last four years in owning and operating my B55. My apologies in advance that this is not an exciting graphic and flashy page. My web skills are extremely limited and this is all I could muster but felt that most would appreciate the info and tips more than something that was "eye candy". I am happy to have the site referred to as "pragmatic", kind of like me. LOL
Many of the missives in this page are the result of collective learnings from the Beech List, that I felt should be archived and shared with other Beechcraft Owners who may not have the time or the patience to participate or lurk through the heavy Beech List Email activity.
Click Here to become a "Beech Lister", the greatest Beechcraft specific E-Mail discussion Group on the planet!
Warning: The Beech E-Mail List can at times be over 100 emails/day! However, priceless information and camaraderie is also included. After joining please don't post to the list: "How do I unsubscribe?" Because it's at the same place you sign up!
For a less Email "intense" type Forum type experience with searchable topics archived into categories, try BeechTalk.
Look for my CSOB* Seal of Approval
 for money saving tips and watch outs
that I have found in owning and operating my Beechcraft B55.
for money saving tips and watch outs
that I have found in owning and operating my Beechcraft B55.
* "CSOB" (Cheap $on of a Beech). Because Owning and Flying your Beechcraft can be done safely AND for less money! See the happy CSOB family below, thrilled that they are flying their Beechcraft safely and for less money (obviously tongue in cheek but I found this when Googling "CSOB" and couldn't resist, LOL!)

 SPECIAL NOTE: The information presented in this page is advisory in
nature and is NOT to be relied upon without proper consultation with and agreement by
your A&P to use or implement any of the suggestions made here. Remember,
the FARs are very clear that the Airworthiness of your aircraft rests with
YOU, the owner/PIC.
SPECIAL NOTE: The information presented in this page is advisory in
nature and is NOT to be relied upon without proper consultation with and agreement by
your A&P to use or implement any of the suggestions made here. Remember,
the FARs are very clear that the Airworthiness of your aircraft rests with
YOU, the owner/PIC.
The material on this site may not be current. All material provided on this site is provided as is and any express or implied warranties, including, but not limited to, the implied warranties of merchantability and fitness for a particular purpose are disclaimed. In no event shall the site owner, administrator, author or contributors be liable for any direct, indirect, incidental, special, exemplary or consequential damages however caused and on any theory of liability, whether in contract, strict liability or tort arising in any way out of the use of the information provided on this site, even if advised of the possibility of such damage.
![]()


Click HERE to Join ABS, the Greatest Beechcraft Association on the Planet!
PS: I've joined this forum and it's quite good.
BeechTalk ™ is the quintessential Beechcraft ® Owners & Pilots Group providing a forum for the discussion of technical, practical, and entertaining issues relating to all Beech aircraft.
These include the Bonanza (both V-tail and
straight-tail models), Baron, Debonair, Duke, King Air, Sierra, Skipper, Sport,
Sundowner, Musketeer, Travel Air, Starship, Queen Air, BeechJet, and Premier
lines of airplanes, turboprops, and turbojets.
BeechTalk.com is not affiliated or endorsed by Hawker Beechcraft Corporation,
Raytheon, or its subsidiaries. Beechcraft ®, King Air ®, and Travel Air ® are
the registered trademarks of Hawker Beechcraft Corporation.
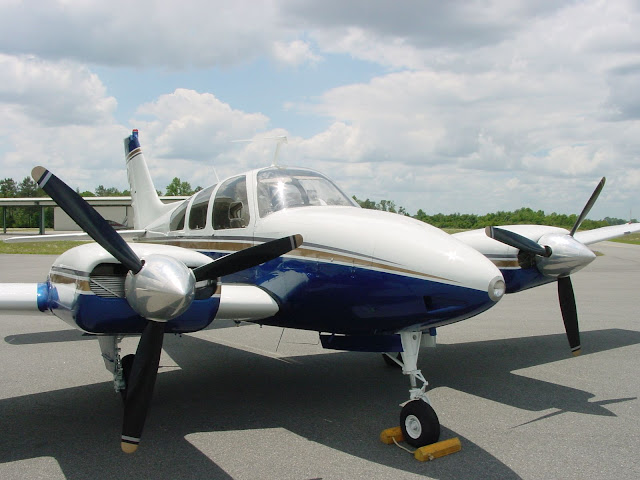
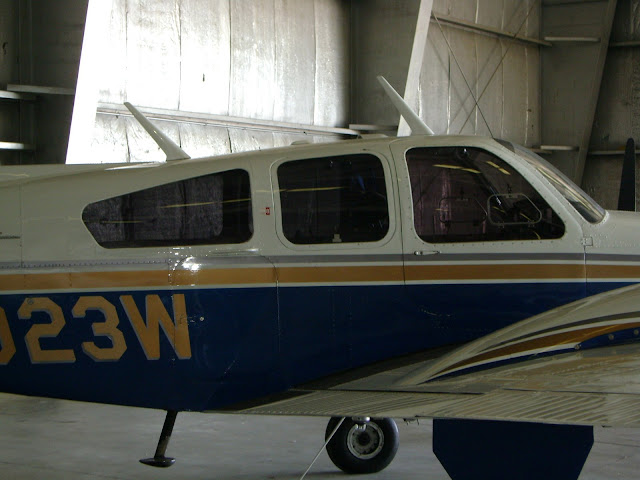
N2023W Beechcraft of the Month May 2006 Cover

How I came to Own & Restore N2023W: ABS Beechcraft of the Month May 2006 Article
N2023W Single Engine Operation after Liftoff & Gear Retraction Video (Experienced ME Instructor on-board)

![]()
 Introducing the 1st Annual
Beer2OSH event!
Introducing the 1st Annual
Beer2OSH event!
Monday Evening - 28th July, 2008
(For Beech Listers ONLY secret handshake and password will be required.)
Designed to enhance the camaraderie and liquid libations enjoyed at the infamous annual Beech Lister Margarita Party at OSH. Many listers throughout the years have supported Beech Lister, Kevin O.'s "Margarita Fund" through their "fines" imposed by the list for some sort of "infraction" on the Beech List. Yours truly has been fined several times and it's quite an honor <vbg>.
This year we will add exotic "full strength" Beers (not to be confused with any Beer using the word Light) from Lister parts of the world, to be shared, bartered or traded with others at the Margarita Party.
So far, we will have kegs of the infamous Shiner Bock brought by Texas Lister Mike S. I am bringing a few cases of Shiner Bock to trade for a Pacific Northwest Lister's Alaskan Amber.
We'll also have a very good Wisconsin brew, Leinenkugel Red.
IMPORTANT NOTICE: All Beer2OSH brews must be served in plastic cups that will be provided. So when you crack one open, demonstrate your superior pour skills and serve your fantastic brew in a plastic cup. Broken glass on the ground can be a FOD hazard to people, planes and air mattresses. Therefore, anyone at the Lister Party seen drinking from a glass bottle is subject to a Margarita Fund fine! So please, serve your Brews in cups and immediately toss the glass in the trash cans. Thanks in advance.
If your state, territory or
country has a great brew, feel free to bring some to share with the group. Email
me
![]() to let me know what you'll be bringing!
to let me know what you'll be bringing!
Beer2OSH 2008 Brews
Alaska: John F.

New York:
Cameron D. Ithaca Nut Brown

Texas: Mike S. &
Mike C. 
The Shiner Keg
is Ready for Beechcraft Transport 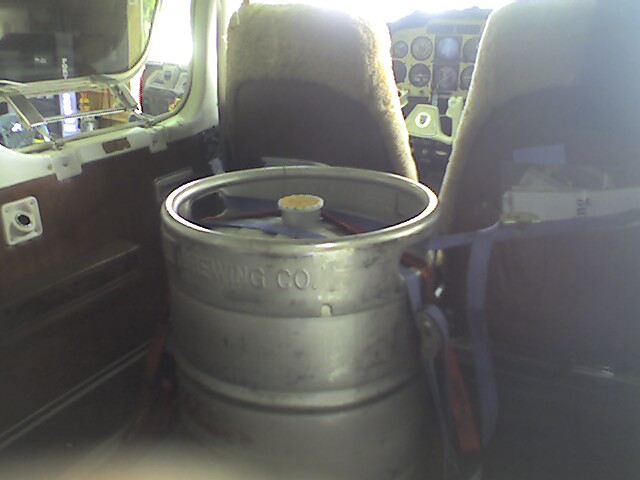
Texas: Ken R.
(some "Texican" Beer <vbg>)


Wisconsin: Mike
C.

Canada: Marc C.


Our goal is to expand Beer2OSH participation each year!
Yours Truly,
1st Annual Beer2OSH Bier Meister: Mike
Caban
![]()
At Sunset the 1st Beer2OSH is just getting going. Note Kevin's limo/taxi in the foreground. The crowd eventually built to about 50 Beech Listers who kept conversation and camaraderie going way into the night.
Thanks to all who brought beer to share, as we had enough left over to fuel additional evening gatherings during the week.


B2OSH Pic Highlights:
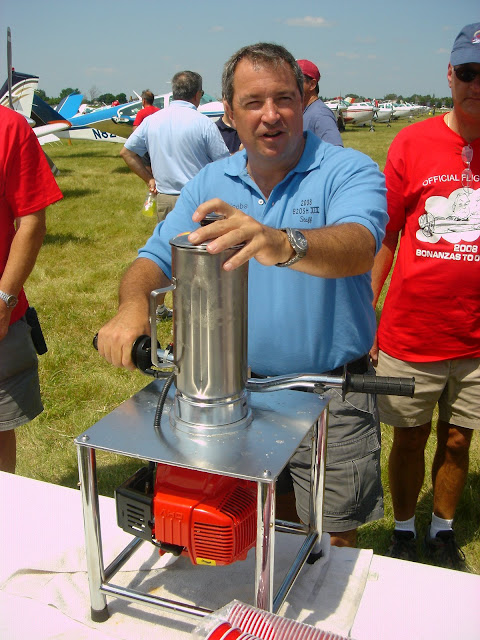
1. "Weebs" at the controls of the 'Weeberator' during the B2OSH Margarita Welcome Party
2. Our Master of Ceremonies Kevin O., celebrating his Christmas!
3. The Pizzas have arrived!
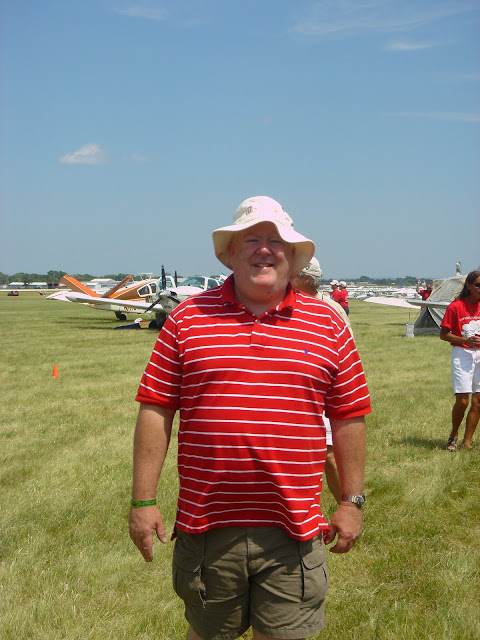
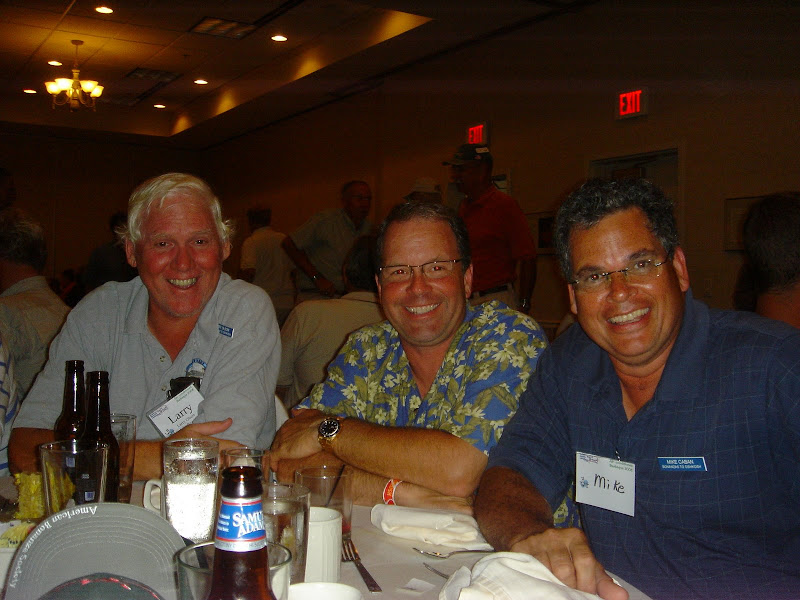
The "Three Baron Amigos": Larry O., Cam D. and yours truly, at the ABS indoor BBQ dinner.
![]()
Do you have "Jumpy"
JPI oil temp data that looks like this? This could be the problem: Click
Through 4 Pics
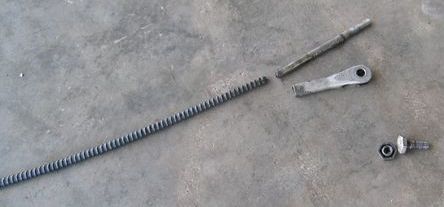
"Sloppy Nose
Steering" and wander when you taxi your Baron or Bo? Have your nose steering rod ends and
bushing been changed out in the last 3,000 hours or so?
I
changed part numbers: 5, 13, 20 and 29 in this Part Catalog Extract and
greatly reduced the slop in my nose steering mechanism. Bonanza part designs MAY be similar,
CHECK YOUR PARTS CATALOG. You do have a parts catalog for your Beechcraft don't
you? Maybe your Part Catalog is listed below and can be easily downloaded?
Editorial comment follows, a broken Nose Steering Rod End on takeoff or landing
might ruin your day, then again, it might not! You decide.............
PS: Ask your mechanic to drill and place a grease zerk in the idler bushing #13 when you change it and also change the bolts and nuts for all those rod ends! A zerk in it looks like this
Picture courtesy of Beech Lister Doug G.
![]()
Don't wait to have a
rod end failure to learn that the insurance companies have been totaling
older Beechcraft that have suffered a landing gear rod end failure with prop
strike and/or gear up landing. Many nose gear collapses are a result of rod end
failure. Right behind your engine, the landing gear is the next system, where a
failure will cause major damage to your plane and/or potential injury to you
and/or your passengers.
Click HERE to see what happens to a 6,500 TT Rod End and see how the tensioning spring is nearly "Stacked"!
Click HERE for More Landing Gear Rod End Tips, Sources, Rod End Catalogs and Part Numbers
YOU'VE
GOT TO READ
THIS Landing Gear Tip: Is your mechanic taking the slack out of your inner gear door
mechanism by tightening the turnbuckle rods? Maybe there is a reason for that
slack in the mechanism? Ask your mechanic to examine the play/wear of this
Bushing/Rod
End and
Bolt
combo that attaches to the top transmission swing arm before tightening up the
linkage. Part total time estimated at 4,000 hours. The bolt was worn down
0.005" and the rod end would not even hold the bushing anymore. This tip
and many other landing gear tips are compliments of a VERY EXPERIENCED Beech
Lister who found this slop and dug further when he was installing a freshly
overhauled gear motor in his Debonair.
![]()
Main Gear Door Hinge Hits Airframe: Well folks, here's another stellar find
reported by Beech Lister Kevin
O. Kevin and Beech expert Glenn
Biggs were looking at a 2002 Baron with milled out new style gear doors.
Glenn noticed that the rear hinge attachment brackets were cracked. The hinge
was hitting the framework of the wing when the door was opened causing the
bracket to flex and ultimately fail! You folks with newer Barons and MAYBE
Bonanzas should maybe look for this. This is a massive repair, it's reported
that the wing must be removed to fix this! Yikes!!! Thanks again to Kevin O for
his Beechcraft sleuthing and reporting!
See picture of the hinge bracket HERE
By the way, Glenn Biggs is known to most Beechcraft mavens as THE premier airframe and reskinning flight controls expert on Beech airplanes. If you have a rigging issue or any other Beechcraft issue, give Glenn a call 405-298-2661. He's in Wellston, OK just NE of Oklahoma City.
NEW
from ABS: Get the Landing Gear Inspection Manual from ABS
HERE
for $25! A great reference for you and your mechanic.

The Manual includes a detailed inspection checklist incorporating lessons learned from our Technical Advisors' over 300 combined years of Beech maintenance experience, and thousands of airplanes inspected in the ABS-ASF Service Clinic program. It includes a highly illustrated, 15-page Amplification that explains and expands upon the checklist inspection steps.
![]()
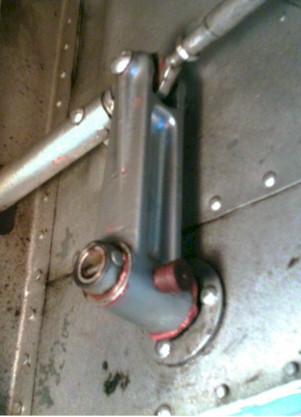
Here is a solution posted by Beech Lister Kevin
O. for his Leaking Gear Crank Handle:
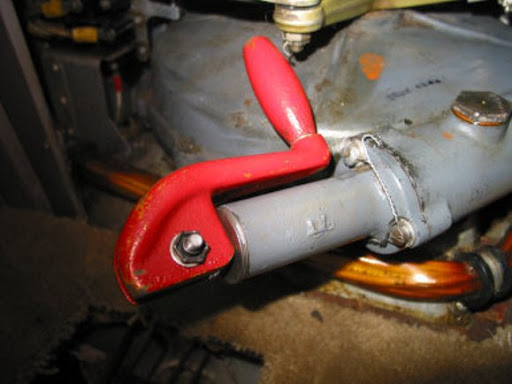
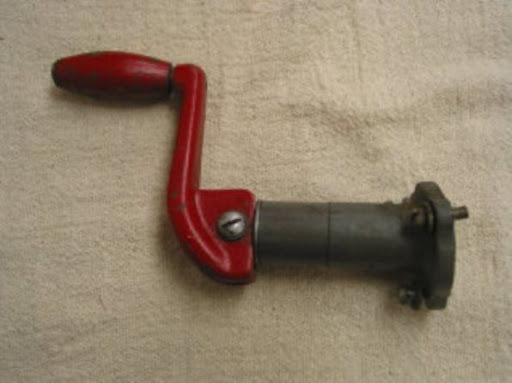
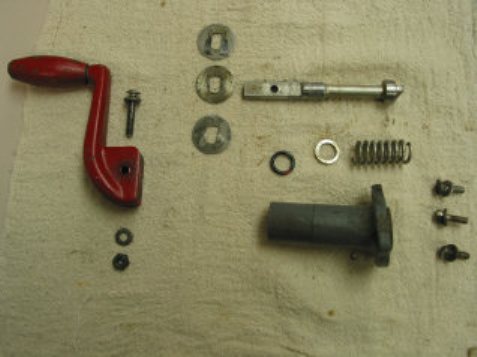
1. Cut safety wire remove three screws place rag under assembly to catch any dripping oil tap on assembly to break it lose from gear box place small rag in hole where handle came off--this keeps oil from draining out remove screw from handle slip shaft out from other side remove O-ring (AN6227-9) clean all parts and inspect shaft for damage on end. See Picture 1 and Picture 2
2. Here is a picture of the groove for the O-ring do NOT scar it getting the old O-ring out. After cleaning all the parts, slip in a new O-ring, AN6227-9, using a small wooden dowel to help in placement replace the washer and spring, lube shaft and slowly insert into housing. Place shims on shaft while pushing in on shaft--place handle and insert screw and nut. Place some RTV around facing that fits to gear box assembly, place handle assembly onto gear box--making sure that it is pointed upwards--NOT down. Replace screws and safety wire all three -- note the slight upward angle of the handle HERE. Test to make sure the handle engages the gear box properly then place cover back on spar-- making sure the handle is not caught under the cover. An easy fix to a dirty problem.

![]()
Low Cost AN & MS
Hardware Source for your rod end replacement project:

Ask for Jerry at Haire Aviation 940-458-4603 or E-mail
BAS
Shoulder Harness Install Article from ABS Magazine Read this article for a
very big time saving template design for cutting the headliner!
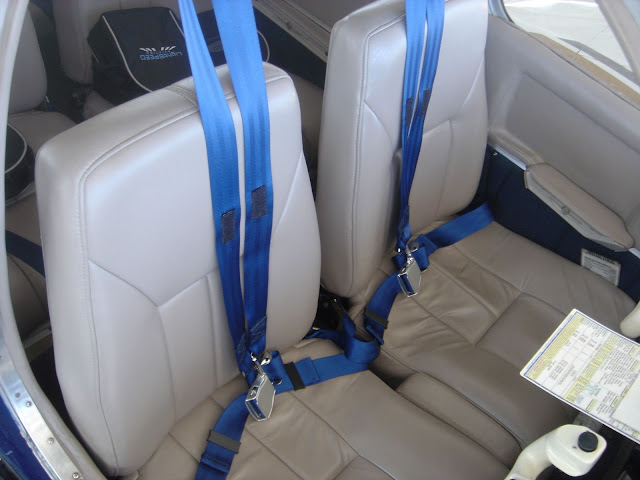
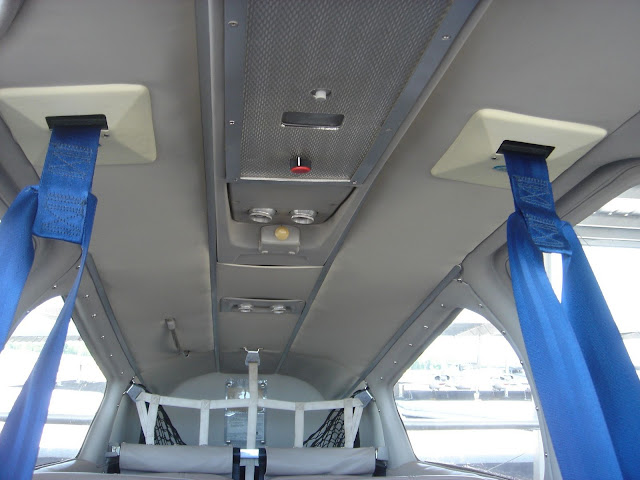
See My BAS Install Pics Here (Click thru 9 Pics) Don't Delay! If you think you don't need shoulder harnesses, Click HERE for this NTSB report. Pilot and Co-Pilot (Pilot was a Beech Lister) die of massive head injuries suffered in the crash landing while rear seat occupant walks away from scene with a broken arm! I recently learned that shoulder harnesses were installed in this plane BUT were not being used by the pilot & co-pilot! Unbelievably sad.
BAS 1970 & Earlier Beech Info HERE 1971 & Later HERE


My Editorial Opinion follows: in case you're thinking about an "Auto Style" three point harness, riddle me this Batman: Why don't we see three-point auto harnesses in the crew seats on jet aircraft, race cars and the bumper cars at the amusement park? Nuff said!
E-mail me if you need pics of the BAS install manual for review w/your mechanic. Easily installed in <10 hours, even if it's your first time seeing the instructions.
![]()
Man, I sure hope I do not have to ever do this door cable job! But, like any
aviation crisis, remain calm and "Fly the Airplane" and digest these tips on
this PITA job from TJ, who had this happen to him in his "experimental" Travel
Air. It starts out looking like this:
OK, take a deep breath and send the wife or girlfriend to the spa for the entire day or weekend and get your mechanic's favorite beer loaded into the cooler in the hangar! Here goes:
1) Remove upper and lower door upholstery panels.
2) Remove Spring from cabin door latch (going to replace it anyways). Ace Hardware has nice springs since you are just experimenting.
3) Remove screw and 3/8 nut from the door right above that spring that acts as a limit stop to the latch. Makes getting in there a lot easier.
4) Remove nut and screw from the bottom cable clevis at the latch. A nice collection of long angled "forceps" are helpful. Also take a few 3/8" open end wrenches, grind down the sides to make them real thin. Take one wrench and bend it about 1" up from the tip at a 30 degree angle to help get around the corner. A real skinny "offset" wrench will be very helpful. Perhaps put these wrenches in a bag for later use.......Don't worry if the parts fall down in the door, a magnet will help.
5) Use the same wrenches to remove the upper clevis nut from the top latch. Observe how all that "action" works up there, and put it back together the same way. There is a bushing up in there that will try to escape. The clevis up there is different from the one at the bottom.
6) Pull out the old broken cable, observe the approximate positions of the clevis ends and save all the parts.
7) Remove the old cable housing. It has 2 or 3 screws under the door seal. They have nuts on the back and you can't get to them most likely. Drill out the heads of the screws, the nuts will fall away and the housing will eventually seem free. Take a Vice-Grip at the upper end of the housing and with a hammer start beating that sucker out. Turn, twist, bang, bang till it is out. Get another one or two people to steady the door so you don't tweak it. Got all the old cable out? Congratulations.
Since we are still just experimenting, ..
8) I might be tempted to call Dick's Speedo-Tach in Phoenix (Shawn: 602-279-6463) and order the following part: 174-vtt-1-36.5 ($75). A 314-vtt-1-36.5 would work too, and would have lower operating friction. Take this new cable and you will see at each end of the housing there are some big nuts to remove and discard. The part of that housing where those nuts were needs to be bent on one end to make the sharp turn at the bottom. When you bend it it will crack, and you will have to have it welded back to about a 20 or 30 degree angle. Clean up the weld real good. This newly bent end will help make the sharp turn down at the bottom of the cable by the latch.
9) Ok, put the bottom clevis on the newly bent end of the experimental housing.
10) Start feeding that sucker up the door track, until it is out the top. Do whatever you have to do to get that nut and bolt back into the lower clevis to attach the latch. Re-install the new spring and the screw with the nut that acts as a stop. Now you are theoretically done with the bottom.
11) I would use an Adel Clamp on a .5" standoff to hold the upper end of that cable housing .. on my experimental. That would hold the upper cable housing fixed for proper action. I also would have taken the old stainless steel housing and cut off the upper 12 inches. Then I would cram that old housing back down the channel next to the new housing with the vice-grip and hammer, which will help to secure the new cable housing in place. Hook up the upper clevis and start working the adjustment until you have wonderful action.
Or, just buy the factory part and try to get the whole mess in there on your own.
And there you have it. Now let me know if you would rather change a fuel bladder than do this door cable on your "experimental"!
![]()
The History of the Turn & Bank and Turn Coordinator, as written by
Old
Bob,
Beechcraft Maven and Ancient Aviator.

Old Bob wants us all to remember this: "If we stop the turn, we will survive."
My editorial Comment: No matter what turn indicating electric gyro you use in your plane, have your partial panel/instrument scan game in good shape. IMHO, Carnahan and Kennedy did not and they and their passengers paid a terrible price for this lack of proficiency. Here are the Kennedy NTSB Report & Carnahan NTSB Report
Here is Old Bob's history lesson:
The T&B dates from World War I days. It is a gyroscope mounted level to the aircraft's longitudinal axis so that any time the aircraft turns, a needle will be displaced. Some of the very early turn needles were hinged at the top. Others were hinged at the bottom, but in either case, the gyro was only sensitive to left or right motion. It was not affected by pitch or by roll. Sometime between the two World Wars, the inclinometer was added to the instrument and most manufacturers hinged the needle at the bottom. With the addition of the inclinometer, it became commonly known as the Turn and Bank. It didn't show the bank directly, but the ball (inclinometer) would indicate a slip or skid as appropriate.
During and just after WWII most T&Bs were made more sensitive and little dog houses were added on each side of the previous single indicator to show a standard rate turn of three degrees per second. To get a standard rate turn on an instrument that only had the single indicator at the top, the aircraft was flown so that the side of the needle just touched the one and only "dog house". The new style was called a double needle width T&B. It was noted that if the instrument was not mounted square to the longitudinal axis of the aircraft, inaccuracies were induced which could make the needle wiggle when it should not. As an example, if the instrument panel was angled such that the top of the panel was forward of the bottom, the instrument would show a yaw in the wrong direction each time that the aircraft wing was displaced up or down. If the instrument panel was angled the other way, (I cannot imagine that ever happened) it would show a yaw in the direction the airplane was rolling.
In either case, it was considered important that the instrument be mounted so that it's gyroscope unit was as parallel to the longitudinal axis of the aircraft's motion as was possible. Some very smart engineer realized that if the gyroscope was mounted so that the front end was higher than the rear of the instrument, it would indicate a yaw any time the aircraft was rolled and that once it was in a stable turn it would then indicate the actual yaw being developed by the turn.
He decided to use that effect as the basis for an economical autopilot. Several other autopilot engineers jumped on the idea and a standard T&B instrument mounted with the front end thirty to forty-five degrees up in the air was used in several early light plane auto pilots to provide sensing. There was no indication given to the pilot. It seemed like a very good idea because if you roll, it is a good chance that the airplane will soon be turning. After the use of a canted gyro for a low cost autopilot had become firmly established, somebody came up with the idea that a human pilot could benefit from that early indication of a roll just as did the autopilot. That was when the Turn Coordinator style of indication was born. It consists of a gyroscope mounted with the front end higher than the rear and it will show roll as soon as it develops and will also show yaw. What that means is that you cannot tell just by looking at the instrument whether it is showing roll or yaw, you have to integrate with other instrumentation to tell what is happening.
At first, it seemed like a very good idea and most of us embraced it's use. For the reasons I have mentioned so very often, many of us became disenchanted with the presentation. I still think it is a good sensor for a cheap autopilot. A true attitude based autopilot will work better, but a well damped canted gyro that is fed through a good electronic balancing device to direct the servos will work adequately. That is what S-Tec uses. They have been very successful in that regard. Not as good as an attitude based unit, but more than adequate for the purpose.
More than you ever wanted to know, but that is the history. What it means to you is that anytime the little wing on the TC drops, you are either yawing or rolling. You cannot tell which just by looking at the instrument. Once the aircraft is in a steady, non rolling turn, the instrument will be showing only yaw. If you fly a knife edge and look at the TC it will show a wings level attitude. Obviously that is wrong, but it is doing exactly what it should do. You are neither rolling nor yawing during a knife edge. It is showing that you are neither rolling nor yawing. I think that is what confuses people. The instrument cannot tell the difference between a roll and a yaw.
For an autopilot that works just fine. It never has to think. For we human beings, it takes more evaluation and interpretation than some of us care to use. I think the TC should be removed from the pilots primary scan and used only for what it does best. Drive a low cost autopilot. If that is more confusing than informative, I apologize, but I would be happy to answer further questions.
AKA
Bob Siegfried
Ancient Aviator
(630) 985-8502
Stearman N3977A
Brookeridge Air Park LL22
So your Beechcraft Factory CHT Probe is Tango Uniform and it's the no longer
made
AC system probe & gauge (as opposed to the Rochester Instruments System)? The Beech Factory
solution is to sell you a VERY EXPENSIVE new gauge and probe combo. This is
against CSOB rules! LOL
Here is a source for a replacement probe and resistor combo that will get your original gauge back in business!
www.instrumenttech.com 972-458-8785
Reports are that they charge about $150 for the replacement probe and resistor. You need their part number 3080-00038 probe w/Resistor 13F145R(82). The old probes are no longer available but Instrument Tech in Dallas can set you up with a probe and variable resistor to keep your original CHT gage system working. Beech went to Rochester brand gauges around the V35A series.
WINK, WINK: When you call them, these parts are for your EXPERIMENTAL airplane that uses the old AC Beech gauge!
![]()
Finally a FAA-PMA Approved redesigned Door and Window seals for our Beechcraft.
Here's what they say about their product:
"The Incredible Door Seal allows the door to fully close and provides a seal that is both airtight and waterproof. It is very affordable and easy to install, and needs only a log book entry by the owner or mechanic to document the installation. And best of all, it works!"
I've installed my Door Seal and Nose Baggage Seal in my B55 and they are both great improvements. No more leaking air coming in the cabin door. It took about 24 hours for the new seal to take a set and was difficult to close initially, but the end result is excellent. I'm looking forward to doing my door and pilot vent windows and rear baggage door with their stuff in the near future.
See my Main Door Seal Install Pics HERE Click through two pics.
See the Nose Baggage Seal Pics HERE* Click through four pics. Note: It will be easier to do this seal by removing the Baggage Door from its hinges (four bolts). Don't forget to mark the hinge positions with a Sharpie so alignment is exactly as removed.
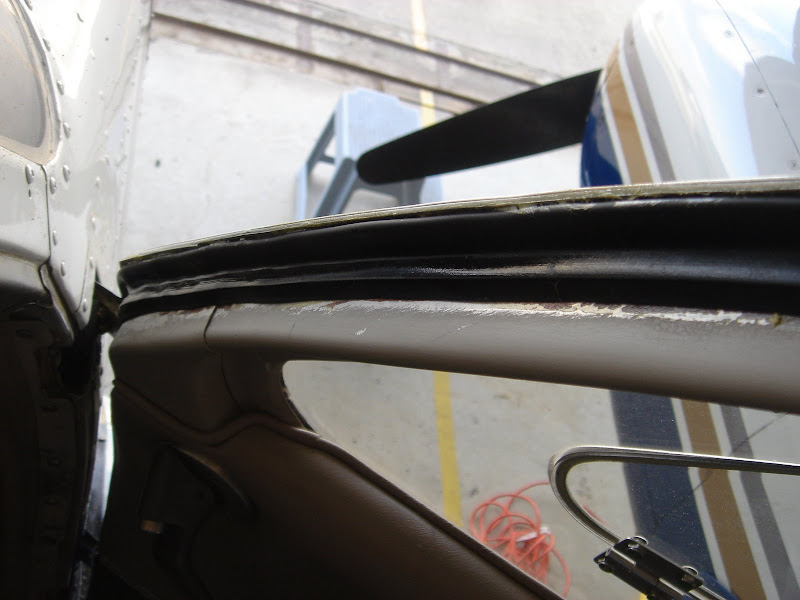
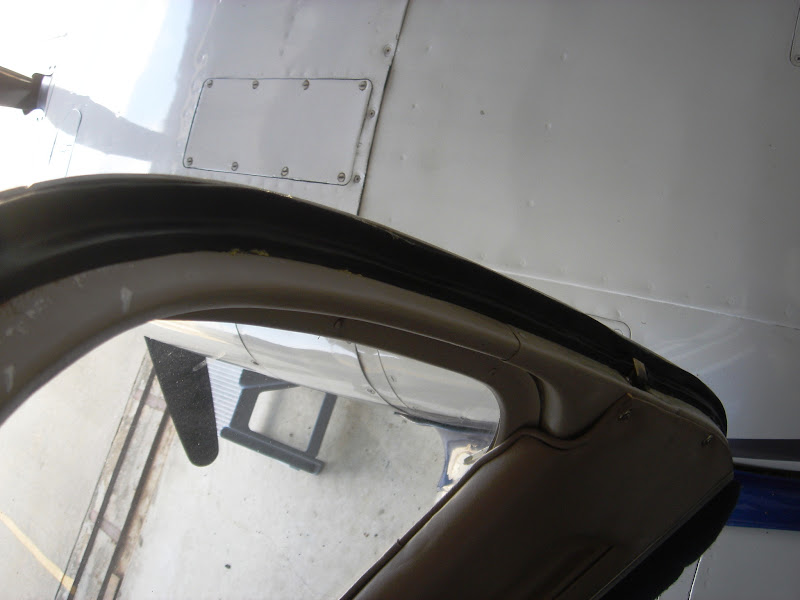


* They cut my nose baggage seal too short. Good Folks, they apologized and cheerfully expedited a completely new seal the proper length to me.
![]()
Beech Lister Door Seal Install Tips, Courtesy of Scott L. (P35 Owner KUES):
What you need:
1. MEK
2. Naphtha
3. 3m super weather strip adhesive part number 08008. This is available from any auto parts store. It is nearly the same as 1300L but black.
4. Roll of painters plastic. (Home Depot)
5. Small acid size brushes. Plastic putty knife. Razor blades.
6. Stiff stainless steel or brass tooth brushes
7. OOPS adhesive remover. Get the big can. (Home Depot).
8. Blue paper towel type shop rags.
9. Carbon filter type respirator (Home Depot).
10. Ibuprofen (CVS, Walgreens)
Part 1: Removal of old seal and glue.
I was not willing to take the main door off so the bottom can be fun.
Cover your wing with the painters plastic. My old seal ripped off but there was a few layers of glue. Use the acid brush and keep soaking the old glue with OOPS. when you get it really soaked then take a strip of painters plastic and press it down to keep it moist. Let is sit awhile then rub it with the towels, metal brushes, and the plastic putty knife. It will come off in little balls of snot and fall on the wing. (You did remember the plastic, didn't you?). It takes awhile. Use the respirator or you will start thinking that the Socialists might not be so bad.
When you are all done getting the glue and loose paint off then wipe it down good with naphtha to get it squeaky clean. Lay the new seal with the thin side up on the main door and mark it with a pencil so you know where to put the glue.
The escape windows can be held open by sticking a broom in between the rear seats and the handle fits nicely in the brackets on the window for the release pin. I used a razor blade to scrape out old glue under the hinge.
Now take the Ibuprofen and go to Part 2.
Part 2: Installing the new main door seals.
Mix about one part MEK to four parts glue and mix well. Use and acid size brush and put a coat of glue on the door between the pencil lines. If the glue starts to get stringy then and a few drops of MEK. Let it dry well.
Take some MEK on a rag and wipe off the back of the seal to remove the mold release agent. It will come off as light tan on the rag. Lay the seal down and apply the glue with the brush. If you gob it on then it will run down and the seal will stick to the floor. Take your time.
By doing a small section at a time you can hold it down so it does not twist.
You will start at the bottom hinge of the door. Since the seal is curving here you need to cut the starting edge on a bit of an angle to get it to line up tight. I cleared the track for the rod by lining it up on the edge and it cleared no problem.
Take a separate brush and some MEK. Brush it on the seal to flash it. I found about 5" at a time works well. You will have about one to two seconds once it touches to get the seal in place before it sets up.
Keep working a small section at a time and do not stretch the seal especially around the curves.
When you get to the side latch area stop about 4 inches before. Take a razor blade and slice on either side of the latch, just far enough to clear the latch. Don't cut out more that you need.
Work your way round to the top of the door and trim the seal by stopping about 4" from the end.
Don't try to cut the length before hand.
Clean up any excess glue around the edges with MEK on a rag and it will look factory.
Closing the door was tough the first time. Here's a solution. Grease up the seal well at the top of the door and had two guy push on the outside while I cranked the handle inside.
I then crawled out the baggage door. The next day it was fine, although you may have to adjust the right screw on the airframe that adjusts the catch travel. A 1/8 turn of the screw makes a huge difference.
The escape window seals have their own adhesive strip so it is easier. Make sure to do a final wipe down with naphtha before installing to get it squeaky clean. I used a putty knife at the hinge area to get the seal under it by starting the seal at the bottom edge, laying it back and using the putty knife to tuck it under the hinge.
Cut it 1/8" longer than you need and superglue it without sticking your fingers to it. A butt splice worked fine with this method and I did not have the talent to mitre it freehand anyway.
![]()
Compass Correction Card Template (courtesy of Beech Lister Ron G.)
Click HERE for the Word Document
|
|
||||||
|
For |
N |
30 |
60 |
E |
120 |
150 |
|
Steer |
355 |
25 |
55 |
85 |
120 |
150 |
|
For |
S |
210 |
240 |
W |
300 |
300 |
|
Steer |
175 |
212 |
235 |
265 |
302 |
328 |
|
Date:
March 6, 2007 |
||||||
When printed, this Word Document makes a nice Compass Correction Card for most compass card holders. Just update your steer values in Word and print!
A CSOB lamination solution method is to place clear packaging tape on both sides and then cut the card out with scissors or x-acto razor blade. Simple, easy and CSOB inexpensive!
Thanks Ron!
![]()
IMHO, Cygnet Aerospace
makes the finest Beech Yokes and Control Wheels & B55 Airboxes! The way I
figure it, every minute I spend flying my Baron, I'm using the yoke and control
wheel, so why not have the thing you use the most in the plane be the best
interaction and experience that it can be.


![]()
Cygnet Aerospace Corp.
P. O. Box 6603, Los Osos, CA 93412
(805) 528-AERO (2376) | fax (805) 528-2377
See more pics of my Cygnet Dual Yoke & Flight Desk HERE
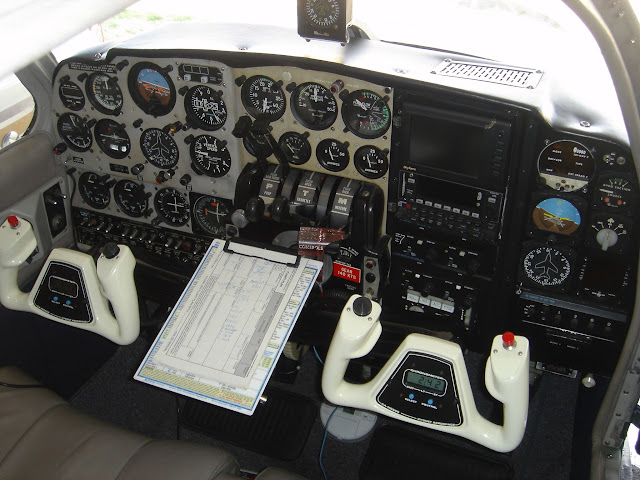
Many Pilots that fly with me are impressed with the utility and convenience of the Flight Desk for Checklist and Approach Plate management. Kneeboards are nice, but if you're like me, once you use a Flight Desk, you won't ever use a kneeboard again. Plus, if you mount one of these CSOB Overhead LED Lights (Click thru 6 Pics) you'll illuminate the Flight Desk perfectly.
The 43 year old Humpty Dumpty Original B55 Airbox:
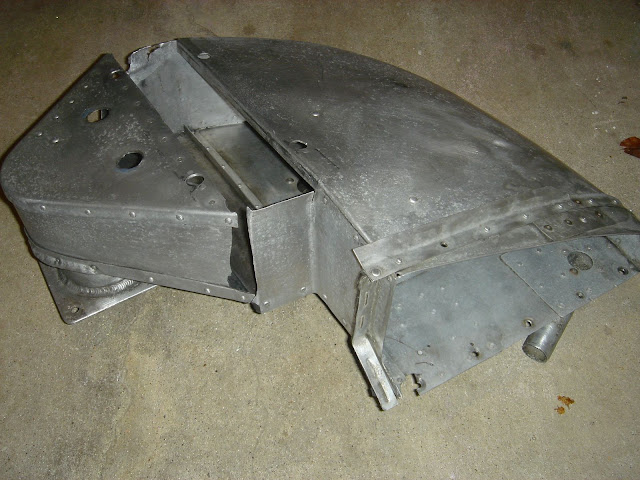
Cygnet's B55 Airbox!
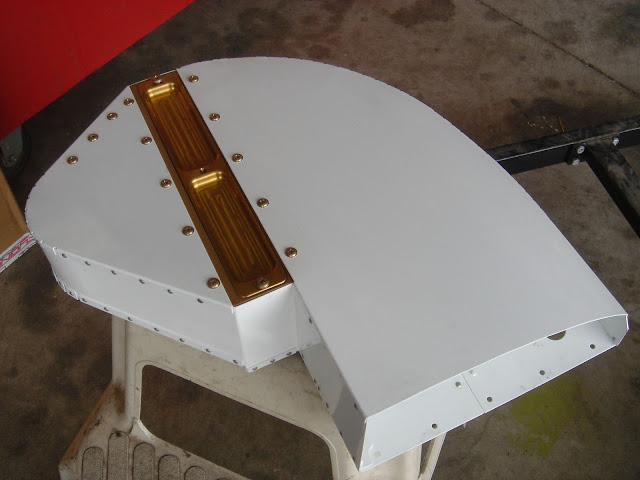
See more pics of my Cygnet B55 Airbox HERE (Click thru 8 Pics)
If your B55 Airbox is looking like my old Humpty Dumpty Airbox seen HERE (Click thru 4 Pics), you should consider giving Chris @ Cygnet a call (805) 528-AERO (2376) before calling the salvage yards.
![]()
Do you need a difficult instrument repair or overhaul? If so, these shops have
gotten excellent pireps from Beech Listers and I have used Rudy Instruments over
the years and been very pleased with quality, service and price. Rudy has
tackled tough jobs like the Baron Dual Vacuum Gauge.
Rudy Aircraft
Instruments Inc.
4711 Old Bowman Rd.
Rudy, AR 72952
Phone: 479-474-8759
Fax: 479-474-3306
Ask for Mike McIntosh
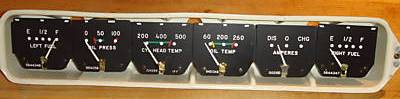
Here is the actual pirep from Mike F. regarding the repair of his S35 Fuel gauge at Keystone Instruments:
All of the gauges are separate and taking them out is relatively straight forward. The 3 screws on the plastic edge light panel secures the tray that holds the instruments. The edge light panel is held on by the bulbs. Take out the bulbs left of the flap switch, take out the three screws, and pull the edge light panel as far forward as you can with the left vent knob pulled out. That will give you access to get to the gauges.
You get the gauges out by unscrewing the posts in the rear. Best access is through the engine compartment removing the plate from the firewall. One little trick worth noting....the gauges have a tongue on the left edge (facing the gauge) that tucks behind the right side edge of the gauge immediately to its left. You will need to loosen the gauge to the left to be able to wiggle the one you want out. Be very careful. It is easy to damage the gauge next to the one you are working on.
Keystone Instruments
320 Proctor Street
Lock Haven, PA 17746-9527
(570) 748-7083
I sent it on Monday, they received Tuesday morning, had it back to UPS that evening and I had it Wednesday. Fabulous service. Call them before you send it and call them again when it arrives. Talking with the guy who was going to work on it made all the difference.
Airparts of Lockhaven also fixes them, but they told me it would be 2 - 3 weeks turnaround. There is no love lost between Airparts and Keystone, but both seem to do good work. I sent my fuel senders to Airparts and got very good service. I tried Keystone because of the turn around difference and was quite pleased.
![]()
Here are a few of my favorite sources for Beechcraft salvage and NOS parts when
I'm in a jam:
 Ask for Mark Morrisey at (785) 878-4000 Ext. #1103 or Email him at
[email protected]
Ask for Mark Morrisey at (785) 878-4000 Ext. #1103 or Email him at
[email protected]
AKA "ASOD" for those in the know! Ask for Tony Dobbs at (972) 227-1111 or Email him at [email protected]
![]()
 Arrell has lots of NOS (new old stock)
Beechcraft parts and has been a friend to many Beech Listers for years. Before
calling RAPID,
gather your Part Numbers up and call Rick Leatherwood at (805) 604-0439 or
Email him at
[email protected]
Arrell has lots of NOS (new old stock)
Beechcraft parts and has been a friend to many Beech Listers for years. Before
calling RAPID,
gather your Part Numbers up and call Rick Leatherwood at (805) 604-0439 or
Email him at
[email protected]
Of course, the source of last resort for any self-respecting CSOB is RAPID.......(888) 727-4344. Some of their prices will make you cry, but then again, a few items that I have purchased from them have been quite reasonable and their customer service folks have been quite helpful. So check them out to determine the Factory prices.
![]()
Need Aircraft Insurance? Check with Aaron Flora of Einstein
Insurance. Both he
and Dennis
Einstein are accomplished aviators. Dennis is an A36TC owner and pilot
examiner in the Philadelphia area and Aaron is an accomplished corporate pilot/CFII/MEII
(he trained me for my Commercial ME and ATP ratings). They have worked to get
quotes for me from several underwriters each year to get me the best rate.
Email
Aaron for a Quote or call (727) 243-4094 and tell him you're a "Beech
Buddy" of Mike.
Aaron, based in the Tampa, Florida area, may be available for CFII or MEII Dual in your Bonanza or Baron. I enthusiastically recommend him, he is an awesome aviator and instructor. Call him directly for his availability and rates.
Another accomplished aviator
and awesome CFII/MEII is David Austin in the Dallas, TX area. Dave is also an
A&P with IA authority and very knowledgeable in the Beechcraft airframes and
systems (I trust him with my bird)! Talk about a combination of pilot and
mechanic in one package! Dave gave me brush-up training for my ATP-MEL ride and
has prepared another friend of mine for his Commercial MEL in my B55. On occasion, subject to time availability, Dave can fly
to your airport to render maintenance assistance, a Hangar Call! Dave also does
extensive RV maintenance and test flights. Contact him directly at
214-236-7973 for his rates and availability and tell him you're a "Beech
Buddy" of Mike! Or
E-mail him.
Also in the Dallas, TX area is
a great CFII Todd Whiteley. He can be reached at: 817-808-7225 or
E-mail
I had a fair and great ATP check ride experience with Kendall Haley, based at
KDTO. If you need to schedule a check ride, give Kendall a call: (214) 534-8067
Another fair and great examiner that I have used on the Gulf Coast of Florida is
Walt Bradshaw, based
at KPGD. Visit his website
for all his contact info.
Last but not least, is David Garner in the Tampa, Florida area: (813) 245-1161.
I took my multi-engine ride with him.
An awesome Pilot Friendly Eye Doctor in the Tampa, FL area is Dr.
Peggy J. Sterling OD, PA. She knows the FAA requirements and goes the extra mile
to tune your eyes up for your FAA Medical Exam. Call her office to set up
an appointment (813) 996-2020.
![]() Some of us remember the Sky King TV series (Click the Sky King logo to hear the
intro theme song) from back in the 50's and the reruns in the 60's, back when TV
was new and only in black and white. Here is a link to all 64 episodes and
background info on Kirby Grant, the star of the show.
Some of us remember the Sky King TV series (Click the Sky King logo to hear the
intro theme song) from back in the 50's and the reruns in the 60's, back when TV
was new and only in black and white. Here is a link to all 64 episodes and
background info on Kirby Grant, the star of the show.
 Videos of All Episodes
HERE
Videos of All Episodes
HERE
Kirby Grant, aka, Sky King background info HERE
![]()

 Do you have the popular Collins VHF 251 and VIR 351 Digital Flip-Flop Nav/Com
setup and flustered that the digital displays are always burning out? Well here
is a posting from the Beech List for a contact to get the displays at something
like $36 and the secrets to changing them out in about 5 minutes time:
Do you have the popular Collins VHF 251 and VIR 351 Digital Flip-Flop Nav/Com
setup and flustered that the digital displays are always burning out? Well here
is a posting from the Beech List for a contact to get the displays at something
like $36 and the secrets to changing them out in about 5 minutes time:
Once or twice a year one of the display units will burn out and die. The five digits displayed in each of these radios are separate display units, so with dual nav/comms, this package has twenty individual display units. Every time I'd bring one in for repair, it costs close to $100 and seemingly without fail, two weeks later a different digit in the same radio would fail!
My avionics shop only charges a half hour labor and usually says "I'll have it done in an hour or so"...so I figured just how hard can it be! The next time it happened I figured I'd give it a shot by doing it myself. The avionics shop agreed to sell me a display unit ($63), but cautioned to be very careful, "there's a trick to getting that face apart without damaging it" (not that they offered to show me what it was!). So I was very careful, figured out the 'trick' without breaking anything, and changed the display.
It took about five minutes, including pulling the radio and reinstalling it in the panel.
So with the help of a couple of electrical engineering buddies from Raytheon, I tracked down the manufacturer of the display units in hopes of getting a really economical fix to this recurring problem. I contacted them and they promptly responded with a note saying they'd be happy to sell to me and they'll even accept a credit card! Price of the displays $36/each with a 10 piece minimum order...not bad I figure, but do I really want to buy ten? If you're still with me...this is where you come in! If anyone wants to go in and buy a few of the displays, just let me know. $36 each plus shipping from me to you and I'll throw in the secret tricks to changing them out! Tom
Contact Tom at: [email protected]
For all the Beech guys that contact you, Thanks Tom, wherever you are!
![]()

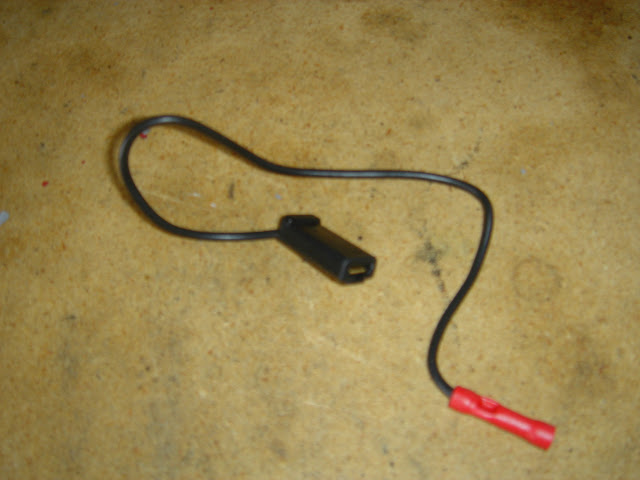
 You Need the one with the wires at the
end.
You Need the one with the wires at the
end.
So, your Skyforce IIIC or Tracker IIIC internal battery is Tango Uniform? Did the avionics shop quote you $250 or more to change it? Well I hate to break this to you but that battery is under $10! These units are circa 1999/2000 and my battery lasted 9 years. Many of these units still in use will be requiring this memory battery replacement right about now.
Here's how to source the battery and change it out.
Order your Battery HERE for the CSOB price of $1.95 or try The Battery Store P/N LS14500C AX or try BatterySpace and ADD the TABS on their order page for $3.24.
Skyforce Battery Spec Sheet HERE
Now follow these guidelines (posted by Tom B. at Piper Owners Forum) to do micro-surgery on your unit to get at the battery:
Disclaimer: this operation is best performed by
someone with electronics expertise or at least that is comfortable with
electrical disassembly and pencil soldering. The battery is soldered directly
to the printed circuit board (PCB) and there are no provisions to isolate /
disable the battery while removing the old and soldering the new. If the
battery is installed backwards, the leads inadvertently touch an adjacent
component, static electricity, etc… your GPS will instantly become nothing
more than an expensive desktop paperweight. Changing the battery itself is not
difficult, you just have to be aware, be comfortable using a pencil-type
soldering iron and make sure you do it right. If you are the least bit
squeamish, don’t chance damaging a great GPS. Buy the battery and take
everything to the local electronics shop or return it to the factory.
1. Place the GPS face-down on a thick piece of foam (to prevent damaging the
front panel toggle switch).
2. Remove the hex-head screws retaining the rear panel assembly.
3. Slowly separate the rear panel from the main chassis. This is a little
difficult because the interconnections (stake-pin connectors) between the PCBs
have a lot of retention force. Move one corner, then the other, etc and the
connectors will separate without bending the leads on the gold stake-pin
connectors.
4. After separating the rear panel assembly from the main chassis assembly,
disconnect the coax connection between the GPS receiver PCB (mounted on the
main chassis) and the rear panel assembly. Set the main chassis assembly
aside.
5. Carefully remove the PCB from the rear panel assembly. The battery is
located on the opposite side of this PCB.
6. Using an indelible pen, mark the + / - battery orientation on the PCB. This
is to aid you to install the new battery with the correct polarity. The
battery terminals are clearly marked with a + and – on the GPS.
7. Now it’s time to remove the old battery. If you sourced a new battery
WITHOUT the axial wires cut the old battery leads as close to the body of the
battery as possible, leaving the battery leads attached to the PCB. You will
use these leads to reattach the new battery later on unless you got the
battery with the wires already soldered. If you got the battery WITH the axial
wires on the end, simply unsolder the old battery wires from the PCB and pull
up (using needle nose or some other such tool) on the wire when the solder
becomes liquid. Carefully clip the excess wire below the PCB after you have
them soldered.
8. Now it’s time to install the new battery. Carefully orient the new battery
correctly and carefully lay it onto the PCB. Notes: Install the battery
backwards and its goodbye GPS. Let the battery leads touch an adjacent
component and its goodbye GPS. Get the idea?
9. Solder the – lead first, then the + lead. Don’t loiter, solder the lead and
remove the soldering iron. Too much heat will damage the battery, unsolder the
lead to the PCB and subject the circuitry to unnecessary static discharges.
10. Repeat steps 5 – 1 in reverse order, being careful to fully seat the GPS
antenna connection and CORRECTLY align the interconnections (stake pin
connectors) when mating the rear panel assembly to the chassis assembly.
![]()
CSOB
XM Nexrad Cockpit Weather Solution Under $800!
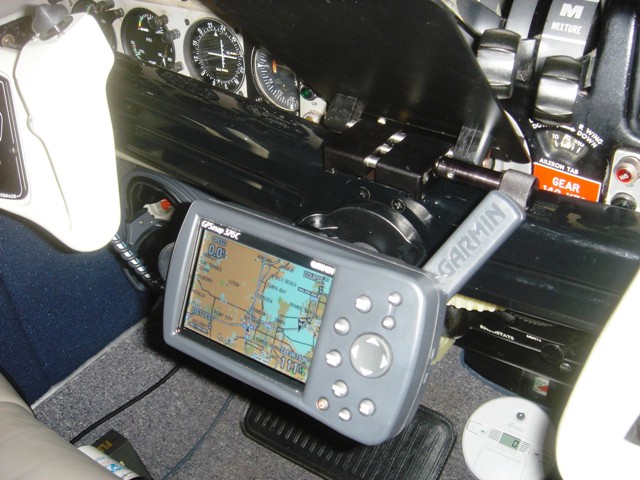
Don't spend $1,800 for the Garmin 396 (unless you really really want to), look what you can do with the Garmin Marine GPSMAP 376C for in the neighborhood of $500 brand new on Ebay! Add the auto kit with the mapping software for $200 and you have a perfect CSOB Nexrad box for your cockpit!
Read my January 2008 ABS Magazine Article, entitled: "Nexrad on a Budget".
![]()
CSOB
Hangar Tug - Why Spend over $1,000 for a tug?
![]()
CSOB Window Tint: Wouldn't it be great to have a really nice modern window
look on your Bonanza or Baron, like your automobile, with interior temperature
reducing benefits. Everyone knows we cannot use the conventional tint films
used on glass because of their aggressive adhesives and the fact that our
acrylic windows has a coefficient of expansion much different than glass.
Well, Beech Lister
Max
G., blazed the trail a few years ago and spoke about a Static Cling Film
he found at Wal-Mart two years ago and with no prior experience with window
film he got a great result. Two years later, Max is still pleased with the
film and look on his Bonanza and he even shared a few install tips with me and
my installer buddy. Thanks Max!
Being based in Dallas, Texas and formerly in Tampa, Florida (yeah, it's mega hot in both those places), I knew a little about what it felt like to get into my plane after even a little while of being on the ramp. Not fun at all! So, I finally got around to trying Max's idea and here are the results. I selected 20% film initially and after further review at night on the ramp, the clarity is not quite what I'd like on the front windows, so I replaced the 20% film with the 35% Visible Light Transmission product. The 20% is excellent, IMHO for the center and rear windows and possibly an "eyebrow" at the top of the windshield for about 5 to 7 inches. The 35% is quite good for the front windows, IMHO, your definition of success may vary.
Click HERE to go to the web album and click thru eight tint pictures.


The 20% film I used is made by![]() and
comes in 26" x 78" rolls at about $13/roll. Three rolls did all six windows. It
also comes in an "eyebrow" roll 5" wide for $3/roll. Total time
for a first timer with tint guy help was about 5 hours. Here's the
stuff I bought for the project:
and
comes in 26" x 78" rolls at about $13/roll. Three rolls did all six windows. It
also comes in an "eyebrow" roll 5" wide for $3/roll. Total time
for a first timer with tint guy help was about 5 hours. Here's the
stuff I bought for the project:
three boxes of 20% stuff 26" x 78" each
one box of the 35%, 5" wide eyebrow film
1 gallon distilled water
1 bottle Baby Shampoo
1 Quart pump sprayer bottle
Plastic squeegees (like hotel card keys or Bondo squeegee/scraper)


Here is how I applied my Static Cling Tint Film:
Clean inside and outside of windows normally.
Prepare a quart of distilled water in a spray bottle with about 1/2 teaspoon of generic baby shampoo
Squirt the outside of one window well with the solution.
Essentially you place a sheet of the film on the OUTSIDE of the window with the paper liner facing you.
Rough cut the size sheet you need.
Mark the outer edge of the window on the paper with a sharpie or ball pen.
Now cut your film and take it to the inside of the plane and squirt well the inside of the window with your solution.
Place film in place and slide around to get in position. Use credit card room key type squeegee or Bondo style squeege to remove air from center to outer edges.
Excess film can be lifted and cut with scissors without removing the entire piece of film from the window.
Film can be stretched in place via squeegee.
Click HERE for Locations to Buy the Axius Film (Wal-Mart, Target, AutoZone)
See the PDF Spec Sheet HERE. Scroll down to the Insta-Cling Film section.
Another Cling Film is made by www.gilafilms.com and can be purchased at AutoZone. I changed my 20% film in my front windows and used the Gila 35% Cling Film. It is noticeably thinner, clearer and visibility at night is better. Gila recommends Cling Film for "plastic" windows HERE. Note their comments about conventional auto film adhesive should never be used on plastic windows.
I did engage the services of an automotive tint guy in the KATW area, Tony, who was extremely reasonable (less than $75 for the 5 hours work). After seeing the install, I could say most anyone with average mechanical ability with a razor and a squeegee could easily accomplish this project in one day or a weekend.
![]()
So you want sexy, sleek Nav Blades
 on your Beechcraft instead of that pimp-mobile high drag Flying V?
 Dorne & Margolin DM N4-17
Nav/Loc/GS Blades
Dorne & Margolin DM N4-17
Nav/Loc/GS Blades
Well here you go folks:
Click HERE for Bob Siegfried II's Bonanza Nav Blades install article, complete with his color pics and detailed instructions on how he installed them on his Bonanza. The bracing fabrication in his install is incredible! You and your A&P decide whether or not that level of strength is needed in your install.
Email Bob II a question about
his install:
![]()
I'm told that the inspiration for the Siegfried install came from the infamous Mike Smith (of Mike Smith Speed Mods* fame) and the Blade position advocated by Mike was to be below the tail and as far rearward as could be achieved. Mike Smith is also reported to have advocated a slight nose low attitude for the leading edges of the blades as the lowest drag configuration for the V-Tailed Bonanza from his drag investigations.
*Side Bar: BDS reportedly purchased all of Mike Smith's Speed Mod STCs. So, if you'd like to to know more about them you'll have to beat down their door as I've heard that they are not actively taking them to market. A shame MHO...........
Another Beech owner has done a little oil wind flow test and found a similarly slight angle downward at the nose of the blade was in line with the airflow in flight.
There have been reports of a Nav blade antenna manufacturer that has drawings showing the mounting of the blades on the fuselage AHEAD of the tail surfaces. This installation has been reported to create tail buffeting at low speeds. As with all things aviation, you and your mechanic decide your course of action regarding any installation, antenna or otherwise.
See my B55 blades install pics HERE, a total of 14 pictures. My install used 0.060" aluminum doublers for what my mechanic and I felt provided the reinforcement needed. You'll also see a nice roof patch plate that becomes the base for the replacement Com antenna.

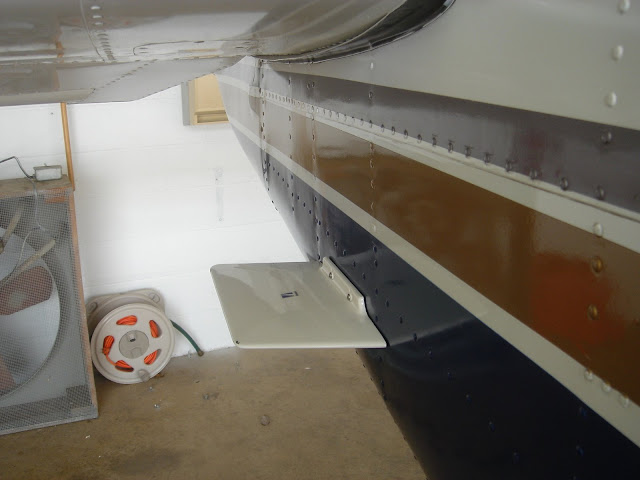
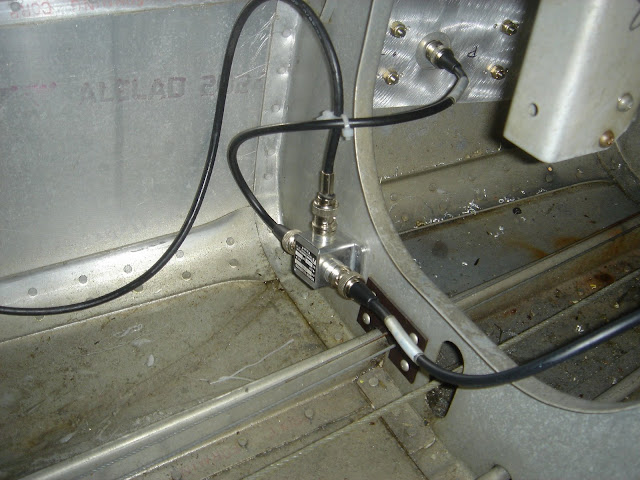
Yes, my blades are below the horizontal stabilizer AND they function quite well in that position, giving me solid VOR signals from over 90 miles at 8,000' and excellent Localizer and Glideslope signal to both my Narco MK12Ds. Also, my blade install is parallel to the water line of the aircraft (I did not have the benefit of the nose down info at the time of my install). Why install there you ask? Installation simplicity! When we thought about the complexities of install in the vertical fin there was no comparison. V-Tails get their blades mounted under their stabilators, right?
See the Comant CI-120 Nav Blades pdf HERE
For a Dual G/S install you
will need something like the
 Comant
CI-1125 Diplexer
Comant
CI-1125 Diplexer
Finding a CSOB set of Nav Blades can be the most challenging part of this project. Since I already have my set of blades from eBay, I suggest you camp out on eBay and wait for a nice set to come along. From what I've seen, you should be able to score a decent set for something under $500.
Be sure you get the antenna "Combiner" with your blades, otherwise you'll be on another eBay hunt for that key item. The Combiner takes the signal from each blade and provides a single point for a single coax cable connection to run up to your Diplexer, then from the Diplexer to your Nav radio antenna connections.
Try these EBay Searches: SEARCH #1 Dorne Margolin or SEARCH #2 Comant or Search #3 Diplexer
or call Mark at Dodson
(785)
878-4000 Ext. #1103 and tell him you want the CSOB Special!
Good Luck!
![]()
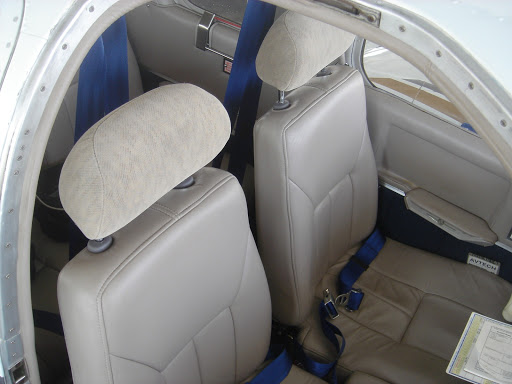
Got CSOB Headrests?
No headrests in your Baron or Bonanza seat back holes? Measure the distance
between your hole centers and visit your local auto U-Pick It salvage yard for a
nice set to match your interior or take the frames to your upholstery shop for
recovering. The mid-90's Nissan Sentra/Altima ft my seat backs nearly perfectly.
See below.
The
"Spring Thing" - IMHO, the best hinge to replace your aging factory rod in
the Baron nose baggage door. And only $16.95 plus shipping at
Discount Marine
Supplies! My "Spring Thing" has stood up to all manner of wind, unlike the
factory rod that lets the door flop around and over the years will widen or bend
the hole in the door frame into which the rod end is placed. A word of caution, do not strike
the spring while removing or inserting stuff into the nose baggage
compartment. You will get nicely whacked on the head! Don't ask me how I
know..........
I like this design because it has plastic mounting ends, so no dissimilar metal corrosion issues when in contact with your aluminum. Click either Image below to go to the Discount Marine Supplies site to order it.
Approx Weight: 0.50 lb.
Supports: 20 Pounds
Dimensions (L x W x H): 12.00" x 2.00" x 2.00"
 Mounted
on my Baron
Mounted
on my Baron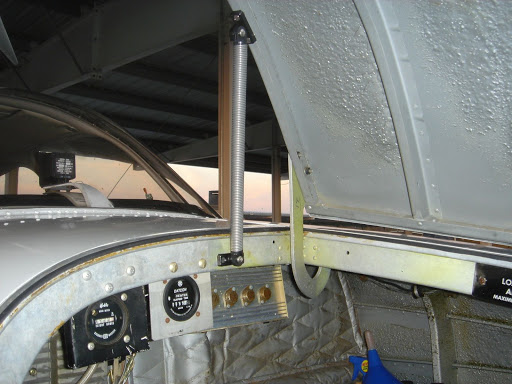 and in high resolution
HERE
and in high resolution
HERE
Email me
![]() if you want the dimensions of
the Spring Thing placement in my Baron baggage door.
if you want the dimensions of
the Spring Thing placement in my Baron baggage door.
![]()
A great way to mount overhead lights that are really effective, low cost and
easy to install.
See pics of my CSOB Cockpit Overhead LED Lights HERE. These lights are pretty common headband lights available from Wal~Mart, Home Depot and Ebay. Prices range from $9 to $17 each.
![]()
CSOB Beech Overhead Speaker Replacement. If your +40 year old Beechcraft
Overhead Speaker is dried out and cracked, you really need to see this:
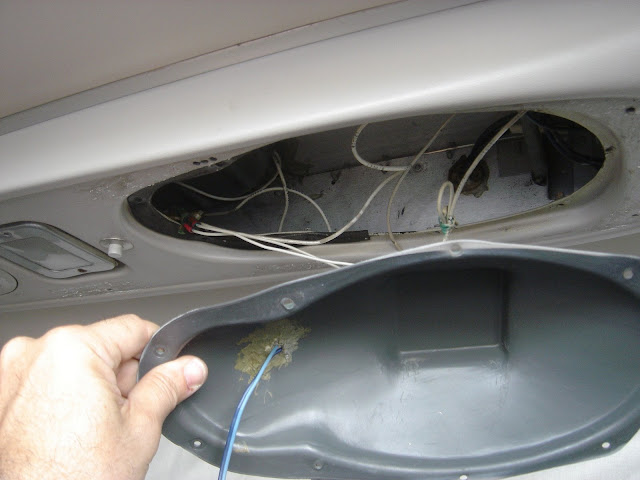
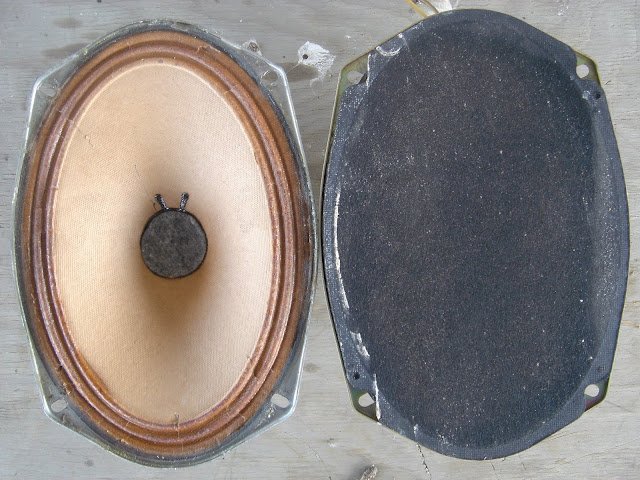
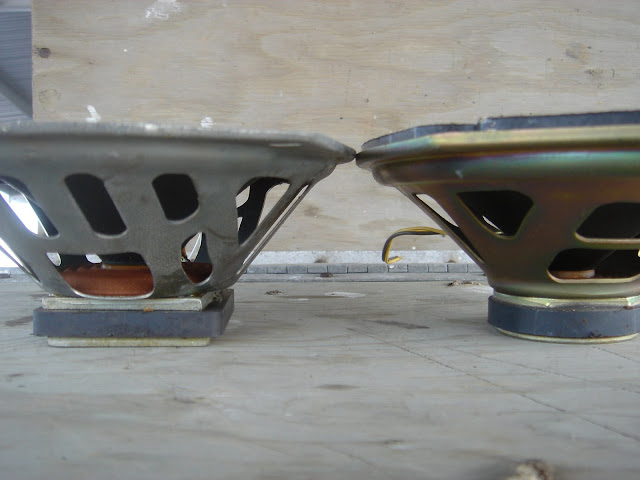
Click Thru 4 Pics Here for a CSOB Low Cost Replacement Speaker Option*
*Go ahead, try to find a brand
new "Factory" replacement speaker! LOL
![]()
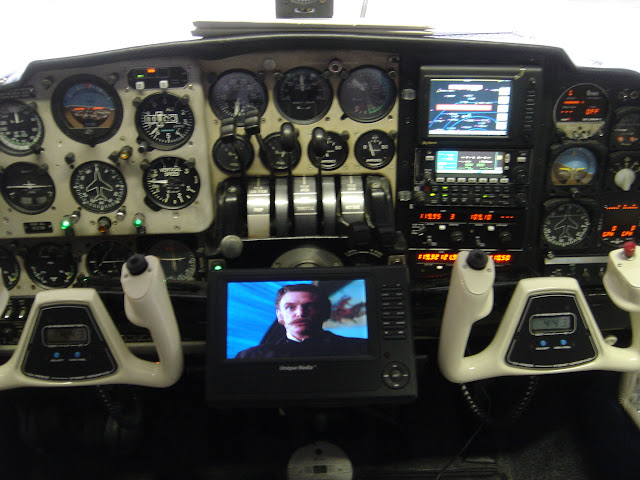
CSOB
In Flight DVD Entertainment System (Easily Straps to Cygnet
Dual Yoke or a Headrest and audio out to Garmin or PS Engineering Stereo Audio
Panel)
![]()
CSOB Pulse Oximeter: If you are regularly flying your trips at 8,000' and above
(mine are 10-12,000'), there's no excuse not to be keeping an eye on your O2
Saturation level. Doing so will be proof positive that you are not altitude
"compromised". At $59, the
Ascent unit is
the lowest priced portable fingertip pulse oximeter I've seen:
 I have one of these $59 units on order and will provide a pirep after I
begin using it. Please feel free to send me a pirep on your unit
I have one of these $59 units on order and will provide a pirep after I
begin using it. Please feel free to send me a pirep on your unit
![]()
Here is another potential CSOB Pulse Oximeter:
 Model
CMS-50B unit is $65.
Model
CMS-50B unit is $65.
Here is another unit @ $69:
 PDF HERE
Get yourself some hypoxia background info with this article written by Mike Busch & Dr. Brent Blue: HERE
So, no excuse to be hypoxic or even be slightly compromised and not know it. Any serious aviator flying trips of over an hour at or above 8,000', IMHO, should have one of these in their airplane to keep an eye on things! Don't even think about being a turbo driver up there on your factory O2 or portable O2 system without one of these inexpensive ways to be SURE your system is keeping you in good shape! Nuf said!
![]()
CSOB EFB:
Are you sick of having tons of paper books of IAPs in your plane for the 4 or 5
states that you're going to fly over every time you take a trip? Well here's
something to consider:
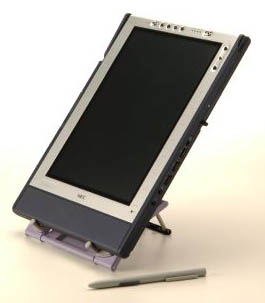
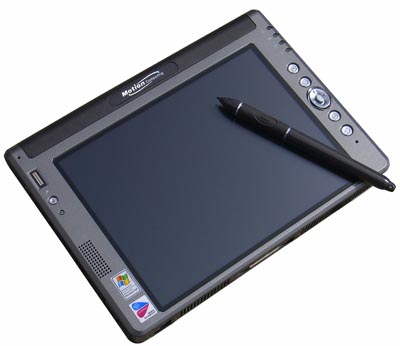

NEC Versa Lite Pad Motion LS800* Samsung Q1 Ultra
* Overheating problems have been reported by LS800 users in high ambient temperature areas of the US.
My personal IFR practice is to have full size pdf printouts from www.fltplan.com of the IAPs that I expect to need and a few others that might be alternates. Now I have my tablet to back me up for that surprise stop or deviation when I would need a chart.
![]()
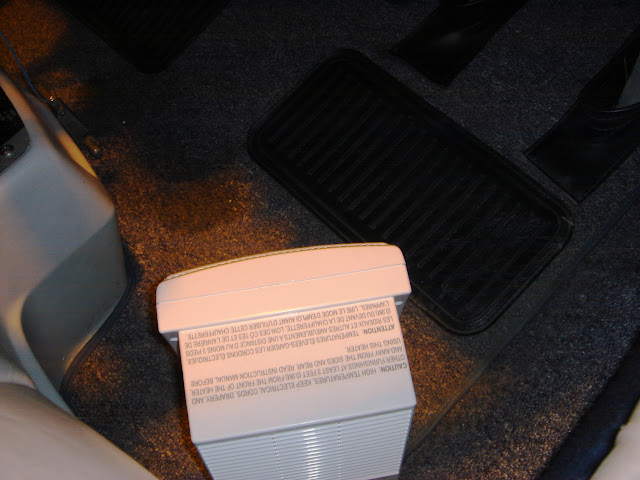
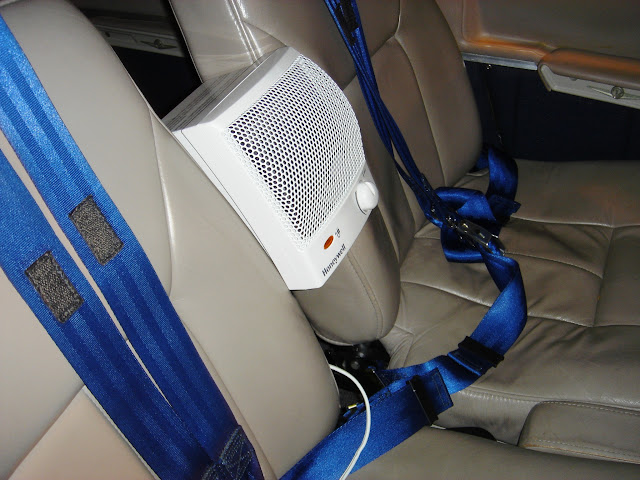
CSOB Ceramic Heater runs on 110V AC for the
interior of your Beechcraft. I just put this Honeywell Model HZ-315 in my plane and it works great
mounted on the right side floor to allow the air to rise and warm the gyros as
well as the rest of the plane. Another mounting option this thing gives you is
that it will fit wedged right between the seatbacks of the front seats and the
plastic housing does not even get warm. I like this unit because it's case does
not get hot at all and it has a nice footprint that would not seem to tip
easily. A Beech Lister reports using a cookie sheet underneath his heater, a
good belt and suspenders approach, IMHO. This thing puts out 1500 watts and in
about three hours I got the inside of my B55 a nice toasty warm from an OAT of
about 25F! Got mine
at Fleet Farm for $20!
Now at Amazon.com for $20.49 click HERE.
See more Honeywell ceramic heaters at kaz.com
 See it mounted in my B55: Click
Through 3 Pics The Baron makes it easy to get an extension cord in through
the firewall of the baggage compartment so that you can leave the entry door
fully closed while powering it from the nose baggage hatch.
See it mounted in my B55: Click
Through 3 Pics The Baron makes it easy to get an extension cord in through
the firewall of the baggage compartment so that you can leave the entry door
fully closed while powering it from the nose baggage hatch.
![]()
Do you sometimes have transmit issues with your NARCO MK-12D through your Garmin
340 Audio Panel? No side tone sometimes and when you turn the audio panel off
(failsafe mode of audio panel is direct connect of Com1 to transmit) your
transmissions are OK?
Well, this is the verbatim fix given to me by NARCO techs that solved my problem:
"There is no bulletin concerning the Garmin 340 audio panel. The work around is a simple fix for your avionics shop to install. All they need to add is a 1K ohm 1/4W resistor from the MIC AUDIO line (PIN N of J101) to GROUND on each of your MK12D trays."
![]()
Do You Have a CO Detector? Every pilot is trained in private pilot training how
insidious CO is and how easy CO can enter the cabin via single engine heater
system malfunctions, twin-engine 100LL burning nose heaters and just plain old
exhaust leaks that can get in the cabin. See my Kidde CO Detector Cockpit Alert
unit
HERE. It's CSOB available from Wal~Mart, Home Depot and Lowes for something
like $30 and has a nice digital display of the CO PPM level that it is seeing.
 Kidde Model #: KN-COPP-B P/N:
900-0146 / User Manual
HERE
Kidde Model #: KN-COPP-B P/N:
900-0146 / User Manual
HERE
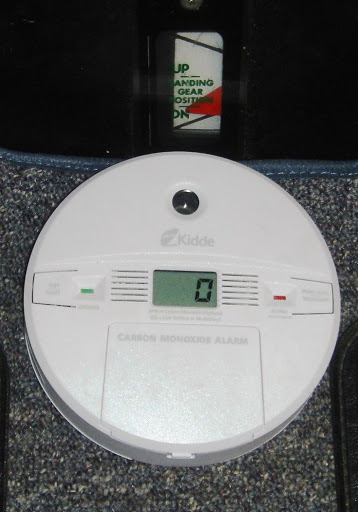 Mounted in my B55
This model CO Detector helped my buddy in his N35 Bonanza get a heads up on his exhaust system while he was flying across Florida. After I had installed my Kidde CO Detector, my buddy Don liked it's footprint and the general idea of some CO warning device. So he got one for his N35 and not long after putting it in his plane he was on a trip with his elderly Mom from Tampa to Miami and the detector went off. He immediately opened all the windows he could and got on the ground quickly. What he found was that his exhaust system on the right side had separated from the pipe to the inlet of the muffler. Need I say more? Imagine something like this happening at night on a long trip at cruise altitude......no, let's not! Nuff said.......
Recently, another CO save story surfaced from a Bonanza owner that had seen my Kidde CO Detector and put one of them in his recently purchased Bonanza. While he was on a trip the CO detector alarmed in flight. He stopped at Paul McCracken's repair facility at T31 in McKinney, TX and had his exhaust system inspected. They found muffler cracks in seams that, if left undiscovered, would have created quite a problem down the road. Early warning system? You bet! Remember, CO is invisible and has no detectable odor so it is incredibly insidious.
Another CO tip: Running GOP or Lean of Peak dramatically reduces CO, so you Rich of Peak Operators take note that you have another reason to get off that fuel wasting and harmful engine operating zone.
A Beech Lister, recently pointed out another CO unit that has just come on the market AND it runs on 12/24 Volts!
 Legal
Warning: Check with your A&P about wire connections and approvals. Legality
aside for a moment, what a convenient looking unit and no batteries to ever
replace! See it
HERE. Read the
Install and Maintenance Instructions for it
HERE
and the Technical Specs
HERE.
I have no personal experience with this unit or any other pireps on it. One
place that sells it for $75 is
HERE.
Legal
Warning: Check with your A&P about wire connections and approvals. Legality
aside for a moment, what a convenient looking unit and no batteries to ever
replace! See it
HERE. Read the
Install and Maintenance Instructions for it
HERE
and the Technical Specs
HERE.
I have no personal experience with this unit or any other pireps on it. One
place that sells it for $75 is
HERE.
For a certified CO Detector for your Aircraft
see: CO GUARDIAN
![]()
CSOB Spark Plugs: Are you still spending $20 each for spark plugs for your
Continental 470/520 Engine? Did you know that a Military Surplus spark plug is
STC'd for these Continental Engines at something less than half the cost of
Champion or Unison options? It is the BG-341
Spark Plug!

See the BG-341 STC Numbers Here
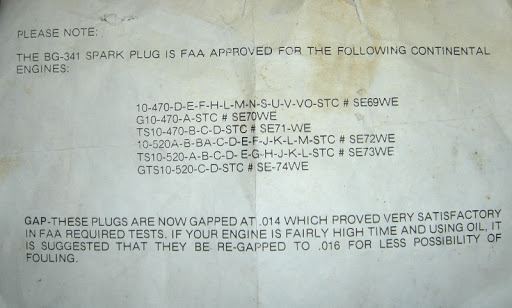
Apparently, there are thousands of these Brand New Sealed in plastic spark plugs still in circulation.
![]() Worst Case is that you pay
about $9 for this plug at Aircraft
Spruce their PN: 08-03699. Best case is you find them on Ebay for sometimes
as low as $1-$2 each (more likely $5-$7) in case lots of 30-50. I've been using
these plugs in my IO470Ls for over 600 hours with no issues and have a stash of
50 in my hangar. Clean 'em or throw them out at annual if you don't like the
looks of them.
Worst Case is that you pay
about $9 for this plug at Aircraft
Spruce their PN: 08-03699. Best case is you find them on Ebay for sometimes
as low as $1-$2 each (more likely $5-$7) in case lots of 30-50. I've been using
these plugs in my IO470Ls for over 600 hours with no issues and have a stash of
50 in my hangar. Clean 'em or throw them out at annual if you don't like the
looks of them.
Still thinking about fine wire plugs? I'm told they last a much longer time than massives, but in my CSOB opinion may not be worth the acquisition costs unless you fly +FL200. More Fine Wire info Here
![]()
Don't
Be a Brake Pad Statistic! To see how you can gauge your brake pad wear during
preflight and get new pads on your plane before brake disc damage or worse
click HERE
![]()
My Favorite B55 O-Rings (Check your parts catalog to be sure they will work for
your SN)
O-Ring Reference Guide PDF HERE
![]()
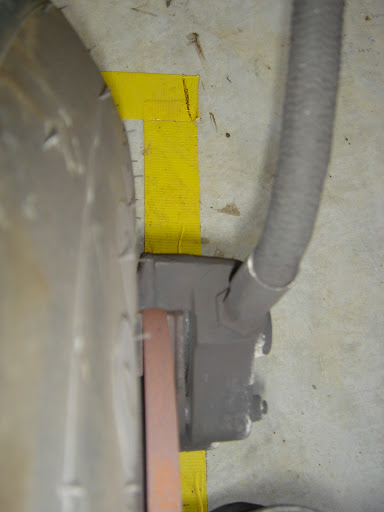
FAA AD 2008-13-17

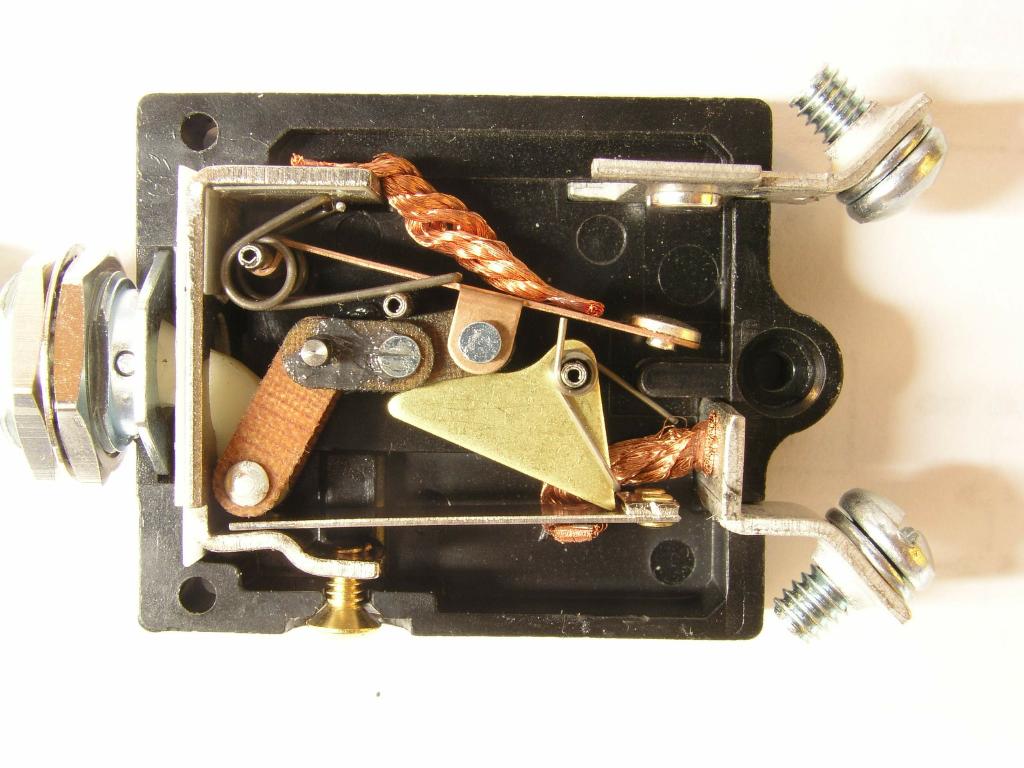
W31 Toggle Circuit Breaker (TCB) Switch
The un-insulated braided wire is the mode of failure.
On July 2nd, 2008 the FAA published
AD 2008-13-17 against many of the Toggle
Circuit Breaker Switches that are found in Beech Aircraft.
This AD requires that certain Beechcraft Part
Number circuit breaker-type switches be replaced in F33, F33A, G33, V35B, A36,
A36TC, B36TC, B55, D55, E55, A56TC, 58, 58P, 58TC, G58 and model 77 Skippers. It
becomes effective August 6th, 2008 and must be complied with within 12 months
following the effective date.
The affected models and SNs extracted from the AD are below:
This AD applies to the following airplane models and serial numbers that have a part number (P/N) 35-380132-1 through 35-380132-53 circuit breaker toggle switch installed and are certificated in any category:
Beech Model Serial Numbers
(1) F33 and G33 CD-1235 through CD-1304
(2) F33A CE-290 through CE-1791
(3) F33C CJ-26 through CJ-179
(4) V35B D-9069 through D-10403
(5) A36 E-185 through E-3629 and E-3631 through E-3635
(6) A36TC and B36TC EA-1 through EA-695
(7) 95-B55 TC-1913, TC-1936 through TC-2456
(8) D55 TE-452 through TE-767
(9) E55 TE-768 through TE-1201
(10) A56TC TG-84 through TG-94
(11) 58 TH-1 through TH-2124
(12) 58P TJ-3 through TJ-497
(13) 58TC TK-1 through TK-151
(14) G58 TH-2126, TH-2127, TH-2131 through TH-2134, TH-2136, TH-2137, TH-2139 through TH-2141
and TH-2143 through TH-2150
(15) 77 Skipper WA-1 through WA-312
Some aircraft could have as many as 15 of these TCB switches in the airplane. Fortunately, my B55 is not affected by Serial Number.
 Allied Electronics also carries the W31 TCB Switch
Read the ABS Article HERE
Read the latest 8/21/2008 ABS Update HERE
Read the AD HERE
Read the W31 PDF Spec Sheet HERE
Read the FAA Narrative HERE
Other Sources for the W31 TCB: Newark @ $21.53 and Mouser @ $26.27
Here are the actual Tyco manufacturer comments regarding these switch designs that Beech Lister Ron G. discovered:
1. The old Beech TCB is provided by Tyco to Beech and isn't available directly from Tyco distributors. Tyco does not consider it to be obsolete, at least not yet. That old Beech TCB is Tyco part number W31-X1005-xx. (The last two digits "xx" represent the Amp rating.)
2. The new Beech part is provided by Tyco to Beech and isn't available directly from Tyco distributors. The Tyco part number is W31-X1017-xx. It includes the additional internal insulation that is described in the FAA AD.
3. The Tyco part number W31-X2M1G-xx, which is available from several distributors including Allied Electronics for less than $25, Newark Electronics, Mouser, and Spruce, does include the additional internal insulation as does the W31-X1017-xx part. However, the toggle handle shape and color is different from the Beech W31-X1017-xx part. Both the W31-X1017-xx part from Beech and the Tyco W31-X2M1G-xx have the amp rating stamped into the end of the toggle.
![]()
Alternator Out Lights: If you don't have an alternator out light OR a voltmeter, I don't think you'll have a good handle on your electrical
system, but that's just my humble opinion. Those old ammeters can be pretty squirrelly
to see a discharge and they're usually not easy to see at the moment an
alternator failure occurs. The B55 I have and many other B55 owners report that
the alternators hardly ever parallel and share load so that you can see some
load being taken by both alternators indicated on the ammeters. Lots of Baron owners end up looking at one
ammeter showing a load and the other at zero. One would never know if the
alternator showing zero load had failed, until it was too late! This issue has
troubled me for several years and I finally solved it with alternator out lights
that were optionally configured in later Baron models. Here are ways that this
can be accomplished with your A&P's blessing of course.

Most older Barons and maybe Bonanzas with belt driven alternators use the Delco or Prestolite design. First, take a look at the Alternator Wiring Diagram PDF extract HERE to see the various factory alternator out configurations. You will see references to Alternator Out lights and annunciators using a relay and also a "sensor". I think the sensor is just a microelectronic relay, but don't take my word for it. With this info you can see exactly how the factory used the "AUX" terminal of the Prestolite alternator or the "R" blade connector on the Delco alternator. These terminals provide one-half the voltage rating of the alternator when the alternator is making juice. So this will be in the 12.5V - 14.5V range. This is key, because it will allow you to use a conventional 12V DC relay to configure your alternator out light.

These are the Delco Alternator PNs from the B55 TCDS: 50 Amp Delco-Remy 1100685, 1100718 and 1100747
Here is an approach taken by a Beech Lister:
He used the Lamar relay PN: A-00258-2, $77 ea from www.airsuppliers.com since it is called out on the B55 wiring diagram/parts catalog. This relay is also used by Piper under PN: 587 857.
He also used the Sloan lights as they are reportedly the supplied lights for current Beech models PN: 102-SI lights & 102-STD-RTP red lens, a few bucks from www.Alliedelec.com
See the Sloan Light Bulb Data Sheet HERE or use conventional PTT (Push To Test) aviation fixtures.
Another approach to the project for review with your A&P with Delco alternators might be:
Go to National Aviation Parts of America (NAPA <grin>) and buy a single female plastic covered blade connector with a little length of wire attached, see pic HERE. This will go on the "R" terminal of the Delco regulator, see pic HERE, (use a regular ring terminal if you are connecting to the Prestolite AUX terminal) and is nice because the plastic housing around the female connector insulates the connection from alternator case grounding (a bad thing) and the "F" field terminal which is right next to the "R" terminal.
Find a glass fuse holder and insert a 2 amp glass fuse in it. Connect this fuse very close to the "R" terminal connector that is connected to the "R" terminal of the alternator.
Now get the best 12V relay you can find and a connector base that plugs into the relay with short lengths of wire for relay connections or use the Lamar Relay PN: A-00258-2 or the same thing under a Piper PN: 587 857.
Connect the fused end of the "R" terminal bladed connector you put on the alternator to one side of the relay actuating coil. Ground the other side of the relay coil to the grounding lug on the alternator.
Connect ONE side of the NORMALLY CLOSED contacts of the relay to the alternator ground lug.
The OTHER SIDE of the NORMALLY CLOSED contacts of the relay will be carried up through the wing to the GROUND side of your PTT (Push To Test) bulb or whatever annunciator light you are using. This is carrying GROUND up to your PTT bulb through the wing so no dangerous voltages can short out in the long wire run in the wing.
The PTT bulb is wired to +24volts from the master bus on the #2 center terminal. The #3 terminal of the PTT bulb goes to ground (so you can test it). The #1 terminal of the PTT bulb, goes to the wire you just pulled through the wing. You'll need two 24V lights of some sort. Red, blue or amber lenses work well and you can find them at the salvage places listed HERE. Use some very nice placard from www.engravers.net "L Alt Out" and "R Alt Out" and you have a professional install that any A&P would be proud to sign off.
Here is what happens in the wiring circuit:
Alternator not running or running and NOT making juice = no 12-14V juice at "R" terminal. So: Normally closed contacts carry ground up to PTT bulb and bulb lights up. Things are BAD!
Alternator running making power = 12-14V juice at "R" terminal. So: Normally closed contacts OPEN UP and remove the GROUND from your bulb. All is good!
A location suggestion for the relays is the backside of the cowl door baffle (through one of the rivets with a nyloc nut and screw) that is right next to the airbox. This makes all your wires very short and a compact tidy install. You can loosely wire tie the fuse and wire bundle to the scat tubing going to the alternator without crushing the scat tubing.
Hi resolution panel picture of my Alternator Out Lights installed (green lenses have since been changed to blue, when I find red ones I'll use those) HERE
Have you Mastered the Hot Start of your big bore TCM engine? Do you dread
refueling in the summer and then having to get the engine started with
everything in the engine bay heat soaked? Well the thing that is really heat
soaked that is the cause of the difficulties is the engine driven fuel pump!
Yup, that puppy is really hot and guess what happens when it starts
"pumping" the fuel? Yup, the fuel gets massive hot and vaporizes and
there you go cranking 'till your battery is nearly dead. Been there - done that!
Here is a procedure adopted from Beech List experts, that has worked for me 99%
of the time:
1. Front of throttle lever to the second white line (above the letter "T" in Baron, in Bonanzas about 1/4 throttle)
2. Mixture to ICO (Idle Cut Off)
3. Boost Pump to HIGH for 45 seconds or more. The hotter it is outside the longer you should run the boost pump. Put your seat belt on, get your frequencies out and stuff like that while the boost pump is running. The first time you do this have someone outside to be sure you are not throwing fuel out one of your vent lines. Your fuel flow gauge should remain at zero or very close to zero. A climbing pressure reading indicates that your mixture control cable or servo is not completely shutting off the fuel flow. (If fuel spews out onto the ground, your fuel system is in need of service, because the fuel servo is not remaining completely closed! Maybe you need to look at TCM SB 01-1 and check for a seal leak in your fuel pump?)
4. Shut off Boost Pump
5. Mixture to Full Rich
6. Give a Boost Pump shot to bring fuel pressure up on the gage
7. Shut Boost Off and go to Mixture ICO
8. Crank engine
9. At first couple of "pops" move mixture to full rich in a smooth medium speed motion
10. Release Starter as you get the mixture to Full Rich and the engine begins to fire on it's own.
This works for me the first time on 99% of the hot starts that I have encountered. If you get a balked start, that is, couple o pops and mixture to full but no start, Boost again at full rich, then take mixture to ICO and crank again at Step #8. If one engine is just being a crank and you balk a second time, go to the other engine (Bonanza drivers do not have this option, sorry) and do the same thing, increasing Step #3 Boost to about a minute at ICO. My personal preference is to have the alternator off line until the engine starts, then bring that alternator on line.
![]()
Rebuilding Your Brake
Master Cylinders
BY ARKY FOULK
THE SYMPTOMS OF LEAKING BRAKE MASTER CYLINDERS ON BONANZAS
AND BARONS:1. Parking brake will not hold.
2. Brake fluid on belly of the airplane or puddles fluid under floorboards.
3. Fluid puddles on top of Master Cylinders.
I have been able to rebuild almost all master cylinders without removing the master
cylinder from the airplane using the following procedure:
Open the engine cowling and find the brake fluid tank on the fire wall. Follow the brake line down to the top of the nose wheel tunnel. If the parking brake valve is mounted on the wheel tunnel, proceed as follows.
Without pumping the brakes, pull the parking brake handle to the ON position. This will prevent fluid from leaking out of the master cy1inder when the master cylinder is disassembled.
If the airplane has the late-style parking brake valve mounted beneath the floorboards, it will be necessary to drain the brake fluid tank. Unsnap and remove the front carpet and carpet pad. (Do not remove the floorboards. Use a rag or shop towel and pack around the rudder pedal to prevent dropping tools or parts under the floorboards. This also will catch any excess brake fluid.
Behind the rudder pedal, remove the bolt, nut and washer where the brake master cylinder clevis is secured to the rudder pedal. Wipe off top of master cylinder. Using snap ring pliers, remove the snap ring from the top of the master cylinder.
Remove the moving parts Pull up on the shaft and remove it and all internal parts of the master cylinder as an assembly. Wrap the assembly in a clean cloth to prevent dripping fluid and take it to the bench.
Clean the parts with solvent before removing them from the shaft.
VERY IMPORTANT: count the threads or measure the shaft so the clevis can be re-installed later in the same position. Then remove the clevis and jam nut.
Remove the top cap and all O-rings. You will probably want to replace the cap. It has a tendency to wear at the shaft hole because the shaft does not actuate straight up and down but at slight angles.
Replace all O-rings. Near the bottom of the piston and shaft you will note a small cotter pin through the shaft. Remove this cotter pin and a small piston-type valve will drop out. This valve has a rubber seal molded on it, so you should replace the complete valve "piston" and cotter pin.
Re-assemble master cylinder parts. Install all new O-rings and a new cap.
Re-install the original washers, snap ring, jam nut and the clevis.
Caution: Be sure to install the snap ring with the sharp side of the snap ring toward the top of the master cylinder to prevent it from coming out of the snap ring groove when the brakes are applied.
![]()
Need a high quality low cost overhauled Starter or Alternator? I've been using
Modified Aircraft Accessories in Brooks, KY for over 10 years. They have
excellent service and prices that a CSOB loves. Contact Debbie or Jimmy at: (800) 605-2113
or (502) 957-6312 and tell them Mike referred you.
See the exploded view of a TCM
Starter Adapter Assembly
HERE
See the mysterious Starter Adapter Spring and Shaft HERE
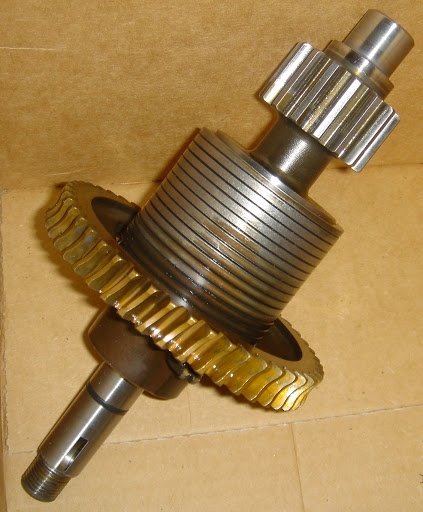
Doing your Own "Freshen Up" of your Starter Adapter? Check out these Low Cost Identical Replacement Parts at a Purvis Bearing Supply near you:
Rear Seal: National 450588
Starter Shaft Bearing: Timken 204PP
Inner Shaft Bearing: Timken 203K
![]()
Whether you need 60-820029-1 or 35-825106, RNL has it for $20 each. I have not found one for less. If you find one for less, please let me know.
![]()

You do have a spare tow pin in your plane, right?
 IMHO, Redline makes the best engineered and constructed towbars for your
aircraft. If you
appreciate fine tools, you absolutely must pull your aircraft with these
products. Redline Aviation has products to fit Beechcraft, Piper, Cessna and now
Mooney airplanes.
IMHO, Redline makes the best engineered and constructed towbars for your
aircraft. If you
appreciate fine tools, you absolutely must pull your aircraft with these
products. Redline Aviation has products to fit Beechcraft, Piper, Cessna and now
Mooney airplanes.
![]()
![]() Let's say your back is not
what it used to be and you are constantly dreading pulling up to the fuel pumps
behind someone and shutting down because you know what that means? Yup, you are
going to have to hump that Bo or Baron with your old factory towbar. Redline has
the Viagra of towbars that will be very kind to your back and every other muscle
in your body, LOL; Redline calls it The
Stiffy!
Let's say your back is not
what it used to be and you are constantly dreading pulling up to the fuel pumps
behind someone and shutting down because you know what that means? Yup, you are
going to have to hump that Bo or Baron with your old factory towbar. Redline has
the Viagra of towbars that will be very kind to your back and every other muscle
in your body, LOL; Redline calls it The
Stiffy!

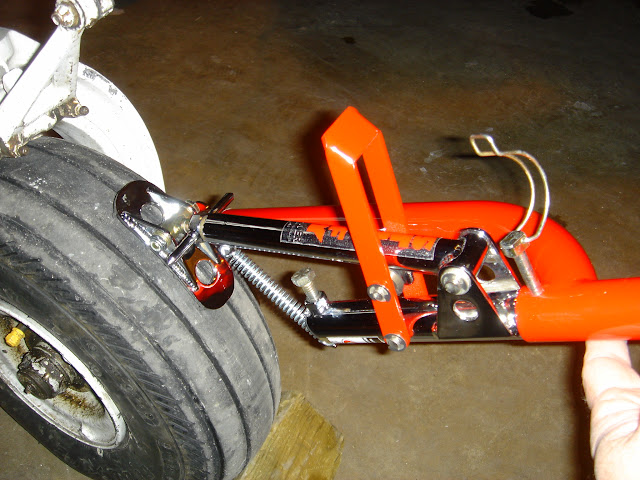
See the Video of the Stiffy in action Click Here. It weighs only 1 pound! It's best suited for relatively flat surfaces or a very slight incline. For big inclines, you really need a powered tug or your buddies.
You just pump the Stiffy like the old hand powered railroad cars we used to see in old movies and you move your plane via the Stiffy's footpad contact with the nose wheel tire. A fantastic piece of engineering that the ancient Romans and Egyptians would appreciate!
Here is an actual Stiffy Owner testimonial:
Once again I was
saved by your STIFFY.
The Bonanza's main gear wheels settled into a wide crack on the ramp while I was
pulling it with your Redline Towbar. It was a real hot day and the crack had
been filled with tar. The tar was soft and both wheels sunk in so far that it
was like having a chock on either side of the main gear tires. Alone, I could
not budge the Bonanza in either direction.
I retrieved the STIFFY and attached it to the Redline Towbar and effortlessly
"pumped" the Bonanza out of the deep rut in the ramp.
Its always good to have a STIFFY attachment in your baggage compartment.
Thanks for a great idea.
Al B.
Bonanza NXXXX
See my Redline ST-1 Towbar, STIFFY and Power Tow Adapter Rod pictures Click Here (Click through 14 Pics)
![]()
Need
to lift one of your wheels (even the tricky nose wheel which will normally twist on you) to change a tire, tube,
wheel, brake disc or service the bearings? Here's
Redline's "Dolly
Jack":

Check out the Ebay Listings of Redline's Towbars & Accessories HERE
![]()
Redline's Revolutionary Powered Tug: Sidewinder
![]()
LATEST NEWS: If you have been considering any type of Power-Tow or Lil Sherman type of powered tow device for your Beechcraft, PLEASE HOLD OFF until you see Redline's Sidewinder! Watch the VIDEO!
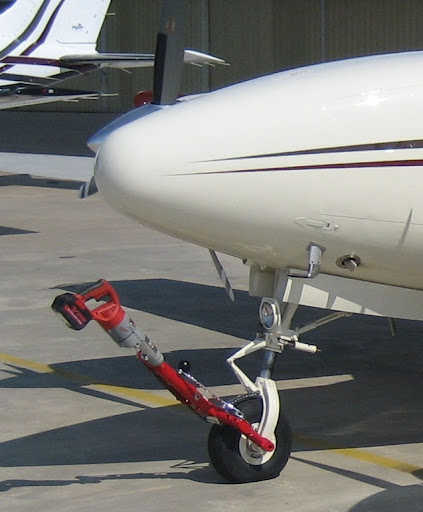
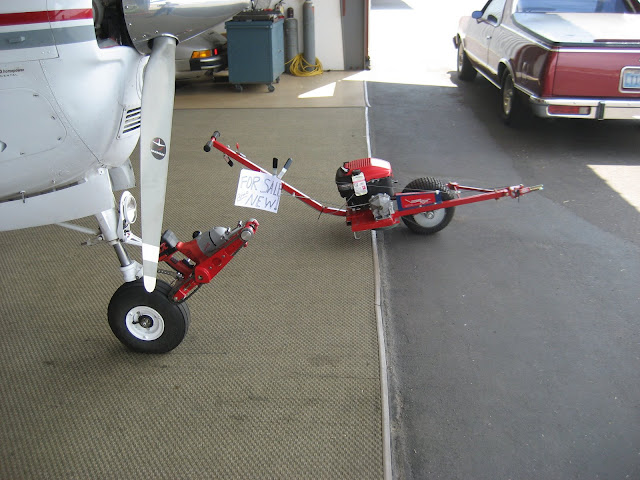
See the Complete Picture Album of hi resolution Sidewinder pictures HERE
Contact me
![]() if you are interested in
learning more or would like to meet in the
DTO or
ATW area for a
demo.
if you are interested in
learning more or would like to meet in the
DTO or
ATW area for a
demo.
NEWS FLASH 10 July 2008: Check out Redline's Sidewinder Tug in this VIDEO
See the Picture Album of Hi resolution pictures HERE
Pricing is $1,600.00. Nope, it's not a CSOB item, but if your back, legs and/or knees are not what they used to be, this could be the ticket for you. You heavy Baron drivers, especially you P-Baron owners, may want to take a close look at the flexibility this could give you in your hangar as well as while traveling. By the way, go price a new Power Tow™ or similar gas powered tug with truck freight to your doorstep and Beech adapters and you'll not be too far off this price. But, you can't take one of those gas tugs with you on a trip and the Sidewinder will never ask you for gas, oil, spark plugs or a rubber belt.
Contact Linn Kastan today to Order your Sidewinder: 619-449-1970
![]()
HID Lights are awesome in your car right? So how come we are still stuck with
1940's incandescent light technology for our airplanes? Well, not any more! And
here is a source for a CSOB
PAR-36 & PAR-46 HID Light Kits, Duckworks
Aviation. Based on user reports, the PAR-36 should mount in any Baron nose and the wings of B55 SN: TC-400 thru TC-1600 and maybe some Bonanza installations, check your parts
catalog to find out if you can use a PAR-36 bulb in any of your plane's light
positions.
A PAR-46 unit is required for the wing cavities of the Baron (SN: TC-399 and lower) and possibly Bonanza wings as well.
See pics of a Bonanza PAR-46 install using the Duckworks HID kits HERE. The cavity is a little tight for the ballast box to be mounted on the side, but it will work and this owner shows you the end results are quite nice, IMHO.
Scroll down at the link to "Phillips 35W HID" at Duckworks PAGE or just call 503-543-3653 and speak with Don Wentz. Don can get you a PAR-46 kit for the wings of your Baron or Bonanza. He reports that he is a HID supplier to Van's Aircraft with these PAR-36 and PAR-46 HID kits.
![]()
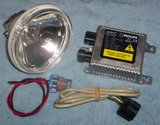 Actual HID kit from Duckworks
Aviation
Actual HID kit from Duckworks
Aviation
HID Lights draw a fraction of the amperage that an incandescent does and also creates a fraction of the heat, which we all know has melted a few landing light lenses in the wings. HID lights also produce so many more candle power of light output and are listed with lamp life in thousands of hours, not tens or hundreds of hours. Those aircraft owners with 14V electrical systems (especially aircraft with generators) would be especially well advised to look into this type of lighting upgrade.
A Beech Lister (Lance F., a B55 owner) posted this about HID technology:
"HID lights produce light from an arc in a Xenon gas. This is the same technology that's been used in strobe lamps for many years, but over the last several years a continuous arc adaptation was developed and is now common for headlights on high end automobiles. The advantage is far greater efficiency which means more light on less current and far less heat. For example the HID lights in my Baron wings consume 50W (yes, there are some 50 watt kits out there) each compared to the original incandescent which needed 250W each and the HIDs put out something like three to four times the light. With the incandescent about 240 of those 250 watts ends up as heat and that's sufficient to melt the plastic lens covers if you operate the lights very long on the ground. The HIDs are so efficient that only 10-20 watts are released as heat and some of that comes from the "ballast" which doesn't affect the lens. BTW the "ballast" is actually a combination of a medium voltage constant current source, and a high voltage "igniter" (it takes a lot higher voltage to initiate the arc than it does to sustain it because the arc produces a low resistance plasma for the current to flow through)."
I love my 35 Watt PAR-36 HID light in the nose of my B55. It is a flamethrower compared to an amp sucking 250 watt incandescent bulb.
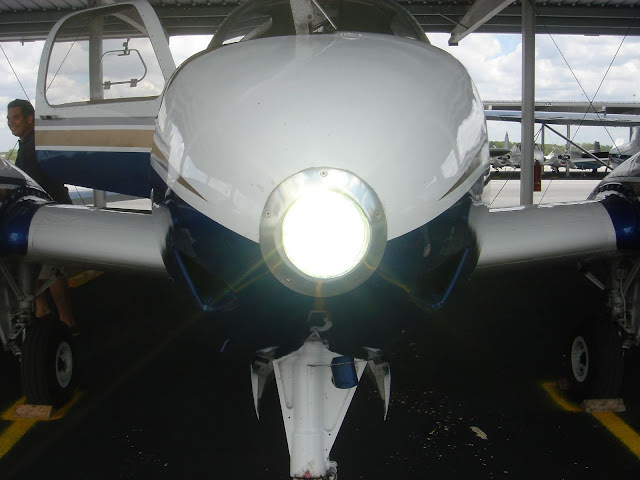
I run it from engine start to shutdown, day and night. And now I have them in the wing positions of my B55 as well and I'm very visible day and night. See the B55 HID nose light HERE (Click through 2 pics).
![]()
![]() Let's
see, on my 28 volt system I go from about a 9 amps of load (for a 250 watt
bulb) to a 1.25 amp load,
the light is waaaay brighter, will not melt anything on my airplane or any of my
body
parts and the bulb is reported to last thousands of hours! Folks, even for a
CSOB this is a no-brainer.
Let's
see, on my 28 volt system I go from about a 9 amps of load (for a 250 watt
bulb) to a 1.25 amp load,
the light is waaaay brighter, will not melt anything on my airplane or any of my
body
parts and the bulb is reported to last thousands of hours! Folks, even for a
CSOB this is a no-brainer.
See the Baron nose and wing cavity install and Bonanza ballast box install pics HERE (Click thru 11 pics)
See a Beech Lister's Bonanza/Debonair Nose Bowl HID Install pic HERE . His install comments are:
"you have to trim a little off the top (curved cut) and bottom to get it to fit in the early model nose bugs. I used the factory doubler that had the nut plates installed. Be very careful when you place the flush rivets---the nose bug is VERY soft metal.
I have also installed the 50 watt HID in the original holder. The 3 extra screws you see are to adjust (aim) the direction of the light." Kevin O.For approval authority consult your A&P/IA as to whether in their mind this qualifies as a MAJOR alteration. I encourage you to carefully read 14CFR Part 43 Appendix A relating to MAJOR alterations HERE and you and your mechanic determine your course of action.
You may also consult the following approved 337s for guidance on your approval process:
Debonair HERE
![]()
OK so here is the super secret Phillips 35W HID pricing deal I just got (1/22/08) from Don Wentz at Duckworks:
Check out Duckworks Special Beech Lister Promo Info Page HERE
He will give Beech Listers the following pricing on EITHER lamp form factor, PAR-36 AND PAR-46!!!:
Buy two Phillips 35W HID Kits (take your pick of PAR-36 or PAR-46) at a price of $280 each plus $10 shipping
Buy one Phillips 35W HID Kit (take your pick of PAR-36 or PAR-46) at a price of $290 each plus same $10 shipping
Be sure to specify your voltage and be sure to tell him you are from "The Beech List"
He does not take credit cards, he accepts checks and PayPal. Once again: you are on your own for the dreaded "paperwork" <vbg>
Call or email Don with your order: [email protected]
The Mailing Address is:
Duckworks Aviation LLC
50641 Firridge Ave.
Scappoose, OR 97056
503-543-3653
Hurry, I don't know how long Don intends to run this promo!
 XeVision
also has HID kits for PAR-36 and PAR-46 applications. See their Price List HERE
XeVision
also has HID kits for PAR-36 and PAR-46 applications. See their Price List HERE
![]()
DON'T BE FUELISH!
 IMHO, every CSOB Aviator should have a set of GAMI injectors AND know how to use
them! I have found my
GAMIs allow me to smoothly and effortlessly achieve "Green" of Peak
operations on my IO470L engines. A great product design, great people and great
service. After you install your GAMI injectors, you do a flight and perform
their Lean Test (listed on the
left side navigation bar of their web site). Send them your data and if
necessary, they will send you a replacement injector or injectors to zero in on the best
balanced flow that your engine can deliver. That's how it worked for me, contact
them and find out for yourself. 580-436-4833 or 888-FLY-GAMI.
IMHO, every CSOB Aviator should have a set of GAMI injectors AND know how to use
them! I have found my
GAMIs allow me to smoothly and effortlessly achieve "Green" of Peak
operations on my IO470L engines. A great product design, great people and great
service. After you install your GAMI injectors, you do a flight and perform
their Lean Test (listed on the
left side navigation bar of their web site). Send them your data and if
necessary, they will send you a replacement injector or injectors to zero in on the best
balanced flow that your engine can deliver. That's how it worked for me, contact
them and find out for yourself. 580-436-4833 or 888-FLY-GAMI.
![]()
These folks can teach you more about why flying your engine "Green" of Peak is the best operating decision you can possibly make for the health of your engine! They even have an on-line course that you can purchase to get yourself educated on what's really happening in the internal combustion event. People say it's like "Myth Busters" for the operation of the piston aircraft engine!
Here is their infamous "Red Box" mixture vs. altitude diagram. Their recommendation is to avoid operations in the "Red Box". Note that above 8,000' the Red Box does not exist = you cannot hurt a normally aspirated engine with your mixture settings at altitudes above 8,000'. Still confused? Click the link above for their seminar or on-line course.

 Learn to use this KNOB!
Just where is that "red box" John Deakin keeps talking about? Some rough numbers, good (that is to say, BAD) for most of these engines -- these are "no fly zones," DO NOT set the mixture between them:
All those numbers are approximate! Please don't start splitting hairs, here!
You probably don't want to run your engine between those mixture settings. If you do, you are running very high peak pressures inside the combustion chambers, and that peak pressure is occurring too close to top dead center.
There's a chance you read too fast, and missed this very important point, so let me put it another way:
(On most of these engines, with a properly set mixture at full rich, at sea level, full power, the EGT ends up at about 250ºF ROP, with some as high as 300ºF ROP and temps of 1250-1300F on most EGT monitoring equipment.)
| Lean of Peak Operation For IO-550 | Lean of Peak Operation For IO-520 | |||||||||||
| GPH | HP | GPH | HP | GPH | HP | GPH | HP | GPH | HP | GPH | HP | |
| 10.0 | 50% | 13.0 | 65% | 16.0 | 79% | 10.0 | 52% | 13.0 | 68% | 16.0 | 84% | |
| 10.2 | 51% | 13.2 | 66% | 16.2 | 80% | 10.2 | 53% | 13.2 | 69% | 16.2 | 85% | |
| 10.4 | 52% | 13.4 | 67% | 16.4 | 81% | 10.4 | 54% | 13.4 | 70% | 16.4 | 86% | |
| 10.6 | 53% | 13.6 | 68% | 16.6 | 82% | 10.6 | 55% | 13.6 | 71% | 16.6 | 87% | |
| 10.8 | 54% | 13.8 | 69% | 16.8 | 83% | 10.8 | 56% | 13.8 | 72% | 16.8 | 88% | |
| 11.0 | 55% | 14.0 | 70% | 17.0 | 84% | 11.0 | 58% | 14.0 | 73% | 17.0 | 89% | |
| 11.2 | 56% | 14.2 | 71% | 17.2 | 85% | 11.2 | 59% | 14.2 | 74% | 17.2 | 90% | |
| 11.4 | 57% | 14.4 | 72% | 17.4 | 86% | 11.4 | 60% | 14.4 | 75% | 17.4 | 91% | |
| 11.6 | 58% | 14.6 | 73% | 17.6 | 87% | 11.6 | 61% | 14.6 | 76% | 17.6 | 92% | |
| 11.8 | 59% | 14.8 | 74% | 17.8 | 88% | 11.8 | 62% | 14.8 | 77% | 17.8 | 93% | |
| 12.0 | 60% | 15.0 | 75% | 18.0 | 89% | 12.0 | 63% | 15.0 | 78% | 18.0 | 94% | |
| 12.2 | 61% | 15.2 | 75% | 18.2 | 90% | 12.2 | 64% | 15.2 | 79% | 18.2 | 95% | |
| 12.4 | 62% | 15.4 | 76% | 18.4 | 91% | 12.4 | 65% | 15.4 | 81% | 18.4 | 96% | |
| 12.6 | 63% | 15.6 | 77% | 18.6 | 92% | 12.6 | 66% | 15.6 | 82% | 18.6 | 97% | |
| 12.8 | 64% | 15.8 | 78% | 18.8 | 93% | 12.8 | 67% | 15.8 | 83% | 18.8 | 98% | |
| Conversion Factor | 14.9 | Conversion Factor | 14.9 | |||||||||
| Max HP | 300 | Max HP | 285 | |||||||||
|
|
||||||||||||
| ROP Percent Horsepower Chart | ||||||
| RPM | ||||||
| MP | 2700 | 2600 | 2500 | 2400 | 2300 | 2200 |
| 29 | 100.0 | 97.5 | 95.0 | 92.5 | 90.0 | 87.5 |
| 28 | 96.5 | 94.0 | 91.5 | 89.0 | 86.5 | 84.0 |
| 27 | 93.0 | 90.5 | 88.0 | 85.5 | 83.0 | 80.5 |
| 26 | 89.5 | 87.0 | 84.5 | 82.0 | 79.5 | 77.0 |
| 25 | 86.0 | 83.5 | 81.0 | 78.5 | 76.0 | 73.5 |
| 24 | 82.5 | 80.0 | 77.5 | 75.0 | 72.5 | 70.0 |
| 23 | 79.0 | 76.5 | 74.0 | 71.5 | 69.0 | 66.5 |
| 22 | 75.5 | 73.0 | 70.5 | 68.0 | 65.5 | 63.0 |
| 21 | 72.0 | 69.5 | 67.0 | 64.5 | 62.0 | 59.5 |
| 20 | 68.5 | 66.0 | 63.5 | 61.0 | 58.5 | 56.0 |
Charts Courtesy of Beech Lister Elliott S.
![]()
A very wise and experienced Beechcraft Owner & Beech Lister, aka Old
Bob, has suggested
that flight at best L/D airspeed (or Best Glide in your POH) times a factor of
between 1.1 and 1.2 will yield nearly the optimum in fuel mileage efficiency. I
have found his guidance to be true in my B55. Here are some examples of
power settings that I have used for maximum range/economy NM/gal in my B55:
Usually 8,000' to 12.000'
17" to 19" MP
2100 RPM
7.5 to 9.0 gallons/hour per engine
Usually in the range of 128 - 138 KIAS
Calculated TAS is usually 150 - 162 KTAS
NEWS FLASH: Recent 700nm Trip at 9.3 gph/side, 2100 RPM, 19" MP (Full Throttle), 12,000' and OAT 11C I achieved 172 KTAS!
See Pics of Actual in-flight Power Settings at 10,000'/8.2 gph per side/12C that yielded 162KTAS HERE (Click thru 4 pics)
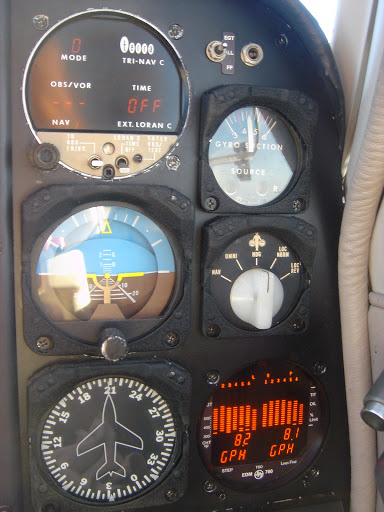
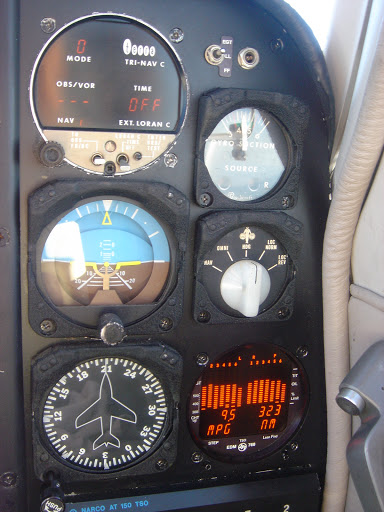
Read Mike Busch's
#59 Article on Leaning
![]()
Your results may vary, but
with these days of >$4.00/gal avgas, I'm getting fuel mileage improvements
anywhere from 15 - 25% with the above power settings vs. WOT (wide open
throttle), 2300 RPM and 10.5 - 11.5 gal/hour with 178 - 185 KTAS! Oh sure, I am
"punished" by having to spend an extra 3/4 hour or so in my plane on
my long trips. Get a Portable
DVD Player and make the time in your bird that much more enjoyable LOL!
![]()
Get
MORE Savvy About the Maintenance of Your Beechcraft (this pdfs page is a good
start)!


Editorial Comment: If any of
the above has ever happened to you and your Beechcraft, you should
seriously consider Mike's website and possibly even attend one of his seminars
or just simply engage him and his team for your maintenance with his
Savvy MX service.
He's an avid participant in the Beech
List e-mail forum and is enthusiastically endorsed by our ABS
organization. He flies a Cessna 310 but we don't hold that against him. LOL!
GOTCHA! You ODB (Old Dirty Ba$xxxx)! Well in this case MILF stands for Maintenance Induced Lift Failure. Lift is created by the wings when airspeed passes over them and the airspeed usually comes as a result of the thrust created by the engine. Therefore, an engine failure, it could be said, leads to a Lift failure. LOL. This is a take off on Mike Busch's Savvy Aviator Article #53 which deals with what Mike calls, "MIFs", maintenance induced failures. See Mike's "MIFs" article HERE and his whole series of Savvy Aviator Articles HERE Just join AVWEB to view them, it's CSOB Free! Anyway, don't let any of these Aviation MILFs into your airplane, the other MILFs are OK!
![]()
Savvy MX:
Brought to you by the same guy who created the Savvy Aviator Seminar, Mike
Busch.
![]()
If you dread what your mechanic will "do" to you (and subsequently your wallet), at annual time or really aren't sure that all avenues of repair are being considered (meeting the criteria of legal, safe AND cost effective), then you may want to check out the services now available from a star-studded team of maintenance technicians. Check out www.savvymx.com for all the info on this service.
Put these stars on your team and get Legal, Safe AND Cost Effective repair assessments and guidance for your mechanic to consider. Bonanzas run about $750/year and Barons are $1,000/year. See what it costs HERE. In some of the annual horror stories I've heard, the amount of their fee could easily be saved in one repair alternative opinion.
TAKEOFF FUEL FLOW: Are you frying your Continental Engine's cylinders with
temps in the climb or in cruise of 400F or more? The engine
management gurus that I trust suggest that cylinder temps (CHTs) for our
Continental Engines should be under about 380F for long cylinder life and engine
health. Takeoff fuel flow plays a part in the cylinder temperature equation.
Here is a formula for what the gurus suggest for SEA LEVEL takeoff flow: 0.55 to
0.60 pounds/hour of fuel per each horsepower. So, take your standard IO-520 engine rated
at 285hp, you would get 26 to 28.5 gallons per hour. You will find that this is
indeed at the redline or above on your engine fuel flow gauge. You will achieve
much cooler CHTs in your climb with this take off fuel flow. How should my
mechanic adjust my fuel flow? Download this TCM
SID97-3D for your mechanic and get to work!
Are you leaning in the climb
to altitude? If not, why not? That's my SOP for good power and CHT balance, to
lean in the climb. Do you have a six-point engine monitor with CHT and EGT
(exhaust gas temperature) readings? If not, why not? I am very pleased with my JPI
EDM-760 with fuel flow and oil temp sensors. The engine
management gurus I trust suggest an EGT for takeoff (at any altitude) and in
the climb of about 1250-1300F. So, I lean to roughly these EGT readings on my
JPI engine monitor. In cruise, running "Green of
Peak" (the procedure formerly known as Lean of Peak) will reduce your fuel consumption AND get your cylinders cooler!
DUH, who knew, removing some of the fuel for combustion would make the fire LESS
HOT!!!! And no, you will not blow up your engine. I've been running my IO470L's
for >650 hours "Green of Peak" and my
engines are just fine. To read more about "Green
of Peak" operations Click
Here.
Read Mike Busch's
#59 Article on Leaning
![]()
By the way, the engine gurus recommend redline RPM and Wide Open Throttle for your climb to altitude. For noise abatement areas they suggest pulling back to 2600 rpm.
Running Your Engine 50F Rich of Peak below 8,000'? Guess what? Congratulations,
your engine is in the Red Box! So here is the TCM
procedure for Cylinder Compression and Borescope Evaluation:
TCM SB03-3,
because you're going to need to be intimately familiar with this
procedure if you persist in operating your engine at 50F Rich of Peak (the
highest pressure and hottest cylinder operating zone). Hey, don't take my word
for it, read
Mike Busch and
John Deakin's engine columns and look at their DATA.
CSOBs hate to break or abuse expensive components so you'll find me operating my
IO470Ls on the
Lean and "Green of
Peak" side, now >750 hours and all is well with my engines and my oil stays
golden brown into the 40 hour zone. Of course if your oil stays a golden brown
color instead of being pitch black, that must mean that it is not being
contaminated by fuel, combustion blow by the rings or mega heat from the high
combustion pressures.
Read Mike Busch's
#59 Article on Leaning
![]()
![]()
 John Deakin - Accomplished Aviator and Engine Operating Guru!
For some great insight into CHT management and how Fuel Flow impacts this critical engine parameter, see "Pelican's Perch #84: Don't Set Mixture with CHT" article written by John Deakin. You may have to register with AVweb to view it but it's CSOB FREE! John is an Owner of the Advanced Pilot Seminar Program, a Bonanza Owner and Designated Pilot Examiner. Click Here for more of John's aviation web references. Email John with a question.

Read "Pelican's Perch #63: Where Should I Run My Engine?" (Part 1) (Part 2 Climb) (Part 3 Cruise) (Part 4 Descent)
Archive of all John Deakin's Pelican's Perch Articles HERE (Courtesy of J.R.)
![]()
John Deakin's Simple "Lean of Peak" or "Green of Peak - GOP" Instructions he provided to a Beech
Lister:
Keep it simple, folks.
At Fred's 8,000 to 10,000' (good training altitude, you can't hurt the engine with the mixture control there), engine and airplane well-stabilized (so you can see changes), set wide open throttle, high RPM, and do the BMP (Big Mixture Pull) by FEEL. Grab the mixture knob, close your eyes (I am not kidding) and pull, and FEEL the slight deceleration as the HP drops off a little on the lean side.
Important! You have to move the mixture quickly enough to make the change in power obvious, but not so quickly that you overshoot and kill the engine (won't hurt anything if you do, just move it back in a little until power is restored). Five seconds from full rich to the desired point is too long, two three seconds is about right. It's not going to throw you forward into the panel <grin>, but it's pretty distinctive. You ever ride with someone in a car who is constantly jiggling the gas pedal? Those little accelerations and decelerations that eventually drive you nuts? THAT'S the feeling you're looking for.
Most absolutely NAIL it, the first time, and leaning is done. If you're really curious, or you're gathering data, or it's your first few times, then read on.
Let that settle down a bit (five minutes?) and then see how you did by enriching ever so slowly to find peak. No, REALLY slowly, sneak up on it. The EGTs should rise of course, and in the very sensitive NORMALIZE mode, it will be obvious when one column of bars stops rising (peak) and starts falling (meaning you've gone over to the dark side on that cylinder). DO NOT use the "Lean Find" feature, it's much too crude for this. Re-lean until that EGT rises to peak again, and a hair more to see "any drop," and you're there.
Further testing: Note the fuel flow at peak EGT on the first cylinder to reverse (your richest cylinder) and keep going (richer), noting the FF at each peak. Quick and simple GAMI Lean Test, with the advantage that you're starting on the lean, green, cool side, and not leaning through "The Red Box."
Once you know it works, and your cylinders all peak at close to the same fuel flow, on future flights all you need do is the BMP, and done. If you lose a couple of knots, you know it's "right."
Once you have confidence in this technique, you can do it in any airplane, even without a monitor. If normally-aspirated, you should also see a very slight loss in airspeed, perhaps 3 knots.
![]()
BAFFLES: Do you still have hot cylinder head temps in cruise?
Are your baffles in good shape? If not, why not? Call Guy Ginby at Gee-Bee Products 800-556-3160 for new silicone baffle seals that are an exact fit for the Beech factory baffles. I installed a set and they are a fantastic fit. You'll have to pull the staples out of the old ones and pop rivet the new ones into place. Gee-Bee's dies have the rivet holes in exactly the same place as where the factory cleco holes were placed.
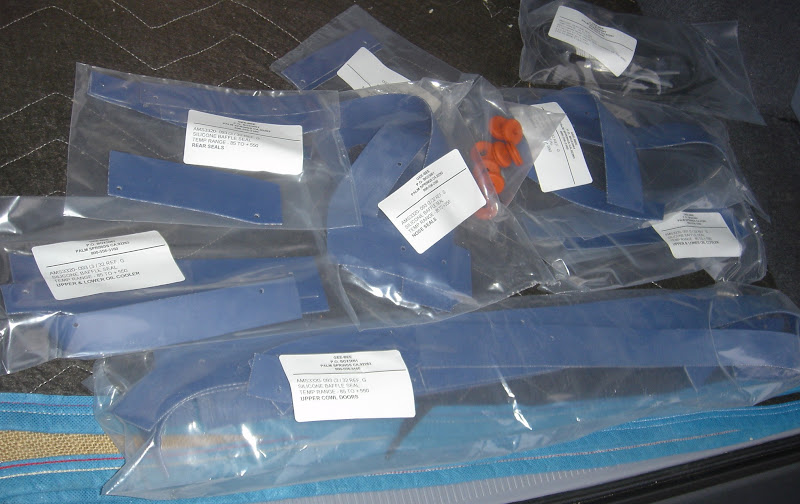
This is a great project for when you've got the baffle seals off for some other maintenance items. Gee-Bee even has a nice landing gear door seals kit for the main landing gear doors. See my Gee-Bee Baron baffle kit Click Thru 6 Pics Here.
![]()
![]() An Awesome Flight Tracker and Aviation Resource
An Awesome Flight Tracker and Aviation Resource
Size of font determined by number of airports in state or territory.
![]()
 In
My Humble Opinion, the Best FREE On-Line Flight Plan Filer
In
My Humble Opinion, the Best FREE On-Line Flight Plan Filer
I've been using www.FltPlan.com for several years to file my flight plans and download approach plates for my trips and am extremely pleased with their service and their web interface. Their weather is an FAA approved alternate source of an official briefing. You can even see your "expected clearance" in your flight plan just after FltPlan.com files your plan and many folks report this is just exactly what they get from ATC! This makes loading the GPS up or briefing yourself on the DP before engine start a literal snap. They have also added a "Fax the FBO" feature that will automatically fax a form to the FBO of your arrival with your info and requested needs!
Thank you FltPlan.com!
Click HERE to Check
Out this Awesome FREE FltPlan.com Approach
Plate Compiler. You get IAPs for any
Identifier then select any or all of them to print them all at once or download them all to your
computer!
Click HERE
to Check Out this Awesome FREE FltPlan.com Airport/FBO Directory that you
download and place into your Pocket PC/Crackberry/PDA or Cell Phone. This find
is courtesy of Beech Lister Jeff R. based at
KMKO.


Click HERE to Get an
Approach Plate Trip Retriever Program called "FlightKit". I have
downloaded it and it works great! All Plates for your defined route and width of
route in PDF form from Origination to Destination!
![]()
![]()
![]()
![]()
In
my humble opinion, AirNav is
the Best On-Line Fuel Price Planner &
Airport Info Source
![]() A Pre-Flight Planner www.navmonster.com
with a Great Weather Summary for Any Route You Define. Weather, Charts, Fuel,
Food & Lodging, and FAA data for all airports along a route!
A Pre-Flight Planner www.navmonster.com
with a Great Weather Summary for Any Route You Define. Weather, Charts, Fuel,
Food & Lodging, and FAA data for all airports along a route!
![]()
Jetplan's
Icing Forecast Map A Great Icing Planning Tool for those in the Frozen
Tundra, IMHO
Intellicast
National Radar Loop A Great Big Picture Nexrad Tool
| Weather Center - Air Sports Net |
Nice General forecasts for several days out.
| Weather Forecasts |
| United State Forecast by State • International Forecasts • |
Charts Courtesy of www.usairnet.com
![]()
 Severe Weather Outlook
 ![]() National Forecast
National Forecast ![]()
Weekly Planner: <Monday> <Tuesday> <Wednesday> <Thursday> <Friday> <Saturday> <Sunday>
![]()

At least it has started DOWN.......Better start flying GOP (even you Democrats <vbg>)!
See the CSOBeech 100LL Fuel Price Page HERE
 |
||
|
|
||
 |
||
![]()
Fuel Prices of Yesteryear - 1947 (Courtesy of Propeller Collector at: http://notplanejane.com/collection.htm )

![]()

FAA Airmen Certificate Search (You Must Enter Info About Yourself First)
FAA Registration Data for US Aircraft (Just Plug in N-number)
All FAA Registration Search Criteria
![]()

NTSB Aviation Accident Statistics
NTSB Aviation Statistics Table (Flight Hours, Fatalities, etc. 1988 to Present)
NTSB Accident Database & Search Query
![]()
Quickly find anything in the world of Aviation!
Created by Beech Lister Jack Showers
![]()
The 20XLc or 25XLc units, IMHO, are the best value in a ANR Headset. The 25XLc is no longer made but there's a nice bounty on them for trade in toward their 30-3G unit. The XL frames are not as robust as other manufacturers so handle with care is my recommendation. However, whenever something broke, Lightspeed Tech Support was excellent and sent me what I needed to change out the broken part or took the unit back and sent me a completely overhauled/new one in return. Service like this will put me in a Zulu one of these days. Thanks Lightspeed!
The XLc models are equipped with a stereo music/IPod and cell phone interface port in the control box, a nice feature if you do not have a modern audio panel with audio input capability (like the PS Engineering and Garmin 340).
News Flash: I traded up a 20XLc and a 25XLc to 30-3Gs and WOW, what a great upgrade (Sold my units on EBay and found good deals on the 30-3G units). Softer on the ears, quieter and bass/treble boost for my XM Music. See their Trade Up Program details HERE for a factory new trade deal.
![]()
 I'm Mike Caban, check my SEMCO,
Inc. consulting site or www.michaelcaban.com
for info on my Marketing, Business Development & Project Management skills and
accomplishments.
If you or a
colleague need assistance in Industrial Manufacturing related industries,
please give me an opportunity to discuss your needs or make a referral.
I am currently on assignment but am always
interested in quoting new Projects!
I'm Mike Caban, check my SEMCO,
Inc. consulting site or www.michaelcaban.com
for info on my Marketing, Business Development & Project Management skills and
accomplishments.
If you or a
colleague need assistance in Industrial Manufacturing related industries,
please give me an opportunity to discuss your needs or make a referral.
I am currently on assignment but am always
interested in quoting new Projects!
![]()
My contact info is HERE.
Aviation PDFs Site Feedback,
Comments & Questions
![]()
I'm ATP-MEL rated with just over 2,200 hours flight experience (750 hours multi-engine B55) so if you need a Baron/Travel Air Ferry Pilot or as Safety Pilot (Baron or Bonanza) while you freshen up your skills or practice approaches, I'll fly right seat with you. Give me a call for Reasonable Commercial Multi-Engine Day Rates!
Need Multi-Engine Time building? Hope this panel is OK? Give me a call, we'll plan some flying together!
![]()
If you have a PDF that you think the Beechcraft Community would appreciate,
Please
![]() the file or send me the FTP info and I will try to fit it onto the page.
the file or send me the FTP info and I will try to fit it onto the page.
Words of Caution:
Don't see what you need in my archive? Try some of these other PDF Download Sites:
http://www.aeroelectric.com/Installation_Data/
http://www.bomar.biz/download.php
![]() ACK
E-01
ELT Manual.pdf 19-May-2007 10:48
885K
Uses Conventional "D" Batteries!
ACK
E-01
ELT Manual.pdf 19-May-2007 10:48
885K
Uses Conventional "D" Batteries!
![]()
![]() TCDS.pdf
02-May-2007 12:04 249k
TCDS.pdf
02-May-2007 12:04 249k
![]() Battery
Backup Circuit.pdf
02-May-2007 12:05 289k
Battery
Backup Circuit.pdf
02-May-2007 12:05 289k
![]() 3 Light Gear Indication
Conversion.pdf
02-May-2007 10:57 1.4MB
3 Light Gear Indication
Conversion.pdf
02-May-2007 10:57 1.4MB
![]() Microswitch MS25026-1 aka BZ-R31.pdf
02-May-2007 12:06 45k (Used in Landing Gear & Flap Limit Switches)
Microswitch MS25026-1 aka BZ-R31.pdf
02-May-2007 12:06 45k (Used in Landing Gear & Flap Limit Switches)
Carrying one of these in your little box of spares in your plane might be a good idea. Imagine being on a trip and your flaps get stuck because one of the limit switches failed.
CSOB Source of BZ-R31
HERE Only $12.00!!!!
![]()
![]() Beech
Pre-Purchase.pdf
02-May-2007 12:07 488k (Courtesy of ABS.
Please Join this fine Organization)
Beech
Pre-Purchase.pdf
02-May-2007 12:07 488k (Courtesy of ABS.
Please Join this fine Organization)
![]() Century
III Autopilot Manual.pdf
02-May-2007 10:59 206k
Century
III Autopilot Manual.pdf
02-May-2007 10:59 206k
![]() Century
III Wiring.pdf
02-May-2007 10:59 90k
Century
III Wiring.pdf
02-May-2007 10:59 90k
![]() Cleveland
6-Inch Wheel Caliper Catalog.pdf 15-Nov-2007 10:59 1.3MB
Cleveland
6-Inch Wheel Caliper Catalog.pdf 15-Nov-2007 10:59 1.3MB
![]() Cleveland
8-Inch Wheel Caliper Catalog.pdf 15-Nov-2007 10:59 417k
Cleveland
8-Inch Wheel Caliper Catalog.pdf 15-Nov-2007 10:59 417k
![]() Cleveland
10-Inch Wheel Caliper Catalog.pdf 15-Nov-2007 10:59
1.5MB
Cleveland
10-Inch Wheel Caliper Catalog.pdf 15-Nov-2007 10:59
1.5MB
![]() Cleveland
Brake 30-66.pdf
02-May-2007 10:59 276k
Cleveland
Brake 30-66.pdf
02-May-2007 10:59 276k
![]() Cleveland
Brake 30-93.pdf
02-May-2007 11:00 1MB
Cleveland
Brake 30-93.pdf
02-May-2007 11:00 1MB
![]() Cleveland
Wheel 40-128.pdf
02-May-2007 11:02 841k
Cleveland
Wheel 40-128.pdf
02-May-2007 11:02 841k
![]() Cleveland
Wheel 40-98.pdf
02-May-2007 11:02 1MB
Cleveland
Wheel 40-98.pdf
02-May-2007 11:02 1MB
![]() Cleveland
Brake Beech Listings.pdf
02-May-2007 11:03 678k
Cleveland
Brake Beech Listings.pdf
02-May-2007 11:03 678k
![]() Cleveland
Brake Cross Reference.pdf
02-May-2007 11:05 202k
Cleveland
Brake Cross Reference.pdf
02-May-2007 11:05 202k
![]() Cleveland
Brake Conversion Kits.pdf
02-May-2007 11:04 1.1MB
Cleveland
Brake Conversion Kits.pdf
02-May-2007 11:04 1.1MB
![]() EDM760
Install.pdf
02-May-2007 11:05 321k
EDM760
Install.pdf
02-May-2007 11:05 321k
![]()
Not Cheap, but pays for itself in fuel savings and engine diagnostics! Get the Fuel Flow option and oil temp probes installed and connect the EDM 760 to your GPS and know your instantaneous NM/gal and Fuel Remaining at Destination. Fuel exhaustion is so "Old School"! I would install Fuel Flow linked to my GPS before I bought wiz bang GPSS or WAAS stuff, but that's just me. After all, one of the biggest causes of engine stoppages is fuel mis-management.
Additionally, if your engine ever had a runability issue, the data download of the EDM760 can be sent to any number of engine experts for analysis and greatly shorten your troubleshooting time.
Here's a helpful article by Mike Busch: "Interpreting Your Engine Monitor" Just register with Avweb to view it, it's CSOB free!
![]() Garmin
340 Audio Panel Install.pdf
02-May-2007 11:05 696k
Garmin
340 Audio Panel Install.pdf
02-May-2007 11:05 696k
A great way to pipe your favorite audio or DVD soundtrack into headsets on trips.
Last seen available for $1,000 at www.dodson.com ask for Mark Morrisey 800-255-0034 ext. 1103
![]()
![]() Garmin
430
Install.pdf
02-May-2007 11:07 4.3MB
Garmin
430
Install.pdf
02-May-2007 11:07 4.3MB
![]() Garmin
530
Install.pdf
03-May-2007 17:03 4.2MB
Garmin
530
Install.pdf
03-May-2007 17:03 4.2MB
![]() Garmin
GI102A
&106A Install.pdf
11-May-2007 21:29 568k
Garmin
GI102A
&106A Install.pdf
11-May-2007 21:29 568k
![]() Garmin
GMX200
Install.pdf
11-May-2007 21:03 3.9MB
Garmin
GMX200
Install.pdf
11-May-2007 21:03 3.9MB
![]() Garmin
GXM30
Magnet Removal
Procedure.pdf
02-May-2007 11:09 363k
Garmin
GXM30
Magnet Removal
Procedure.pdf
02-May-2007 11:09 363k
![]() Garmin
MX20
Install.pdf
02-May-2007 11:09 3.2MB
Garmin
MX20
Install.pdf
02-May-2007 11:09 3.2MB
![]() Guest
Battery Charger/Maintainer Catalog.pdf 05-Nov-2007 21:09 800K
Guest
Battery Charger/Maintainer Catalog.pdf 05-Nov-2007 21:09 800K
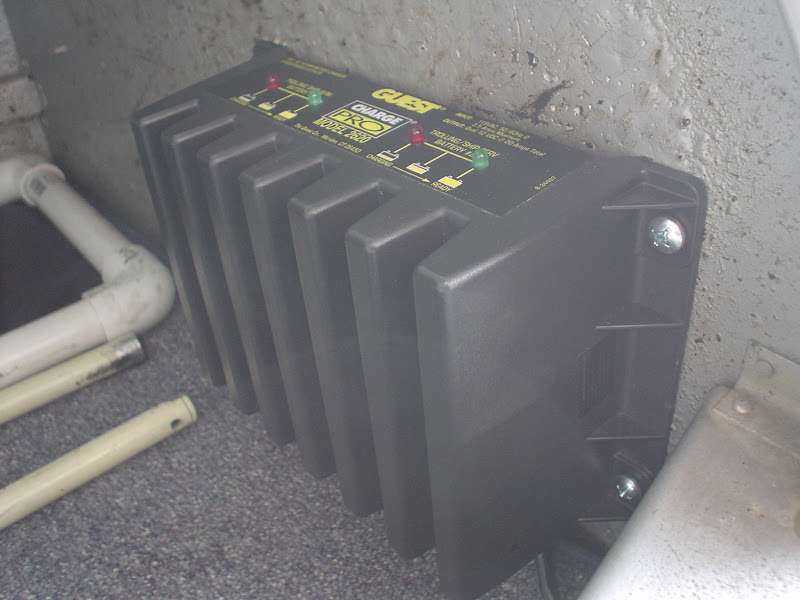

![]() IMHO, the Model 2620 is an excellent 24v
choice for maintaining your batteries. It will not boil or overcharge your
battery. Been using mine for 4 years and my
Concorde batteries are still quite healthy. Good choice for doing gear swings or when at
the avionics shop or in cold weather climates for that extra "edge" in
cranking power!
IMHO, the Model 2620 is an excellent 24v
choice for maintaining your batteries. It will not boil or overcharge your
battery. Been using mine for 4 years and my
Concorde batteries are still quite healthy. Good choice for doing gear swings or when at
the avionics shop or in cold weather climates for that extra "edge" in
cranking power!
![]()
![]() Heim
Rod End Catalog.pdf 18-Sept-2007 10:09 1.6MB
Heim
Rod End Catalog.pdf 18-Sept-2007 10:09 1.6MB
Don't be a Gear Collapse
Statistic!
CHANGE YOUR ROD ENDS AND ACTUATOR ROD SPRINGS SOMETIME BEFORE 4,000 TT some factory manuals and the ABS organization recommend 2,000 hours!
Click HERE to see what happens to a 6,500 TT Rod End and see how the tensioning spring is nearly "Stacked"!
BE
SURE YOU LUBE THIS
ROD END AND THE IDLER ARM BUSHING UNDER THE BOOT AT EVERY ANNUAL!
![]()
![]() The
Bushing #48 on the idler arm in this
B55
Nose Gear Retract Part Catalog Diagram is often neglected. If/when you
change bushing #48 ask your mechanic about drilling it and fitting it with a
grease zerk fitting. An experienced Beech Lister has reported that you DO NOT
have to remove the co-pilot rudder pedal shaft to remove this idler arm. Simply
remove the outer hardware and rotate the arm aft to clear the nose gear cavity,
then slide the idler arm off the shaft!
The
Bushing #48 on the idler arm in this
B55
Nose Gear Retract Part Catalog Diagram is often neglected. If/when you
change bushing #48 ask your mechanic about drilling it and fitting it with a
grease zerk fitting. An experienced Beech Lister has reported that you DO NOT
have to remove the co-pilot rudder pedal shaft to remove this idler arm. Simply
remove the outer hardware and rotate the arm aft to clear the nose gear cavity,
then slide the idler arm off the shaft!
You can use the Aurora Rod Ends available from Aircraft Spruce and others if you want, however, compare the strength specs for yourself, then decide.
A manufacturer Rod End Cross Reference Catalog is HERE
Don't forget to put in all new nut and bolt hardware with your shiny new rod ends. Get great AN and MS hardware HERE
Heim Bearings can be found at:
Aircraft
Spruce and possibly Purvis
Bearing Supply
![]()
New Heim Rod End Catalog is at:

| Landing Gear | Nose Gear Actuator Rod | HM-5S | (1) | Nose Gear Actuator Rod Front | ||
| Aft Rod | HML-6 | (1) | Aft Rod end, rear | |||
| Aft Rod | HM-5S | (1) | Aft Rod, front rod end | |||
| Nose Wheel Steering Mechanism | MD46-15 | (1) | Aft rod end, connect to rudder pedals | |||
| Nose Wheel Steering Mechanism | HM-4 | (1) | Front Flexible steering link | |||
| Right Main Doors | HM-4 | (4) | Outer gear door | |||
| Right Main Actuating Rod | HM-6 | (1) | In board gear door | |||
| Left Main Doors | HM-4 | (4) | Outer gear door | |||
| Left Main Actuating Rods | HM-6 | (1) | In board gear door | |||
| Ailerons | Right Assy | HM4 | (1) | control rod | ||
| Right Assy | HML-4 | (1) | control rod | |||
| Left Assy | HM4 | (1) | control rod | |||
| Left Assy | HML-4 | (1) | control rod | |||
| Aft Fuselage | Differential Cntrl Assy | MD46-15 | (4) | Differential Push Rods |
Do not completely rely on this chart! Check your Parts Catalog to be sure OR, remove what is on your plane and replace with the same size rod end.
Chart Courtesy of: www.vintagebonanza.com
![]()
![]() KFC-200.pdf
02-May-2007 11:35 8.9MB
KFC-200.pdf
02-May-2007 11:35 8.9MB
![]() KLN94
Install.pdf
02-May-2007 11:12 2.5MB
KLN94
Install.pdf
02-May-2007 11:12 2.5MB
![]() KMA-24
Install.pdf
06-May-2007 08:17 1.5MB
KMA-24
Install.pdf
06-May-2007 08:17 1.5MB
![]() KMD150
Install.pdf
02-May-2007 11:48 22.8MB
KMD150
Install.pdf
02-May-2007 11:48 22.8MB
![]() KNS-80
Install.pdf
02-May-2007 11:37 5.4MB
KNS-80
Install.pdf
02-May-2007 11:37 5.4MB
![]() M2001 Digital Voltmeter Documentation.pdf Much More than a Voltmeter! (Courtesy of Beech Lister Ron G's
Digging) 31-Aug-2008 11:37 4.0MB
M2001 Digital Voltmeter Documentation.pdf Much More than a Voltmeter! (Courtesy of Beech Lister Ron G's
Digging) 31-Aug-2008 11:37 4.0MB
![]() OTTO
T5-0055 Switch.pdf
02-May-2007 11:39 787k
See
it in use Here
OTTO
T5-0055 Switch.pdf
02-May-2007 11:39 787k
See
it in use Here
![]()
![]() Push-to-Test
Bulb.pdf
02-May-2007 16:27 1.9MB
Push-to-Test
Bulb.pdf
02-May-2007 16:27 1.9MB
![]() RAPCO
Brake Listings Catalog.pdf 19-May-2007 09:57 268K
RAPCO
Brake Listings Catalog.pdf 19-May-2007 09:57 268K
![]() Sandel
SN3308 Install.pdf
02-May-2007 11:42 973k
Sandel
SN3308 Install.pdf
02-May-2007 11:42 973k
![]() Sandel
SN3308 Manual.pdf
02-May-2007 11:39 34k
Sandel
SN3308 Manual.pdf
02-May-2007 11:39 34k
![]() Sandia
SAE5-35 Encoder Install.pdf
16-May-2007 11:39 107k
Sandia
SAE5-35 Encoder Install.pdf
16-May-2007 11:39 107k
![]() Skyforce
IIIC Manual.pdf
02-May-2007 11:42 927k
The CSOB's Moving Map with Airways!
Skyforce
IIIC Manual.pdf
02-May-2007 11:42 927k
The CSOB's Moving Map with Airways!


![]()
![]() Skyforce Brochure and
Skyforce Pilot Guide Rev. 9 2006
Skyforce Brochure and
Skyforce Pilot Guide Rev. 9 2006
![]() TCM
Compression & Borescope Procedure SB03-3
03-April-2008 07:31 1.2MB
TCM
Compression & Borescope Procedure SB03-3
03-April-2008 07:31 1.2MB
![]() TCM
Engine Break-In.pdf
03-May-2007 17:31 154k
TCM
Engine Break-In.pdf
03-May-2007 17:31 154k
![]() TCM SB94-2.pdf 15-April-2008 22:30 92K
TCM SB94-2.pdf 15-April-2008 22:30 92K
TCM has received field reports that the oil filter mounting stud on the oil filter adapter housing of some engines have become loose allowing the stud to screw into the housing and provide less than the specified stud extension. Check this SB to see if it applies to your engine.
![]() TCM
SB01-1.pdf 01-May-2008 22:30 300K
TCM
SB01-1.pdf 01-May-2008 22:30 300K
![]()
To Provide A Leak Test Procedure To Insure Integrity Of Basic Fuel Pump Fuel Seal On Fuel Pump Assemblies Manufactured Between July 1, 1998 And May 31, 2000.
IO-240, IO-360, IO-346, O-470-G7, O-470-G10, O-470-GCI, IO-470, GIO-470, IO-520, LIO-520, IO-550, GIO-550, LTSIO-360, TSIO-360, TSIO-470, TSIO-520, TSIO-550, TSIOL-550, GTSIO-520 model engines with P/N 642932-1, 2, 3 & 4 basic fuel pump manufactured between July 1, 1998, and May 31, 2000.
Any of the above listed engine models that have had a new or rebuilt engine driven fuel pump installed between July 1, 1998, and November 26, 2000. Any of the above listed engine models that have had an engine driven fuel pump overhauled using a new P/N 642932-1, 2, 3, or 4 basic fuel pump between July 1, 1998, and November 26, 2000.
![]() TCM Shower of Sparks Ignition Vibrator Service Manual 28-June 2008 10:55
2.6MB
TCM Shower of Sparks Ignition Vibrator Service Manual 28-June 2008 10:55
2.6MB
![]() Terra Tri-Nav
C Ops & Install Manual.pdf 19- Oct-2007 10:35 550k
Terra Tri-Nav
C Ops & Install Manual.pdf 19- Oct-2007 10:35 550k
![]() VA1A-Volt
Amp Meter.pdf
02-May-2007 16:19 290k
See
it in use Here
VA1A-Volt
Amp Meter.pdf
02-May-2007 16:19 290k
See
it in use Here
If you fly in IMC for much at
all, please consider some form of Voltmeter or alternator out annunciation light
for your panel. Early warning of an alternator failure or bus voltage problem
BEFORE the battery is DEAD is very helpful, IMHO. ![]()
Big airplane saving tip
follows: If you experience an alternator failure in flight (and don't know how
long you were without charging cause you don't have a voltmeter or alternator
out light), if you extend the gear with the battery PLEASE give a check of the
crank counterclockwise to confirm that you have a FULL extension and only about
1/4 turn to the mechanical stop of the transmission sector gear. When your plane
is on jacks sometime and the gear is down, give a few turns of the crank
CLOCKWISE and see how few turns it takes to break the nose gear downlock arm
from over center. You really want to make sure, via the crank, that your
weakened battery got the gear completely down.
![]() Zeftronics
R251DR 24volt Voltage Regulator.pdf
16-May-2007 11:41 387k
Zeftronics
R251DR 24volt Voltage Regulator.pdf
16-May-2007 11:41 387k
![]()
* (courtesy of www.timeanddate.com)
|
Main World Clock |
Large World Clock |
Capitals |
Custom Clock |
Weather Africa | North America | South America | Asia | Australia/Pacific | Europe |
| * means the time shown is adjusted for
daylight saving time(DST) or summer time (74 places listed). |
![]()
Michael Caban, ATP - MEL
Dallas, Texas 75019
 (214)
295-6507 Office (813) 956-5331 Mobile
(214)
295-6507 Office (813) 956-5331 Mobile
Copyright © 2009 Michael Caban, All Rights Reserved.
![]()
________________________________________________________________________________________![]()
![]()
![]()


