| This is a small collection of 'traditional' Aussie Tucker. Some used by our swaggies on their wanderings throughout the land, some invented when food was in short supply during WW1, the horrendous depression following WWI, and again during rationing in WWII Then we have our all time favourite, pavlova, a delicous meringue sweet dish, rich with fruit and fresh cream...forget your diet when you try this heavenly dish. Wherever possible, I'll endeavour to give you a little history behind each recipe...not all...but some. Over time, a lot of our history behind these dishes has been lost, and all we have now is conjecture as to their origins. |
| For many years brought about by the necessity of hardships, Australian housewives have learned to be very ingenious with cooking economical, nutritious and filling meals for their families. |
| LAMINGTONS |
| The lamingtons are pre-sold by the children and families of students. Each particpant is given a "pledge sheet". Then on a given day, a working bee is formed to make and distribute them to the buyers. They are usually sold in packs of 6. |
| LAMINGTON SLAB CHOCOLATE ICING MIXTURE INGREDIENTS INGREDIENTS 120 grams (4 1/2 ozs) Butter 30 grams (1 oz) Butter 2/3 Cup Sugar 1/2 Cup Boiling Water 2 Eggs (beaten) 3 Cups Icing Sugar 2 Cups Self Raising Flour 1/3 Cup Cocoa 1/3 Cup Milk 1/2 Teaspoon Vanilla Essence 1/2 Teaspoon Vanilla Essence 1 Teaspoon Ground Cinnamon |
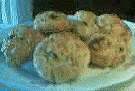
| A.N.Z.A.C. BISCUITS |
| The word Anzac stands for Australian & New Zealand Army Corps. The biscuits were popular because they require no eggs and store well. They were often shipped in food parcels by loved ones to soldiers during wartime. It's uncertain as to whether this recipe originated during the 1st or 2nd World War. They are a favourite of almost all Australians. INGREDIENTS 1 Cup Plain Flour 1 Cup Rolled Oats 3/4 Cup Desicated Coconut 3/4 Cup Brown Sugar 1/2 Teaspoon Baking Powder 120 grams (4 1/2 ozs) Butter 2 Tablespoons Golden Syrup Preheat oven to 150*C (300*F) Combine all the dry ingredients in a bowl and mix well. Melt butter, add golden syrup to butter and stir over a low heat until the syrup has melted into the butter and the mixture is well blended. Pour the mixture into the dry ingredients and stir well with wooden spoon until well blended and smooth. Roll into balls, 1 heaped teaspoon of the mixture, place on lightly greased biscuit trays and flatten slightly, allowing plenty of room for mixture to spread during cooking. Bake for 15 minutes, turn out onto cooling rack, makes approximately 3 dozen. |
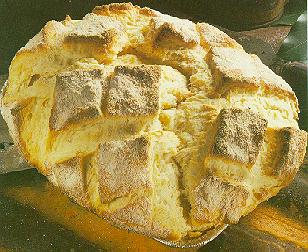
| PAN DAMPER |
| Pan damper was the staple diet of swaggies. No matilda (bedroll) was complete without a good supply of flour, salt, dripping and baking powder. They often had nothing but pan damper and billy tea, for weeks at a time, until they could get to an isolated homestead, pick up some work for a day or two, then purchase a variety to their diet. Often they simply traded their labours for supplies, before being on their way again. The original recipe for pan damper has been modernized for convenience these days. The recipe I am giving you, is the original. These days 'damper' is nothing more than a large scone, cooked in one piece.....but the original recipe is the one that should be cooked for an authentic pan damper. Cooked in a camp oven over a campfire is the authentic way to cook damper. A camp oven is a rounded heavy cast iron cook pot, with a matching lid. |
| INGREDIENTS |
| 4 Cups Plain Flour 1 1/2 Cups Water 1 Teaspoon Salt 1 Teaspoon Baking Soda 1 1/2 Tablespoons Dripping METHOD Carefully rub the dripping well into the dry ingredients...until a crumbly mix is achieved. It's important to take plenty of time to do this correctly, to ensure the dripping is evenly spread throughout the mixture. Add the water until a workable mix is achieved, do not kneed the mixture as you do with bread. Coat the mixture with extra flour so that it can be picked up and worked into a round ball. After the fire has reached 'red coal' stage, dig out a hole in the middle of the fire, deep enough to hold the pot. Place the greased and floured, pot in the hole and wait until it's hot before you add the damper mixture, 230*C (450*F) approximately. Place the mixture into the heated pot, patting it down to make it flat on top as well as bottom. Place the lid on the pot, then cover the entire pot with the hot coals previously removed. Cook for at least 30 minutes before checking, the damper should be golden brown on the top. But be aware it may be a little overdone on the bottom...if you had the campfire to the required temperature. It's important that the ground under the campfire has had a chance to heat up, before you cook damper. Damper is best served hot, with a little butter if available, or dripping spread as you would butter. Also with 'billy tea', tea made in a billy can, with the tea leaves thrown in and allowed to draw. In the bush the swaggies used to flavour their 'billy tea' by including a eucalyptus gum leaf in the billy. mmm mmmmm good! |
| Lamingtons were originally designed as a way to use up stale cake. In the early days, the coconut helped save the ladies white gloves from being soiled by the chocolate, as tea's were always taken with gloves on. The wife of the Govenor of New South Wales, Lady Lamington, is attributed to have invented these, hence the name. These days we take the convenient method of purchasing our plain slab cake from our local baker. However I have included the recipe for the slab cake. |
| They are very popular at street stalls, fetes and parties and are a must in any fund raiser. Children particularly enjoy these treats, but have to be rather quick, to beat the adults to them. Organisations such as P & C's and all charities find them ever popular and easy to sell by holding a "lamington drive". |
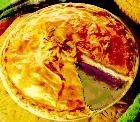
| SHEPHERD'S PIE |
| Shepherd's Pie, is a delicious way of preparing minced meat, (ground beef). I have never met an Australian who doesn't enjoy a serving of Shepherd's Pie, served with vegetables. It's easy to prepare and can be made the day before it's needed. Freezes well, and keeps for 3 months in the freezer. Simply popped in the oven and reheated, it's quick, nutritious and very tasty. When making Shepherd's Pie, it's a good idea to make two, one to eat now, one to store in the freezer for later. It can also be served alone with or on toast. |
| INGREDIENTS 1 Large Onion, finely chopped 1 1/2 Kgs (3 lbs) Minced Meat (Ground Beef) 1 Tablespoon Salt (or salt to taste) 1/2 Cup Worstershire Sauce 1/2 Cup Tomato Sauce (Ketchup) 1/2 Cup BBQ Sauce 1 Tablespoon Butter or Vegetable Oil 3 Tablespoons Corn Flour (corn starch) blended in cup cold water 4 - 5 Large Potatoes Steamed/Boiled and Mashed 1 Cup Grated Cheese 1/2 Cup Bread Crumbs (crushed corn flake crumbs are excellent) Saute onion in the oil until cooked in a non stick pan, add mince meat, salt to taste and a little water if mince needs breaking up. Cook well until mince is cooked properly. Add the sauces, and more water. The water from the boiled/steamed potatoes adds to the flavour if preferred,to make a sloppy mix. Gradually add corn flour (thickener) to make a gravy, stirring constantly to avoid lumping. Place mixture in a DEEP pie dish, spread mashed potato evenly on the top forming uneven small peaks. This does not have to be smooth on top...the rough top adds to the character of the dish. Sprinkle the cheese evenly across the top of potato peaks, then sprinkle the breadcrumbs on top of the cheese. Bake in the oven at around 180* C (350*F) until the cheese melts and is golden brown, forming a delicous golden crust. Serve with preferred vegetables. Serves up to 8 people. |
| CAMP FIRE TREATS |
| When camping, these basic but wonderfully easy campfire treats make the occasion a 'special' one. DOUGHBOYS Using the recipe for damper (or scone mix) squeeze a sausage shaped doughboy onto the end of a stick or long fork if preferred. Toast over the open coals turning constantly until golden brown. Dip into golden syrup, and enjoy! POTATOES IN THEIR JACKETS Scoop out the coals at the edge of the campfire, place medium sized unpeeled potatoes in the hole..(they can be wrapped in tinfoil if preferred). Cover with coals...cook for 30 minutes. Cut open, place a daub of butter, salt and pepper on the cooked potato..enjoy! |
 |
 |
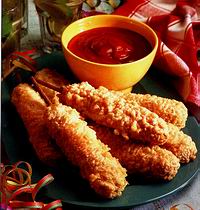
| PLUTO PUPS |
| Pluto Pups (Dagwood Dogs or Battered Saveloys) are a scrumptious snack. They are saveloy sausages, impaled on a wooden skewer, dipped in delicious thick batter and quickly deep fried until they are crisp and golden on the outside. Dipped in tomato sauce (ketchup) for extra flavour. BATTER INGREDIENTS 1 Beaten egg 1 Cup Milk 1/2 Teaspoon Salt 1 Cup Plain Flour or enough to thicken mixture to tacky stage so that it sticks to the saveloy when dipped. METHOD Add the salt and half the milk to the egg and beat well, gradually add the flour mixing well to prevent lumps forming. Batter mix must be thick and smooth. Use extra milk or flour to achieve the right texture. Have your oil for deep frying very hot. Impale each saveloy lengthwise with a skewer, leaving enough skewer to hold the pluto pup with to eat it. Quickly dip the saveloy in water, roll into flour, then back into water, then dip and coat the pluto pup with batter, drop into hot oil. When golden brown, they are done, drain well on brown paper to absorb excess oil. Dip top half of pluto pup into tomato sauce (ketchup) and serve immediately. *Note: Saveloys may be called by other names in different countries, they may be called frankfurters also. Also sausages are delicious cooked in this manner too...however they must be cooked first and allowed to cool, to remove any excess fat. |
 |
| METHOD Preheat oven to 180*C (350*F) Grease cake tray 30cm x 25cm (12"ins x 10"ins) Cream butter & sugar till fluffly Gradually add beaten eggs, mix well Add sifted flour & milk alternatively gradually, ensuring you mix gently between each addition Add vanilla, gently mix well Spread mixture evenly into tray & bake for 35 minutes. Turn out onto wire cooling rack |
| METHOD Melt butter & 1/2 boiling water Sift icing sugar, cocoa & cinnamon into a bowl Add the butter & boiling water & vanilla, mix well until smooth Add enough of the remaining boiling water to make a moist thin icing mixture. |
| Cut the slab evenly into approximately 30 pieces (or desired size) and while the coating mixture is still warm, quickly roll each square into the mixture ensuring that each side is coated. Roll into desicated coconut, place on wire rack and allow to dry. |
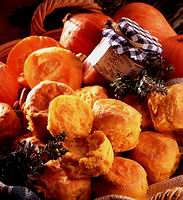
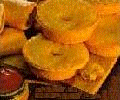
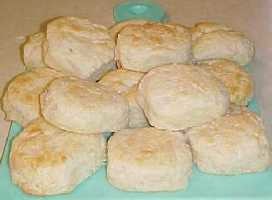
| PUMPKIN SCONES |
| Pumpkin scones have long been a favourite of Australians, but are very closely related to the state of Queensland in particular. Even as recently as the 1980s...when an opposition member distinguished this association by commenting sarcastically that Lady Florence Bjelke-Petersen who had recently been elected to the Australian Senate, was going to teach how to make pumkin scones. Lady Flo (as she is fondly referred to as) is the wife of the then Premier of Queensland, Sir Joh Bjelke-Petersen. Thus began the association of pumpkin scones to Lady Flo. She is a very down to earth lady, with strong family ties, and enjoys cooking. Along with Lady Flo, Queensland is closely associated with pumpkin scones, because the best pumpkin to use is called Queensland Blue, a very hard skinned, bluish pumpkin, with bright orange flesh. Excellent for this recipe...however butternut pumpkins can also be used just as successfully. |
| ** Note - Scones are called 'biscuits' & pumkins are called 'squash' in the USA |
| INGREDIENTS |
| 1 Cup of mashed cooked pumpkin Steam or boil pumpkin, mash with butter, salt, pepper 1 1/2 Tablespoons (2 ozs) softened butter 1 Egg (beaten) 1 Teaspoon Salt 1/4 Cup Sugar 1/4 Cup Milk 1 3/4 Cups Self Raising Flour Preheat oven to 250*C (480*F) Lightly grease & flour baking trays Cream the butter & sugar, add the beaten egg and whip to mix well Add pumpkin, salt & milk, mix well Gently fold in the sifted flour with a fork and mix well till the mixture is ready to handle Use a little extra flour to seal the outside of the mix, tip out onto a lightly floured surface and pat into shape ready for cutting, about 1"in to 1 3/4"in thickness Using sharp scone cutter, cut and place onto prepared baking trays Brush the top with milk, bake in a moderate to hot oven for 12 to 15 minutes, or until golden brown Turn out onto cooling rack. Best served warm, with butter |
 |
| **Note Icing Sugar is known as Confectioners Sugar in US |
| **Note Biscuits are known as cookies in US |
| PAVLOVA |
| Pavlova is a delicious, decadent meringue sweet dish and has been part of the Aussie 'special occasion' scene for many many years. The true origin of this dish has been lost forever, except for the fact that the dish was named after the famous and much admired Russian ballet dancer ANNA PAVLOVA (Feb 1881 - Jan 1931 aged 49) Australians pride themselves on being able to bake a good pavlova, and if you are ever invited to dine at home with an Australian family for a home cooked meal, the odds are, that you will be treated to this most wonderful of sweet dishes as desert. Pavlova is served as a complete desert, there is no need for any embelishments to this dish. It consists of a crisp, solid, cake shaped flan of meringue, topped with delicious, specialty fresh fruits, and thick sweetened fresh cream. The meringue flan may be prepared a day in advance of serving, ensuring that it is kept in a dry atmosphere. Australians today are fortunate, as a ready baked meringue flan may be purchased from local bakeries and there is no need to cook it. However, for the less fortunate, I am including the recipe for the flan. INGREDIENTS MERINGUE FLAN 4 Egg whites (room temperature) 1 Cup Castor Sugar (US granulated sugar) 1 Tablespoon white vinegar Cornflour for dusting, (US cornstarch) It's important that the utensils used, the beaters & bowl, be dry and clean, a crockery or oven proof bowl is prefered rather than plastic. Beat the egg whites with an electric beater until soft peaks form, then gradually add the castor sugar a desert spoon at a time, ensuring that each is disolved throughly before adding more. This will take around 15 - 20 minutes, finally add the vinegar, beat until very stiff and able to be shaped, do not rush this procedure. Lightly grease and dust with cornflour, a cake tin, with removable sides, or if unavailable a flat baking tray, this can be just as attractive with it's uneven side surface. Shape into a round shape, scooping out the middle to peak at the edges to form a dip for the filling in the centre. Place in a preheated oven 180*C (350*F) for 10 minutes to cook the outside crust, then decrease the heat to 95*C (200*F) and cook for 40-50 minutes. The flan must not be browned, turn the oven off and allow to cool IN the oven, for several hours till cool, preferably overnight. It's quite acceptable for the mixture to be soft in the centre, however the flan must be crispy at the edges as a good meringue should be. TOPPING 1 1/2 Cups Cream 1/4 Cup castor sugar 1/2 Teaspoon Vanilla Essence Pulp of 2 passionfruit Whip the cream, sugar and vanilla till stiff, mix in the pulp of passionfruit with a fork. Spoon onto the top of the meringue flan, decorate with fresh strawberries, freshly sliced banana & freshly sliced kiwi fruit. **Any fruit can be used in a successful combination, if the above fruit is out of season...however a true pavlova is not complete without the pulp of passionfruit, which can be frozen whilst in season and kept readily in the freezer. Serve as you would a slice of cake, one pavlova usually serves 6 people |
| CHOCOLATE CRACKLES |
| Like the lamington, chocolate crackles are synonymous with children's parties in Australia. Both adults and children alike enjoy these treats. Easy to make, no cooking involved, and they are always one of the first food items to disappear from the party table. One thing I did learn from making this part of the page, is that copha is only found in Australia, and is a derivative of the coconut. However in other countries vegetable shortening is the equivalent, being a solidified oil is important, so these delicious treats can still be made. |
| 4 Cups Rice Bubbles (US Rice Krispies) 1 1/2 Cups Sifted Icing Sugar (Confectioners Sugar) 3 Heaped Tablespoons Cocoa 1 Cup Desicated Coconut (Grated Coconut) 250 Grams Copha (US 8 ozs Vegetable Shortening) |
| Melt the copha but do not bring to boil, leave to cool but not reset again, it's best if just warm. Combine all the dry ingredients in a large bowl, stir to mix Add copha, stir well to coat the rice bubbles well with the cocoa mixture, then spoon into paper patty cake cases (cup cake cups) Place onto large tray and place in the refrigerator until set These quantities make approximately 24 Chocolate Crackles, so if more is required simply double the quantities |
 |
 |
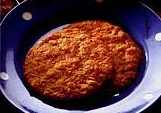
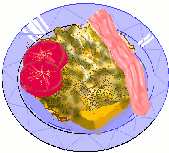
| BUBBLE 'N' SQUEAK |
| An ingenius and tasty method of using up those cooked but nutritious left over vegetables from last night's dinner. Any type of vegetable leftovers, but is much more tasty if pumpkin is include. Serve it for breakfast with toast, fresh sliced tomato and a slice of bacon if prefered or simply alone on toast. |
| INGREDIENTS |
| 1 Beaten Egg Salt & Pepper to taste 1/2 Finely Chopped Onion Quantity of left over vegies |
| Saute chopped onion in little butter in frying pan. Mash the left over vegetables, then mix with the beaten egg and seasoning. Drop into frying pan and stir to mix in the lightly cooked inion. Have the frying pan fairly hot, spread the mixture to around 1/2 inch thickness, then leave until browned, turn the mixture in portions and brown the other side. Serve as suggested above... If lots of vegetables, use 2 eggs and 1 whole chopped onion. |
| AUSSIE MEAT PIES |
| With the exception of Vegemite, Australia is most recognised for it's delicious variation of meat pies and sausage rolls. These days it is so convenient to buy puff (flaky) pastry frozen sheets, that it's virtually impossible to have a failure with these popular dishes. Unless you burn the pastry. |
| Use the mince recipe for Shepherd's Pie, thicken with corn flour (corn starch). Allow the mixture to be warm to cooled before adding to the pastry. Pies can be large family size, (dinner plate size) or small foil pie cases for single serves. Carefully line the pie case with pastry, add the mince mixture to just under the lip of the pie case to allow for expansion when hot. Then cover the top completely with a pastry lid and pinch the edges closed. Cut a small hole in the centre to allow for the steam to escape. Brush with egg white, and bake in oven 180*C (350*F) for 10 - 15 minutes or until golden brown on top. Place on cooling rack, leave in pie cases. Pies can be frozen and reheated later or eaten immediately. For Pie 'n Peas, add one tablespoon of cooked mint peas to the top of the mixture before sealing with pastry. |
| You can let your imagination run wild on ingredients and variations to pies, by adding chopped bacon, grated carrot, small potato dices, anything at all. And of course the age old favourite of all, steak and kidney pie. |
 |
| INGREDIENTS |
 |
| Of course no sporting fixture in Australia would be complete, without the standared supply of meat pie and peas, washed down with a beer. They are generally served with tomato sauce (ketchup). |
| Ausralian cooks have learned all sorts of tricks using pastry. From using up left over vegetables and meat, to rolling simple sausages in pastry, just for variety. No kitchen is complete without a supply of frozen pastry sheets in the freezer. |
| CORNFLAKE BISCUITS |
| Cornflake Biscuits are a quick way to fill that biscuit tin or cookie jar for the family, economical to make and a family favourite. |
| INGREDIENTS |
| 2 Cups Cornflakes 115 Grams (4 ozs) Butter 3/4 Cup Castor Sugar 1 Large Egg (beaten) 1 Cup Self Raising Flour 1 Tablespoon Coconut (optional) 1/2 Cup Raisins (optional) 1/2 Teaspoon Vanilla |
| Preheat the oven to 120*C (375*F) Lightly crush the cornflakes to around 1/4 size, do not crush too finely. Cream the butter and sugar and vanilla, add the beaten egg mix well. Add the flour, coconut & raisins & 1 cup of the cornflakes, mix well. Take a small rounded teaspoon of the mix and roll to make a ball...drop into the remaining cornflakes and coat it to form a prickly crust, place on a biscuit or scone tray. Allow space for spread while cooking. Bake for 10 - 15 minutes, place on cooling rack until cool. Makes approximately 24 biscuits. |

|
| You are guest number |
| to visit this page |
| Sign |
| View |
| Archives |
| That completes my original Aussie Tucker Recipes, but I know there are many more. As my page travels around Australia, if you can think of some others you would like to see added, please feel free to contact me. I will be only too happy to add them. Or if you are looking for a particular recipe favourite, contact me and I will send it directly to you. |
 |
| Wallpaper by Virtual Australia |
| Please visit my other pages |
| LEMONADE SCONES |
| Not so much an 'old' recipe this one, but an increasingly popular one with Australians. Extremely easy and quick to make, these scones are light and fluffy and delicious. |
| INGREDIENTS |
| 3 Cups Self Raising Flour 1 Cup Fresh Cream (warmed not hot) 1 Cup Lemonade, room temperature Preheat oven 260*C (500*F) Tip the warmed cream and room temperature lemonade into the sifted flour. Mix quickly |
| by hand. This makes an extremely wet mixuture, tip out onto a well floured board and quickly seal the outside with extra flour. Cut into desired shape using a sharp scone/biscuit cutter. Place on a scone tray and place in the oven. Because of the moisture in this mixture, these scones take longer than a 'normal' scone to cook. Bake for 20 minutes, or until the scones are golden brown on top Cool on a rack, best eaten when warm with butter, strawberry jam and topped with whipped thickened cream. |
 |
 |
 |
 |
 |
| (Poem) |
| (Poem) |
| (Poem) |
| (Poem) |
| (Poem) |
| (Poem) |
| Also linked with OLD AUSSIE FOOD RECIPES Click the map to view |