|
Waxing Silk. Draw off about 12" of silk from the reel and then pull it rapidly over the piece of tying wax, keeping it in place with a finger or thumb of the hand which holds the wax. The movement should be very rapid so as to cause friction between the wax and the silk. This melts the wax and coats it round the silk. A slow movement will cause the silk to stick and break it.
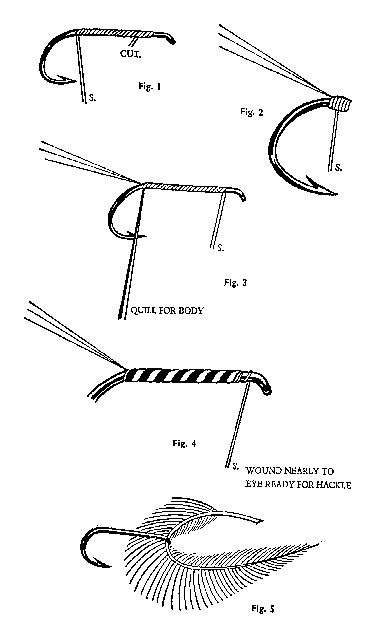
Start winding the silk about an eighth of an inch from the eye of the hook. Cut off tied in end, and wind to a point on the shank where the bend starts. Fig 1.
Tail. To make the tail take three or four fibres from a large stiff hackle, usually of the same colour as used for the shoulder hackle. The fibres should be about three quarters to 1 inch long, and are tied down on top of the shank where the initial tying of the silk ends. One turn of the silk is enough, and then put another turn of silk under the tail close to the previous one, and another turn round the shank in front of the first one. This will give a smart lift to the tail of the fly. Fig 2. The butt ends of the tail fibres can now be cut off, or left to form a "bed" on which the body material can be wound.
Body. For the body we will use a stripped quill from the eye feather of a peacock's tail Tie in the narrow end of the quill close to the tail with two turns of silk, and then wind silk back to starting point.
Fig 3. Now wrap the quill round the shank towards the eye, overlapping each turn very slightly. The bicoloured quill will then give a very good imitation of the rib markings found on many flies. When the silk foundation has been covered, put two turns of silk round the quill and cut off surplus. We should now be as Fig 4.
Hackle. For a dry fly a good stiff fibred cock hackle should be used , and for a wet fly a softer one or a hens hackle. The length of hackle to be used can be judged as follows: Bend the hackle in the middle, and the length of the fibres that will stand out should be about the same as the distance between the eye and the point of the hook. Fig 5.
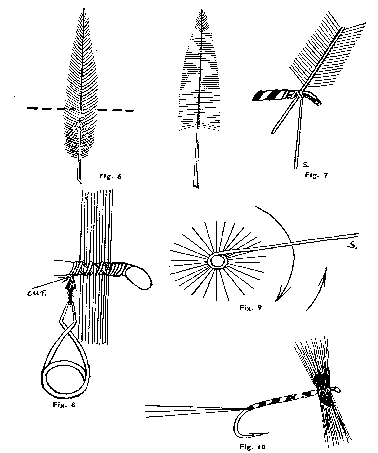
Hold the hackle by the tip and strip off the soft fibres below the dotted line. Fig 6. Draw the remaining fibres downwards so that they stand out at right angles as per the next illustration. Now tie the stripped butt under or on top of the hook shank near the eye. The way you tie in the hackle is most important, so tie it in the way you most find comfortable and convenient. I usually hold it by the stem, on top of the shank, and fix it with a firm figure of eight tying. I then bend the butt to the rear and take another couple of turns round it, which brings the silk up to the body again. Cut off surplus stem.
The outside of the hackle should face the front, and it is essential that it be tied in perfectly edgewise to the shank, otherwise the fibres will not stand out right angles when the hackle is wound.
Now take the tip of the hackle in the hackle pliers and wind three or four times clockwise to the rear. The turns should almost touch but never overlap. After the turns been made, allow the tip of the hackle to hang down in the hackle pliers, and wind a couple of turns of silk over it. Then cut off the tip. Now wind silk through hackle fibres towards the eye, binding down the hackle stem but avoiding the fibres. Make a whip finish when the silk is clear of the hackles as Fig 8. To wind the silk through the hackle without binding down any of the fibres, keep the silk taut, working it in between the fibres as you bind down the stem. Use a backwards and forwards motion, going further forward than back. Fig 9. The finished fly should look as Fig 10.
|
|