|
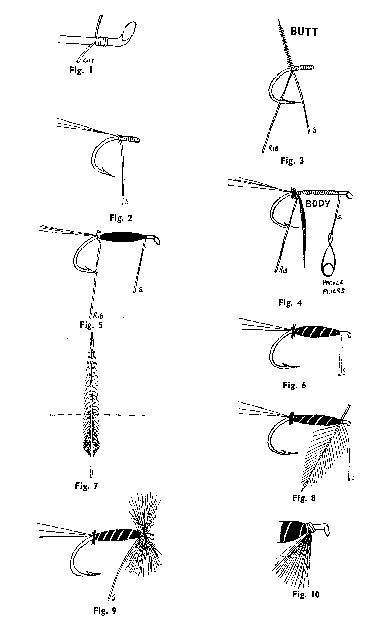
Body. Place the hook in the vice and start winding the tying silk an eighth of an inch from the eye. Fig 1. Wind the silk down the shank and with the last two turns tie in the tail. Fig 2.
Tie in the rib material as Fig 3.
( If butt or tag is required, tie this in before the rib), wind a couple of turns of silk round the loose end of the butt and cut off surplus butt material.
Tie in the body material, Fig 4, and wind silk back to the starting point. (If dubbing is used this will of course have to be wound to the eye with silk)
Wind on the body material, Fig 5.
Wind on the rib material, Fig 6, and secure with a half hitch.
Hackle. Take the hackle of the required size and strip off the soft flue at the base. Fig 7. Hold the hackle by the tip with the thumb and forefinger of the left hand, with the shiny side to the right. Place the stem diagonally on the hook and take three or four turns and a half hitch, Fig 8. Cut off the surplus stem.
Hold the tip of hackle with the pliers and wind four or five turns clockwise around the hook. If the hackle starts to wind edgewise it will go on without any trouble, bit if it does not it is better to remove it and try again. A few attempts will give the required knack of tying in the hackle at the right angle. Always be sure that the outside of the hackle is to the front.
When the hackle is wound ok, take two turns of silk over the tip, and cut off the tip as close as possible, Fig 9. With the thumb and forefinger of the left hand reach up from beneath the hook and pull all the fibres downwards. Make two or three turns of silk over the top of the hackle only, and this will hold them in place and point them to the rear, Fig 10.
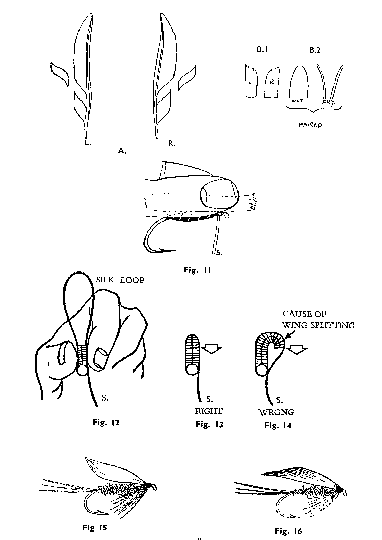
Matched Wings. Take a pair of matched wing quill feathers and cut a section from each about a quarter of an inch wide. Place the two even and concave edges together with the tips pointing inwards, then cut off the root fibres.
Grip in the thumb and fore finger of the left hand and place on top of the hook, Fig 11.
Tying in the Wings. This is the most difficult operation of all, but if done properly it can become as simple as any other. The following points should always be in mind.
Grip wings and hook tightly to ensure that the feather fibres are drawn down, Fig 13.
Don't let go until three turns of silk have been firmly drawn down.
If wing splits, take it off and start again.
Make a bed of two or three turns of silk. Never tie wings on to a bare hook shank.
Procedure. Place the wing on top of the hook so that its tip just reaches the bend. Pass the silk up between the thumb and near side of the wing and down between the finger and far side of the wing, allowing a loop to form above, Fig 12. Draw the silk down gently but firmly so that all fibres come down one on top of another, Fig 13 and 14. Repeat two or three times before releasing the wings. Cut off the surplus roots and give one or two turns of silk to make a tapered head. Finish off with a whip finish and varnished head, Fig 15. The sweep of the wings is controlled by whichever is placed on the hook, Fig 15 and 16.
|
|