
1. Introduction
2. The basics of recoloring
3. A more complex recolor
4. The basics of splicing
6. Transparency using Irfan view
7. Trainer sprites
8. Tips/Tricks
9. Downloads
10. Animated Sprites
11. Comics
12. Contact/Coming soon
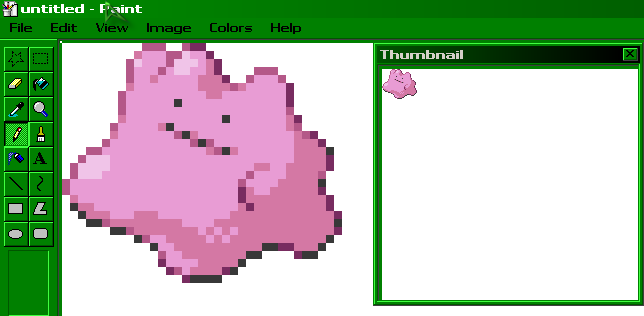
Let's start off with a recolor of ditto. First, open up MS Paint. Now, go to Pokemon Elite 2000's Ruby/Sapphire sprites and find ditto (I think it's on Page 2). Right click on ditto and choose copy and on Paint go to edit and choose paste (or CTRL+C to copy and CTRL+V to paste)
You should have this
Now, click on the magnifying glass (zoom) and choose 8X. Then, on the top toolbar click View>Zoom>Show thumbnail. That should supply you with a thumb of what your picture looks at normal size.
Now you should have this on your screen
Now you need to get familiar with the pixels and their colors and names.
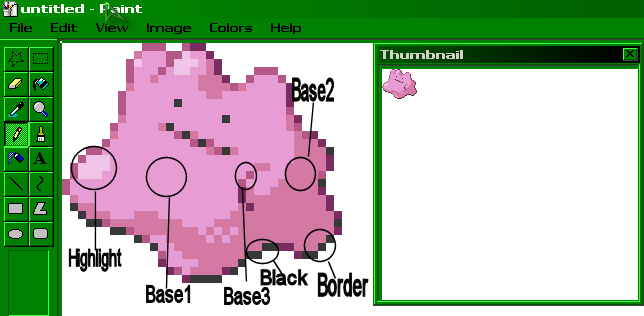
Highlight-The lightest pixels.
Bases- The base colors of the image. Goes from lightest to darkest. There usually only 3 or 4.
Border- The darkest of the colors (not including black). Only used for the borders.
Black-Pretty much every sprite uses the color black in the borders. The color black dose not have to be changed unless there is a special reason.
Now, using the dropper tool (between the pencil and eraser), suck up each color (excluding black) and put them in a row under the ditto (as shown below).

We will call the row of pixels the 'old guide'.
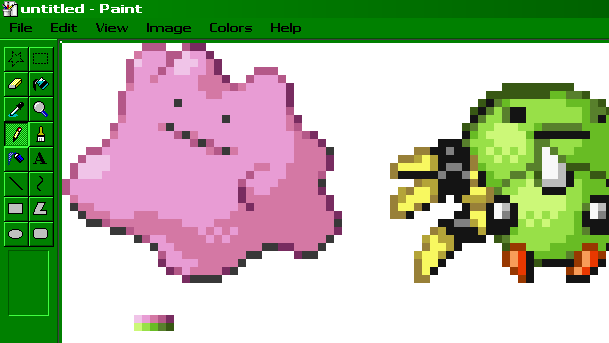
Now, We will pick our new colors (I'm choosing green). There are two ways to do this, 1) try picking them yourself or, 2) use another sprite as your guide. I am going to do method #2 for this (#1 will be explained later on).
Lets go back to Pokemon Elite 2000's Ruby/Sapphire sprites and find a pokemon sprite with the color green. I chose spinarak and already taken all of the pixels off it and make a new row under the 'old guide'. We will call this one the 'new guide'.
This is where the fun starts
Using the dropper tool, right click on the first color of the new guide. Now, using the dropper tool again, left click on the color you want to replace.(the color under the color you already selected)
If you look at the bottom left (next to where all the colors are.) should be a box with 2 more boxes in it. The first box should be the color from the old guide and the second box should be the new one.
Using the eraser and holding the Ctrl and right click, swipe the sprite until all of the old color you selected has changed to the new one. Easy huh?
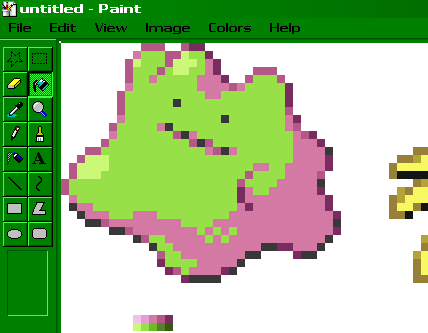
Do this with all the other colors until the sprite is totally done

Now, delete the spinarak and the guides. Then, Resize the picture so that it's only as big as the sprite (get rid of all the extra white)

After your sprite is finished save it (again if you have already saved it) and you now have your sprite. Remember to save your sprite as a .bmp instead of a .jpg . To use your sprite on the internet I suggest you register for Photobucket.
this is our final product-![]()
This concludes the basic recolor tutorial. Now that you know the basics lets move onto the more advanced recoloring.