window seat
project:
window seat
room: Jane
and Katie's bedroom
date:
May 6,
2006
labor: Yimmy – 2 hours
Missy –
12 hours
materials & budget:
|
Place Purchased |
Item |
Quantity |
Price |
Total Cost |
|
Fabricana |
Fabric (meters) |
2.5 |
20.98 |
52.45 |
|
|
Fabric for piping |
1 |
11.98 |
11.98 |
|
|
Cording (meters) |
9 |
0.19 |
1.71 |
|
|
Batting (7 oz) |
3.5 |
3.98 |
13.98 |
|
|
Zipper (60") |
1 |
2.50 |
2.50 |
|
|
Sewing Machine needles |
1 |
3.49 |
3.49 |
|
|
Pins |
1 |
2.99 |
2.99 |
|
|
|
|
|
|
|
Jimmy's Garage |
6" foam |
|
|
|
|
|
5/8"
Plywood |
|
|
|
|
|
Staple Gun |
|
|
|
|
|
|
|
Subtotal |
89.10 |
|
|
|
|
Taxes |
12.47 |
|
|
|
|
TOTAL |
101.57 |
comments:
This project completed Jane and Katie's
room. I'm so pleased with the results!
-
I decided the dimensions of the
window seat based on a couple of factors: I wanted to be able
to store a couple of Rubbermaid containers under it, and I wanted
the possibility of using it for a little bed for visiting kids.
I marked out different sizes with masking tape on the floor and then
my dad and I figured out the final size which was 30" deep and 51"
across. My dad made the height so that it would fit under the
window sill.
-
My dad made the
base at home in his garage and then brought the pieces down and
assembled it here. It's basically just a plywood platform.
-
We cut the foam to
fit the dimensions of the platform. We used a deboning knife
from my kitchen knife set and it worked perfectly.
-
I then wrapped the
batting around the foam, trimmed off the excess and then just
quickly stitched the batting together so it wouldn't slip off the
foam. The batting and the foam stick to each other quite well,
but I didn't want it to bunch up too much when I slipped the cover
on it.
-
Sewing the cover
for the cushion was actually easier than I thought it would be.
The thing that took me the longest was covering the cording for the
piping. I was looking for some precovered piping, but couldn't
find what I wanted, so I decided to do it myself. I found
excellent instructions for continuous bias cording on this website:
www.ca.uky.edu/fcs/FACTSHTS/HF-LRA.079.PDF
-
I guess the tricky part was measuring
the strips (I tend to be really anal about measuring and making
everything lines up perfectly). Once I had the strips measured
and cut, the actual covering of the cording was straight forward.
I used the zipper foot on the sewing machine and just stitched a
straight line. I bought a stiffer cording and I think that
helped with feeding it through the machine.
-
I then cut the pieces for the cover.
I used a 1/2 inch seam allowance on all seams.
-
I stitched the sides together first
and tested it for fit.
-
I then started the painful and time
consuming job of pinning the top of the cushion to the sides of the
cover with the piping in between them. It was slow going -
just lining everything up right and pinning it - but not hard.
There was nothing tricky about it. The only time it got a bit
tricky was when I started pinning the bottom on - the sheer bulk of
material that I was working with made it difficult to manoeuvre at
times.
-
Again, I used the zipper foot to sew
the top and bottom to the sides (because of the piping). It
went quite quickly and there were no real tricky bits at all.
I was nervous about making the corners neat, but, I just clipped the
extra material out of the corners as I pinned, and they were fine.
notes for future reference:
-
Before you sew the
final seam on the cover, UNZIP the zipper. I didn't even
consider that, so when I finished sewing, I wasn't able to turn
it right side out. I had to take apart one of the side
seams, open the zipper, and then restitch.
-
I bought about
twice as much fabric for the cording than I needed. I
wasn't exactly sure how to estimate how much I needed, but I
only used half a meter of fabric to cover 9 meters of cording.
final verdict:
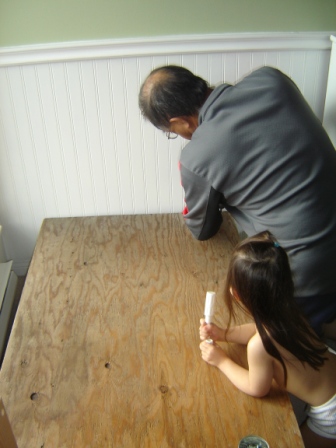
Jane helping my dad assemble the platform
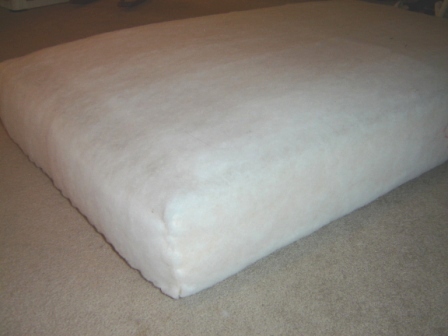
The batting wrapped around the cushion and sewn closed
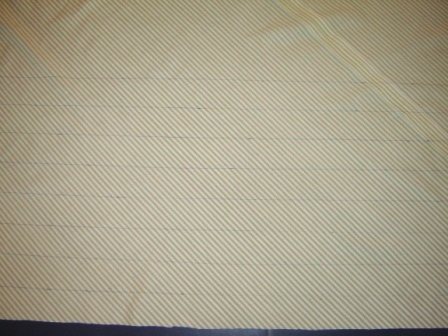
Measuring the fabric for the cording
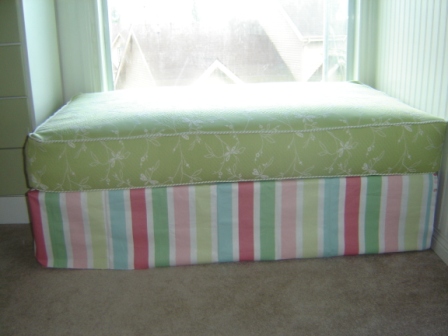
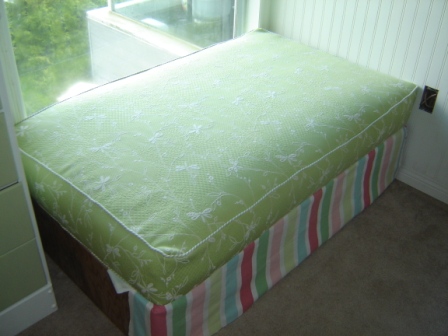
The final product
Another view - my dad forgot the piece of bead board for
the side...he'll bring it down next time, and I'll sew the skirt then :)