|
roman blind
project:
roman
blinds
room:
jane
and katie's room
date:
april 16-17, 2005
labor:
approx 12 hours plus 8 hours of research on the internet
budget:
|
place purchased
|
item |
quantity |
price |
total cost |
|
Fabricana |
Fabric (meters) |
2.5 |
12.98 |
32.45 |
| |
Blackout Material (meters) |
2.2 |
7.98 |
17.56 |
| |
Cording (by the foot) |
40 |
0.10 |
4.00 |
| |
Rings |
20 |
0.19 |
3.80 |
| |
Thread |
1 |
3.89 |
3.89 |
| |
Sewing Machine Needles |
1 |
4.99 |
4.99 |
| |
Velcro (meters) |
1.3 |
7.98 |
10.37 |
| |
Cleat |
1 |
2.98 |
2.98 |
|
Home Depot |
1" x 3" Board |
1 |
6.98 |
6.98 |
| |
Doweling |
5 |
0.78 |
3.90 |
| |
Weight Rod |
1 |
1.47 |
1.47 |
|
Borrowed |
Drill |
|
|
0.00 |
| |
Screws |
|
|
0.00 |
| |
Sewing Machine |
|
|
0.00 |
| |
|
|
|
|
| |
|
|
Subtotal |
92.39 |
| |
|
|
Taxes |
12.93 |
| |
|
|
TOTAL |
105.32 |
comments:
-
NOT A PROJECT
FOR INEXPERIENCED SEWERS (like me)!!!!
-
It took me
about 8 hours of looking at different patterns and ways of constructing the
blind on the internet. These are the sites that I read in detail and based
my plan on:
http://www.hutchal.clara.net/curtains/roman.htm
http://www.terrelldesigns.com/plain_shades.htm
-
The Terrell
Designs website had the most explicit information and you can also order the
supplies from there if you don't have easy access to them. It goes into
great detail about how to design your blind, do all the measurements, and
make the mounting fixture. The only part I didn't like was gluing the
doweling to the shade. I decided to sew mine in instead.
-
After reading
everything and deciding that I could do a better job myself, I decided to
make my own pattern and develop my own sewing techniques.
-
I made a very
detailed drawing of the shade with all the measurements, took that to the
fabric store and got everything I needed with the assistance of a VERY
helpful store clerk.
-
I started by
cutting the outside material with a 1 inch seam allowance. I was doing an
outside mount, so the blind was to extend 1 inch on either side of the
window frame and was 4 inches taller than the window frame.
-
Then, I
carefully measured the blackout material so that I could sew the doweling
pockets directly into the blackout material before I attached it to the
outer material. I wanted to skip the step of sewing the front material and
the blackout material together and then sewing separate doweling pockets and
attaching them later, and I also didn't want to have stitching showing on
the front side of the blind. This proved to be a fatal error.
-
I then sewed
one side and the bottom of the blind together. I inserted the doweling into
the pockets and then sewed the other side shut. I decided to sew the
doweling right into the blind because in my research I saw some blinds that
were constructed with the doweling in unclosed pockets, and I thought it was
ugly to expose them.
-
Then I dropped
the weight rod down to the bottom of the blind, and sewed up the top,
attaching 2" Velcro along the entire width.
-
I hand sewed
three columns of rings to each of the dowels.
-
The mounting
system was easy to construct and install. I really have no experience in
this department either, but it was straight forward. I simply stuck the
Velcro onto the board, screwed the eye screws to the underside so that they
lined up with the rings sewn on the back of the blind and then screwed the
board into the studs about 4 inches above the window frame.
-
I attached the
cleat about a meter from the top of the window.
-
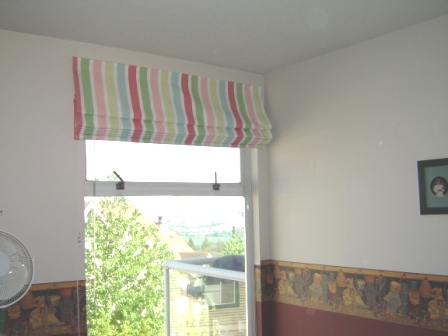
Then I hung
the blind using the Velcro. As I tested the raising the blind for the first
time, it became very apparent why you need to sew the front material and the
lining together at every dowel. The blind raised beautifully along the
edges, but sagged and drooped in the center. I ended up taking the blind
down and sewing the two materials together, which was no easy feat, seeing
as I had sewn the doweling into the blind and now had to sew with them
inside. It worked, but what a pain
notes for future reference:
-
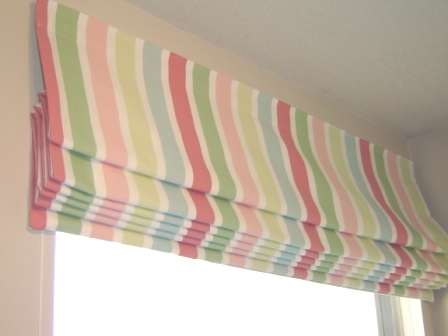
The fabric I chose was pretty stiff and the addition of the
blackout lining, made for a really stiff blind. I really was making the blind
for light control, so I'm happy with the end result, but it was difficult to
handle and sew, and it doesn't fold well when raised. I end up straightening it
all time as I raise it. Apparently, the blind will improve in this regard as it
is "trained". We'll see.
-
I didn't realize that light would come so easily through
EVERY single hole I made in the blackout material. When it is light outside,
you can see every stitch hole as well as anywhere that I pinned. I’m trying to
think of a way to reduce this - maybe I'll glue strips of left over blackout
material over the stitch lines.
-
I
need to take some sewing lessons, or fool around with the machine a little
before my next project. I could never get the tension quite right and the
stitching looks terrible.
-
I
saw two ways of mounting a blind - one with Velcro and the other with staples or
upholstery tacks. I would definitely recommend the Velcro. It is
nice to be able to easily adjust it at any time without a hassle, and it makes
it easier to remove for cleaning, recording etc.
final verdict:
-
The finished product was really nice. Looking back, it was
worth the stressful weekend (maybe Ian wouldn't agree!). I would try in
again, but use my new found respect for taking other people's advice on how
to construct a blind.
-
I now need to redo their entire room to match the blind. I'm
thinking bead board wainscoting painted in a nice cream and a fresh pretty
green on top…then new bedding and maybe a little window seat/reading alcove.
|