|
|
|
|
upholstered
headboard
project:
Upholstered
Headboard
room: Ian and Missy’s
Bedroom
date:
May 21-22,
2005
labor: Yimmy – 2 hours
Missy – 3 hours (4 hours if you include an aborted trip to the fabric
store due to the screaming tantrum of a certain two year old)
materials & budget:
|
Place Purchased |
Item |
Quantity |
Price |
Total Cost |
|
Fabricana |
Fabric (meters) |
1.9 |
11.49 |
21.83 |
|
Rona |
Glue |
1 |
3.38 |
3.38 |
|
|
Bolts |
4 |
0.16 |
0.64 |
|
|
Nuts |
4 |
0.07 |
0.28 |
|
|
Washers |
4 |
0.04 |
0.16 |
|
The Foam Shop |
2" Foam (27" x 62") |
1 |
32.49 |
32.49 |
|
|
Batting (meters) |
2 |
7.98 |
15.96 |
|
Jimmy's Garage |
1x4 Boards |
2 |
|
|
|
|
OSB Plywood |
1 |
|
|
|
|
Staple Gun |
1 |
|
|
|
|
|
|
Subtotal |
74.74 |
|
|
|
|
Taxes |
10.46 |
|
|
|
|
TOTAL |
85.20 |
comments:
This project was pretty low stress and easy – especially because I
had my dad do the hard part for me! I would recommend it to the
inexperienced DIYer .
-
I already had a good idea of what I wanted before I started, so I
didn’t do any research. I just emailed my dad a picture that I
found on the internet and let him work out the design. I decided on
a rectangular shape because I’ve never upholstered anything before
and thought I should keep it as simple as possible.
-
I figured out the height that I wanted by making a newspaper
template and taping it to the wall at varying heights. I took
digital pictures of all the heights, emailed them to my dad and we
agreed that the best height would be 48” from the floor. Luckily my
mom has the same bed frame as me, so he was able to do all the
measurements and calculating for the support system at their house
(they live 5 hours away from us).
-
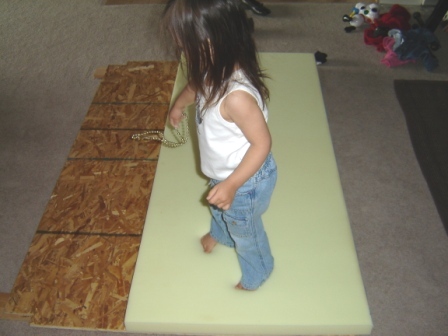
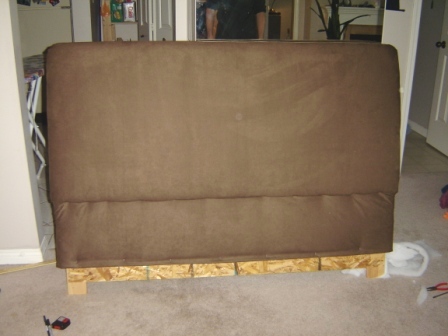
My dad precut the plywood and brought it down. It only needed a
minor adjustment for our bed. He then attached the 1x4 to the back
of the plywood (for added support) and bolted it to the bed frame
(it’s really good and sturdy).
-
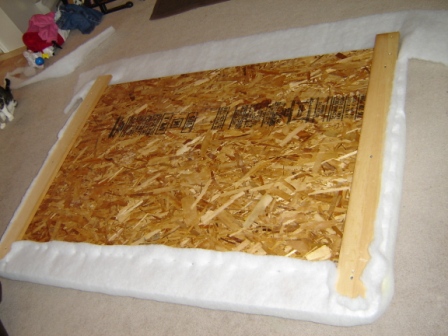
I took the headboard off the bed, laid it on the floor and glued the
foam to the OSB. I let it dry for about ½ an hour.
-
I then smoothed the batting over the foam and attached it securely
with a staple gun all the way around the back.
-
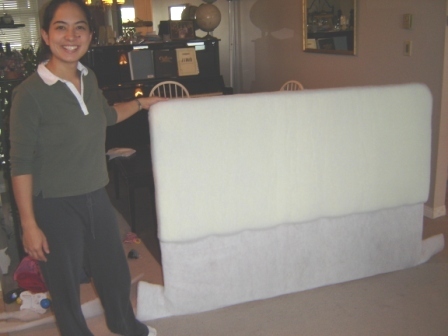
Then I did the same with the fabric. It’s best to have two people
for this step. I smoothed and stretched and held the fabric while
Ian stapled. You could probably do it alone, but it would be hard
to get the tension even.
-
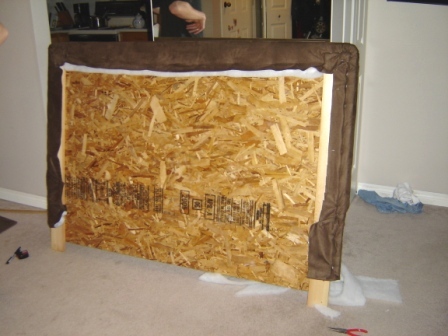
The corners were the only tricky thing – I tried a couple of
different ways, but took them out because they looked weird. I just
kept fooling around with them until they were somewhat smooth. I
really enjoyed working with the staple gun (as opposed to sewing)
because it was so easy to fasten (and unfasten) things.
-
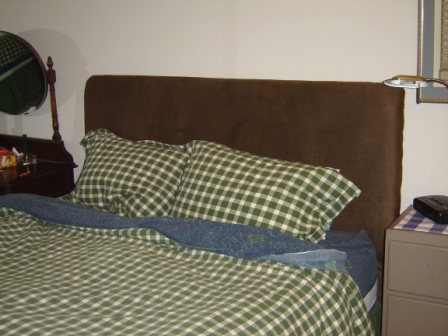
Then I re-bolted it to the bed and voila – a beautiful new
headboard!
notes for future reference:
-
I
got my dad to cut the headboard 2” wider than my mattress. I thought it
might be a little wide, but it looks really good. My blankets stick out
kind of far from my bed, so it seems to be a good size
-
My
dad has warned me about the OSB plywood. YOU CAN’T GET IT WET!! It
totally soaks up the water, splits and falls apart. I don’t think this
will be an issue with my headboard, but if you think you might get yours
wet (not just damp, but really wet), go for real plywood instead.
-
I
like the fabric that I used. It’s rich and warm. BUT, I can see that I
might get tired of it after a while. No problem. It would be really
straight forward to sew a slip cover for it. I think I will make a
summer slip cover with a light, pretty fabric and use the suede for the
winter. I’m excited about the possibilities.
final verdict:
-
I’m basically happy with the finished product, although I think it
needs some detail. I’m thinking about tufting it with buttons or
adding some upholstery tacks or cording…
-
I would like to paint our room and get new bedding. The look I’m
going for is cozy, comfortable and inviting. I like the plaid
bedding, but we’ve had it for several years, and I think we need a
change. I’m thinking of sewing a duvet cover and window
treatments. Oh boy, my to-do list is getting longer and longer by
the minute!
|
|
contact me |
 |
|
|