These instructions are great also for general tag stamping! Well, the time for Stamping Down Under (SDU) is nearly here. If you have not made your trading pins yet and wish to make a simple but effective pin. Follow on. For SDU it is recommended that you make lots of trading pins to share with other stampers on the day/s you attend. More than likely they will want to swap with you and you�ll end up with a large collection of wonder- ful ideas that maybe you can adapt to a card when you go back home. Because you are making so many, you�ll want a design that is quick and distinctive too. The following lesson is intended as a guideline. With the exception of the 8 cards used for the scanning purposes, I stamped all 100 tags in 2 hours. All that needs to be done now is to cut the lengths of cord and to loop them on and attach a mini pin to each hole. That's a job I�ll do whilst I am waiting for one the kids at sports practice. *See hints below. There's not much time to waste so let's get going: |
| SDU Tags Pins |
| METHOD Supplies needed Eraser 100 tags (available from office supplies) Stipple brush Cranberry Adirondack Pad Butterscotch Adirondack Pad Autumn Leaves Kaliedacolor Pad Letters from an alphabet set 6 metres of wool/cord Stamp: Ellen from Imprint Rubber Step 1 Whilst tags are still joined together, use a stipple brush and ink from the Cranberry pad to lightly stipple around all the cut edges. See Fig 1 above Step 2 Stamp SDU on one edge of tag near hole in Butterscotch. See Fig 2 Step 3a Use Cranberry and the edge of cheap eraser for block stamping opposite the hole from the SDU. See Fig 2 Step 3b Use the green section of the Kaleidacolor and the longer edge of cheap eraser for block stamping over SDU. Step 4 Gently separate the tags. (if your next image is small or you don�t mind a bit of overlapping, then leave tags together for speed for the next bit of stamping) Step 5 Since the tags are basically too small for using a postioner for placement of stamp, I modified by lining up the stamp on the corner of a larger scrap paper and stamping there. Then I placed the tag on top of where I wanted the image of the stamp to be on my tag. Fig 4 shows the paper with the placed tag over the stamped image. (# See hints at end of notes) Step 6 Next I stamped "Ellen' over the tag with the Autumn Leaves Kaliedacolor ink pad. See Fig 4 for clarity. Step 7 Scrape all edges of tag across Cranberry pad for a finished edge. Step 8 Label the back of the tag with your name and address or email. A personal stamp or a computer printout will expedite this process. Step 9 Cut 200 lengths of cord or wool to approx. 30cm. Tie/loop 2 threads through each hole and insert a mini pin for attaching to clothing. Fabulous, wonderbar, you have finished. |
 |
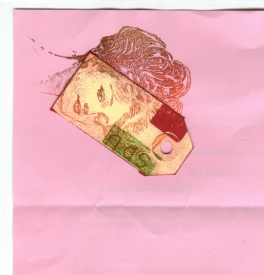
| Finished Tag with wooly fibre |
 |
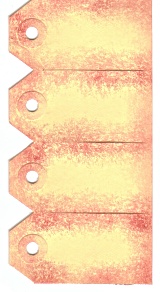 |
| Fig 1 |
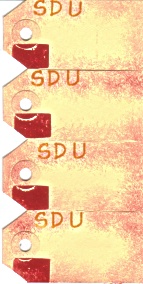 |
| Fig 2 |
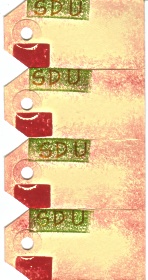 |
| Fig 3 |
|
| The finished tag |
| Hints * Most of my friends & clients know that I carry 2 lunch boxes of supplies in my car for such times. One box stores pre-stamped images and a pair of small sharp scissors that need cutting out. The other box carries the cut images that need colouring, together with a small leak proof jar and a couple of paint brushes and markers. # Mark out the outline of the tag on the scrap paper so that you can know where to place the card next time. I also put a small dab of Repositioanl Glue on the scrap paper under where the tag is to go. This will hold the tag in place and help prevent it from slipping out when stamping. |
| Like a sample ? (Limited stock) Then send a SAE to The Stamping Ground PO Box 385 Unanderra, NSW 2526 (Australia). |
| Cards after inking |
| Michelle's Stamping Ground |
| Home Gallery Basic Stamping Instruction Other Crafts Christmas 2000 Projects Layering Tags Shaker Cards Tea Bag Folding Twisted Spine Cards Coluzzle Acetate Reinker |
| Fast Links Home Latest Madness Latest Project Next Project |