 |
| Shaker cards are very popular with people of all ages. You will need to choose your base card colour and the stamps and "bits and pieces" that you want to use to construct the card. There are many things that you can use as the filler for the shaker in your cards � 100's & 1000's, glitter, beads, sand, coffee beans, Mini lollies, buttons etc. You may want to use your stamped images to construct some sort of frame shape that you can cut the centre out of. Border stamps are good for this, or use small stamps repeated to created a frame. One of my samples is just a rectangle cut frame � no stamp and a stamped cut out on top and a stamped backing card. Use your imagination. I�d love to see scans of any cards you have made. Just email tehm to me with a brief note introducing yourself. |
| Shaker Cards |
|
| Materials; A5 card A6 card x 2 Frame Stamp Craft knife Cutting board Double sided sticky tape (DST) Mounting tape Markers Glitter, sequins etc for shaker |
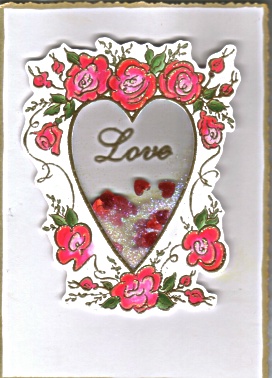
| Instructions for shaker on top of card. 1. Select a card for the frame. Stamp, emboss and/or decorate your top "frame" piece of card if desired. 2. Cut the middle out of it to create your frame with a craft knife. 3. Stamp and/or decorate your base card if desired. Emboss/colour as desired. 4. Cut a piece of acetate/window plastic to cover the whole of your frame less 2 mm all round, and stick it down with double-sided tape (DST) to the reverse side of the frame. 5. Use double sided mounting tape to surround your window on the reverse of the frame ensuring that there are absolutely no gaps. Cut strips of mounting tape in half to make narrow strips if necessary. Ensure that it can't be seen from the front of the frame. Stick it down onto the back of the acetate layer. Do not remove the exposed backing paper as this stage. 6. Take the last piece of A5 card. Cut it down to fit behind the frame with out being seen from the front except thru the window. (In my example I pre-stamped & embossed this middle layer with the word �Love�) 7. Now back to the frame �Remove the backing tape and carefully drop your "shaker" pieces into this area, ensuring none of it lands on the mounting tape. I suggest that for starters, you start by less than half filling the window space. (in my example I added glitter and red heart confetti). 8. Now stick the backing card onto your mounting tape. Join the shaker section to the prepared base card with DST (double-sided tape). Viola ! You have a beautiful shaker card for friend or family. Check out the other samples |
| Instructions are for this card |
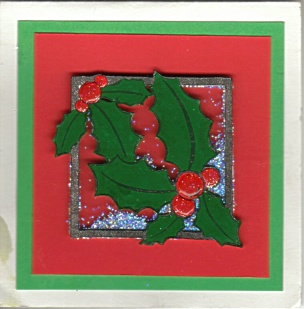
| The thin border of the stamp made this one more difficult. I ended up edging the tape in same glitter as filler and making it part of the feature. The berries were given a coat of Dimensional Magic. |
 |
 |
 |
| Hints: * Overhead transparency sheets work well for the plastic, even the plastic from hubby�s shirt box tops work well. * If you are trying to surround a curved area with double sided mounting tape, you just need to cut straight strips of the tape and clip them down one edge so that it can be curved (as you would clip curved seams to ease in dressmaking!) * If using a bulky filler, use either a double layer of mounting tape or my preference is to cut a frame out of �Foam Core board� using DST to adhere foam core to acetate window and to card. * If working on dark cards, use permanent marker to darken the edges of the Mounting tape to decrease visibility. Or make a feature of it by running super tape around edges and rolling in glitter, seed beads etc. |
| This love heart has been adhered to a green card before cutting the 'hole' thru' both layers. Also the backing card is a complimentary coloured card |
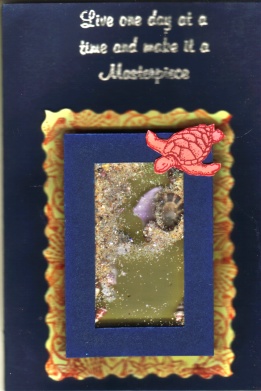
| I cut a hollow rectangle for my frame. mounted it onto a pre-stamped yellow backing. A stamped turtle was mounted over a corner of the frame. (Sorry it is out of focus) |
| Like a sample ? Then send $5 & a SAE to The Stamping Ground PO Box 385 Unanderra, NSW 2526 (Australia). |
| Michelle's Stamping Ground |
| Fast Links Home Latest Madness Latest Project |