 |
|
|
|
|
|
|
|
|
|
|
|
|
|
|
|
|
|
|
|
|
|
|
|
|
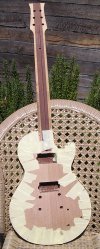
Page 8: gluing the neck to the body. keith gregg's guitar-building site |
|
|
|
Before the neck and body could be glued together, it was necessary to route a groove around the top, for the binding that will be installed later. Because the binding has to run under the fretboard in the cutaway region, the groove is most conveniently cut before the neck is attached. This was done with the home-made attachment for a dremel-type tool. With a bit of modification, the tool worked well and gave an even groove. The perspective is a little deceptive in the picture, but the groove is precisely the height and depth of the binding. |
|
|
|
 |
|
|
|
 |
|
|
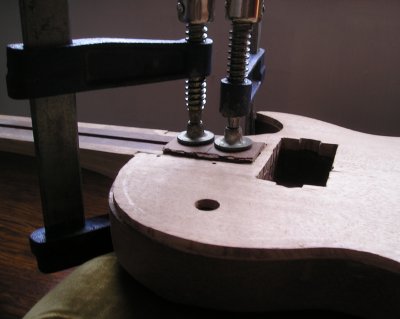
FINALLY, I could glue the neck into its mortice, ensuring that the surfaces were all covered completely with glue, to ensure maximum adhesion. Most of the glue squeezed out when the joint was clamped, because there is very little space in the join. (Note to self: next time, put a glue-catching tray under the joint, it will save cleaning glue off the bench, the floor and the toolbox!)
Before staining the Tasmanian oak top (finally decided this is how I'd finish it) it will be necessary to check the vertical alignment of the fretboard and the bridge. Rough measurements suggested that I might need to sand the bridge mounting down a millimetre or two, to give the correct string line. |
|
|
|
|
|
|
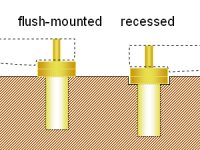
After thinking about the string-line, I decided that lowering the bridge position by sanding down the carved top is not practical.... because the body is already very thin, compared to a regular Les Paul. So a better alternative is to recess the bridge-mounting posts. The bridge normally sits about 16.5 mm above the body of the guitar. That can be reduced by about 3 mm by recessing the post rims into the guitar top.
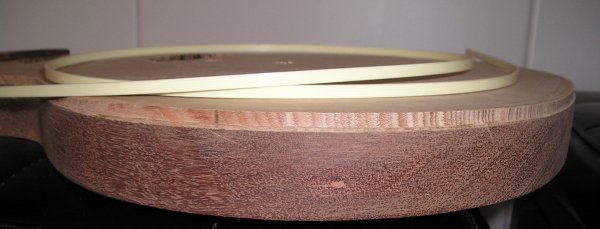
Before putting the final touches to the guitar body, I wanted to shape the binding, ready for gluing, so that it can be installed right after the top is stained. This was done by taping the binding in place, after heating it to soften it and allow it to follow the curves of the body. |
|
 |
|
|
|
|
|
 |
|
|
To get the binding tight against the binding groove, I found it easiest to attach the tape to the back of the guitar, heat the binding (very gently) and bend it into place, then bring the tape over it and fasten it to the top.
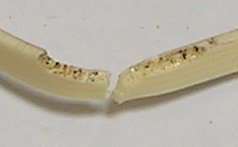
Mistake # 9: A heat-gun is very effective for heating the binding material to make it flexible,, but hesitate a moment too long and the binding will burn away to nothing. I learned just how much heat application is too much, the hard way. I would recommend all novice guitar makers to take a very small piece of binding and, wearing face and eye protection, test just how much heating is too much. For some reason, binding material is still made of nitrocellulose. In case any readers don't know, this is highly inflammable, and can be explosive, if ignited ! |
|
|
|
|
|
|
The picture on the left shows what happened when I first tried to bend the binding around the sharp curve at the end of the cutaway. ugly!
At this stage I was not gluing the binding on,, but simply setting it into the correct shape, so that gluing will be a simple process and won't require much heating. Accidents are easy to fix when shaping, but if part of the binding is already glued, it means either ungluing it, or doing a cut and splice job while it is on the guitar. |
|
|
|
 |
|
|
 |
|
|
|
|
|
|
|
|
|
|
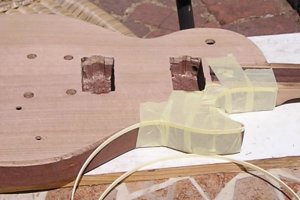
Next step: recessing bridge-post holes |
|
|
|
Developments with hardware.
Index Page: 1, 2, 3, 4, 5, 6, 7. 9. |
|