 |
|
|
|
|
|
|
|
|
|
|
|
|
|
|
|
|
|
|
|
|
|
|
|
fretboards, necks, etc... keith gregg - first time guitar builder |
|
|
|
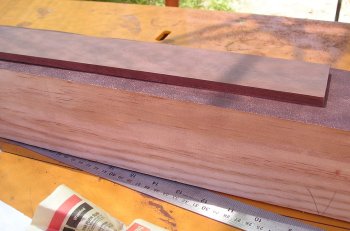
Making the final shape of the neck was going to be a slow, hesitant process, because I wasn't really sure what shape it needed to be. So while thinking about this I started the process of making the fretboard. This was to be a piece of jarrah, about 1/4" thick.. For this I wanted less aged wood, because the really old stuff was very dry and felt less resiliant than younger wood, so I had to go through the store, holding up pieces of wood and tapping them to hear the tone. I discovered that it was possible to find new jarrah that had a good tone, but only about 3 pieces out of the 15 or so that I tested gave a satisfying tone. It may be just a coincidence, |
|
|
|
but the better tone appeared to be found in the darker pieces of wood.
I sliced a piece from a 3/4 inch board, cutting it thicker than the final 1/4" thickness. This was very necessary, because I had some trouble getting it truly flat. Finally, I used my 4" square pine slab, which I had checked for flatness, and fastened a strip of 60 grit sandpaper to it with double sided tape, then held the ends down with masking tape. This was used as a base on which to sand the fretboard. It sounds like an easy way to get the board flat, but in fact I found it really easy to press too hard on one side, causing the fretboard to become uneven. Finally, with careful application of pressure, I got the board down to 1/4" thickness and flat, according to my metal ruler. |
|
|
|
 |
|
|
|
|
|
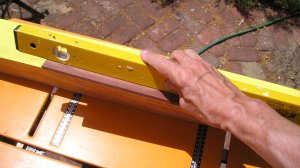
Mistake #6: A little later, I discovered that the warmth generated by sanding the fretboard caused it to bend a little. This bend disappeared when it cooled off and the surface wasn't quite flat after all. Presumably the side being sanded expanded with the warmth, but the other side didn't, and this acted almost like the action of a truss-rod. This was solved by using double-sided tape to fix the fretboard to the flat base of a builders level. Then the board was sanded again with 120 grit,, using the pine block as a flat base and the level as a handle for the board. This really did get it flat because it was evenly squeezed between the hard edge of the level, and the base. On measuring the board with a vernier caliper, it measured exactly 6.3 mm (1/4 inch) along its whole length.. The relief at finding that I didn't have to start from the beginning again, or settle for a slightly thinner fretboard, was immense. |
|
|
|
 |
|
|
|
|
|
|
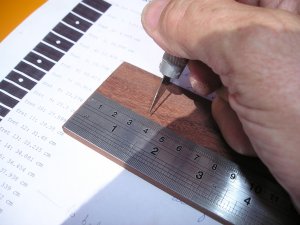
With guidance from various builders sites at project guitar.com I had decided to cut the slots for the frets before shaping or radiusing the fretboard, to take advantage of the square sides when measuring and marking the fret positions (is "radiusing" a real word?). The measurements for fret positions were calculated using an online fret-calculator, which gives the position of the frets to a frighteningly precise measurement. The position of the nut was marked first, then the positions of the frets marked using a craft knife, which gives a very fine line and a starting groove for the sawing of the slots. The final shape for the fretboard was calculated using the shape calculator that was also available online, courtesy of Martin Koch. |
|
|
|
 |
|
|
|
|
|
 |
|
|
|
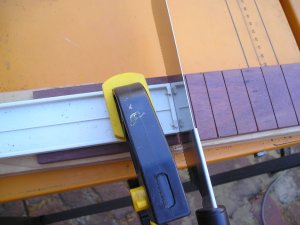
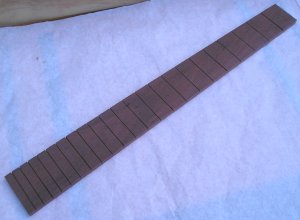
The fret-slots were cut with the razor-saw, making a slot that held the frets when the board was turned over, but loose enough for them to be easily removed.
Mistake #7: I used a simple jig that allowed the slot to be cut precisely, but forgot to practice on a piece of waste wood before tackling the real thing (BIG MISTAKE). The first fret was partly cut, and on checking the distance from the slot to the end of the board I discovered that it was out by about 1 mm. I recut the slot at the right place, but will have to fill the unwanted part of that slot before putting in the frets. Not an irretrievable mistake, but would have been a serious problem if I had cut the slot completely before checking the position. From that point on, I double checked every slot when the first saw mark was visible. |
|
|
|
|
|
 |
|
|
|
A final re-measuring of the position of the frets showed that they were as precise as I could have hoped to make them (BIG sigh of relief).
I finally worked out why this project is such a therapeutic process, in helping to let go of work stresses. The anxiety involved in getting measurements and saw-cuts right doesn't leave room for worrying about minor things like work.
While making the fretboard, which still has to be radiused, two thoughts occurred to me about the shaping of the neck. |
|
|
|
|
|
1. Because I have large hands, the neck of a Fender Stratocaster feels a bit narrow. The extra 1/16" on my Telecaster makes a big difference, but I could imagine just a little extra room suiting my hands even better. So I decided to keep the neck and fretboard about 44 mm wide at the nut, rather than the conventional Les Paul 43 mm (1.68").
2. The narrow neck on my Strat tends to cramp my hands a little, while the more substantial neck on the Tele ('63 re-issue) is more comfortable. So I decided that the neck on my home-made Les Paul would be the chunky rounded shape of the '50's models.
Back to shaping the neck.. page 7. Index |
|
|
|
page: 1, 2, 3, 4, 5, 6. 7. |
|