The aim of this section is to provide sketches and notes for ocnversions and scratchbuilding projects. As I am not very good at making drawings, most sketches will be rather simplified, highlighting only the most important parts. Generally, try to get as much photographic reference, as you can when trying a conversion or scratchbuilding.
This conversion is based on the Esci M3A1 scout car kit, which is out of production now. However, as Italeri seems to take up the Esci range of kits, it might soon reappear. In any case, with only a little more effort, you can scratchbuild this vehicle using front bodywork parts from a M3 halftrack.
First of all, a general note on modelling homemade IDF ACs. I recently had an argument with a 1/35 armour modeler who had built a White AC using a conversion set (by Azimut, I think) and was talking about two general types of AC conversions and things like 'type characteristics'.
Forget about that! Although the turrets seem to follow more or less the same pattern - even then there are noticeable differences - there were lots and lots of detail differences. Probably the only 'type characteristic' was the fact that the rear compartment was covered with armour plate! You have therefore quite a lot of license when converting. The best advice is, get as many pictures as you can..
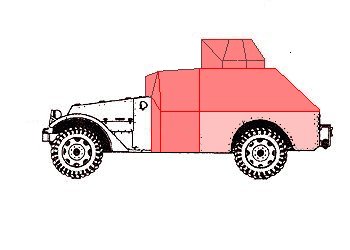
An explanatory note on the drawings: parts that have to be scratchbuilt are marked in red, kit parts that need modification in pink. The drawings should be 1/72 scale, but when you're using them, check before whether they are to scale.
You will note that you I outlined only the main armour panels of the upper body. Details such as doors, vision slots, armament and other equipment (like spare wheels, sand channels and the like) were left out. The reason for this is that, while the conversions were made according to a more or less general plan, they differed considerably in detail. It is thus necessary to consult pictures for the aforementioned details.
Note the lower parts (pink) of the rear body. These are kit parts that have to be cut down, again, use also pictures as reference material as the height of these parts differed.
No doors on the drawing. These again showed considerable differences, so - you'll have guessed it - go for pictures.
You won't need the roller fitted to Esci's M3A1 scout car. I have yet to find a picture showing an AC fitted with it, they seem to have been rather rare.
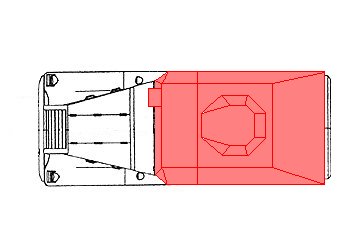
To the right of the driver (or left, depending on your point of view) is the machine gunner's position. A note on the mounting of the machine guns, which were almost exclusively MG 34s: There seem to have been two types of mounts: a simple slot and a kind of ball mount. The choice is yours, but use the same mount in the turret and in the armoured body! By the way, I recently found a picture of an AC looking much like a White AC which apparently was left-hand drive with the MG 34 on the right side of the driver.
Another possibility is mounting a short-barrelled 37mm gun in the turret. Again, use photographic reference for that.
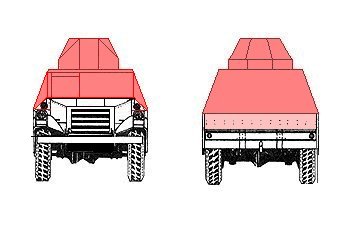
The back of the vehicle shows another kit part modified, i.e. cut down. Somewhere on the upper back plate a spare wheel would be carried, also antenna mounts were to be found there. As I said, pictures are not everything, but without pictures everything is nothing...
Again not much to see on the top. Reference is needed for such details as periscopes above the driver's position, turret hatch (can be two-part or one-part) and externally mounted AA weapon, which should also be a MG 34.
still under construction!!