Digital Camera OperationIn the previous chapter the basic operation of the conventional film camera was explored, with this basic understanding in mind we will now explore how the digital camera operates. As mentioned earlier, at its most basic level, the digital camera operates similarly to a conventional camera; it has a series of lenses that focus light to create an image of a scene. But instead of focusing this light onto a piece of film, it focuses it onto a semiconductor device that records light electronically. A computer then breaks this electronic information down into digital data. The following topics will examine how the digital camera works. Capturing the ImageThe preceding chapter illustrated how the optical component of the film camera captures the light bouncing off the target object and focuses the image on the film. The digital camera operates in the same way, but instead of projecting the image on a film, the lens of the digital camera focuses the image on a sensor. The purpose of the image sensor is to capture the light and convert it to electrical charges and then to binary (digital) data. The image sensor employed by most digital cameras is a Charge Coupled Device (CCD, however, some cameras use Complementary Metal Oxide Semiconductor (CMOS) technology instead. Both CCD and CMOS sensors convert light into electrons. This process is similar to how solar cells collect and convert sunlight (solar energy) to electrical energy, but on a much smaller scale. A simple way of illustrating this is to think of the image sensor as a 2-dimentional array of thousands or millions of tiny solar cells. The sensor consists of an array of these “tiny solar cells”, which are light-sensitive spots are called photosites. Photosites are usually square in shape and laid out in rows and columns. The size of a photosite, depending on the manufacturer, ranges from 3 to 11.8 microns square. Once the sensor converts the light into electrons, it reads the value (the accumulated charge) of each cell in the image; in other words, it reads the light intensity. However, there is a difference in how the CCD and CMOS sensor converts the charges into binary data. A CCD transports the charge across the chip and reads it at one corner of the array. An analog-to-digital converter (ADC) then turns each pixel's value into a digital value by measuring the amount of charge at each photosite and converting that measurement to binary form. The CMOS sensor uses several transistors at each pixel to amplify and move the charge using more traditional wires. The CMOS signal is digital, so it needs no ADC. The difference between the two major types of sensors used in the digital camera, lead to a number of pros and cons:
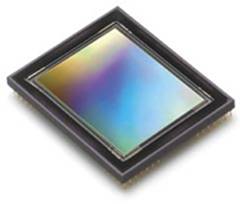
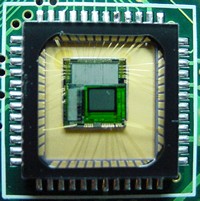
Figures 2.1 and 2.2 are photographs of the CCD and CMOS sensors(Adapted from How Stuff Works) .
Nevertheless, both accomplish the same intended function of capturing the image, that is, capture the light from the image and convert it to electrical, digital data. But how clearly are there pictures, stored as a combination of 0’s and 1’s, displayed? ResolutionThe amount of detail that the camera can capture is called the resolution, and it is measured in pixels. The more pixels a camera has the more detail it can capture and the larger pictures can be without becoming blurry or "grainy." Some typical resolutions for digital cameras include:
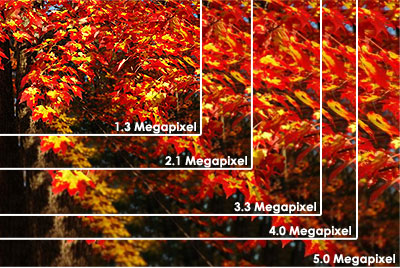
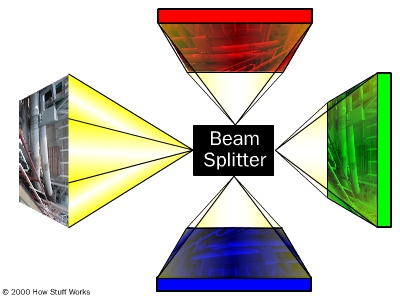
The above list gives an idea of how clearly digital cameras of different resolutions display pictures. The picture in figure 2.3 gives a graphical idea of the various resolutions. Figure 2.3. The size of an image taken at different resolutions (Adapted from How Stuff Works). There are “High-end” consumer cameras can capture over 12 million pixels. Some professional cameras support over 16 million pixels, or 20 million pixels for large-format cameras. For comparison, Hewlett Packard estimates that the quality of 35mm film is about 20 million pixels. Capturing ColourThe photosites that determine the number if pixels, is “colour-blind” and hence only keeps track of the total intensity of the light that strikes its surface. In order to get a full color image, most sensors use filtering to look at the light in its three primary colors. Once the camera records all three colors, it combines them to create the full spectrum. There are several ways of recording the three colors in a digital camera. The highest quality cameras use three separate sensors, each with a different filter. A beam splitter directs light to the different sensors. Think of the light entering the camera as water flowing through a pipe. Using a beam splitter would be like dividing an identical amount of water into three different pipes. Each sensor gets an identical look at the image; but because of the filters, each sensor only responds to one of the primary colors. The diagram below illustrates this technique. Figure 2.4. Images split in a beam splitter(Adapted from How Stuff Works) .
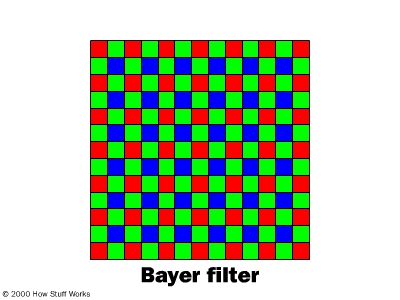
The advantage of this method is that the camera records each of the three colors at each pixel location; however, cameras that use this method are bulky and expensive. Another method used to capture colour is to rotate a series of red, blue and green filters in front of a single sensor. The sensor records three separate images in rapid succession. This method also provides information on all three colors at each pixel location. The three images aren't taken at precisely the same moment, so both the camera and the target of the photo must remain stationary for all three readings. Both of the above mentioned techniques of capturing colour work well for professional studio cameras, but they're not necessarily practical for casual snapshots. A more economical and practical way employed by manufacturers is to permanently place a filter called a color filter array over each individual photosite. By breaking up the sensor into a variety of red, blue and green pixels, it is possible to get enough information in the general vicinity of each sensor to make very accurate guesses about the true color at that location. This process of looking at the other pixels in the vicinity of a sensor and making an educated guess is called interpolation. The most common pattern of filters is the Bayer filter pattern. The Bayer filter pattern alternates a row of red and green filters with a row of blue and green filters, as demonstrated in figure 2.5. The pixels are not evenly divided; there are as many green pixels as there are blue and red combined. This is so due to the fact that the human eye is not equally sensitive to all three colours. As a result it's necessary to include more information from the green pixels in order to create an image that the eye will perceive as a "true color." The raw output from a sensor with a Bayer filter is a mosaic of red, green and blue pixels of different intensity. Digital cameras use specialized demosaicing algorithms to convert this mosaic into an equally sized mosaic of true colors. The key this process is that each colored pixel can be used more than once. The true color of a single pixel can be determined by averaging the values from the closest surrounding pixels. Figure 2.5. An illustration of the Bayer filter (Adapted from How Stuff Works).
The advantages of this method are that only one sensor is required, and all the color information (red, green and blue) is recorded at the same moment. Hence the camera can be smaller, cheaper, and useful in a wider variety of situations. Still some single sensor digital cameras use other types of filters such as X3 Technology, which embeds red, green and blue photo-detectors in silicon. While other more advanced cameras subtract values using the typesetting colors cyan, yellow, green and magenta instead of blending red, green and blue. There is even a method that uses two sensors to capture colour. However, the majority of consumer cameras on the market today use a single sensor with alternating rows of green/red and green/blue filters. Exposure, Focus and ZoomIn the previous chapter it was shown that in the conventional film camera, the amount of light that reaches the film is controlled by the aperture and the shutter, this is also true for the digital camera. The aperture is automatic in most digital cameras, but some allow manual adjustment to give professionals and hobbyists more control over the final image. However, unlike film, the light sensor in a digital camera can be reset electronically. As result digital cameras have a digital shutter rather than a mechanical shutter. In addition to controlling the amount of light that reaches the sensor, the camera has to adjust the lenses to control how the light is focused on the sensor. One of the most important differences between the lens of the digital camera and the 35mm film camera is the focal length, that is, the distance between the lens and the surface of the sensor. The sensors in digital cameras, although they vary is size, is much smaller than a piece of 35mm film. Hence, in order to project the image onto a smaller sensor the focal length is shortened by the same proportion. This results in the focal length of the digital camera being much smaller than that of its 35mm counterpart. Focal length also determines the magnification, or zoom, when a person looks through the camera. When the focal length increases the magnification is also increased, and objects appear to get closer. The reverse happens when decreasing the focal length. A zoom lens is any lens that has an adjustable focal length and hence can magnify or diminish the size of an object that is viewed through it. While the 35mm film camera has only optical zoom, the digital camera can have optical zoom, digital zoom or even a combination of optical and digital zoom. Digital cameras even possess what is called a macro focusing capability, in other words, the camera can take pictures from very close to the subject. Digital cameras can have one, or a combination of 2 or more, of the four types of lenses mentioned below:
As mentioned, some cameras use a combination of two or more of the different type of zoom lenses. For example the Kodak CX7330 Zoom Digital Camera has a combination of optical zoom and digital zoom, whereas, the high-end Kodak Z650 Zoom Digital Camera has a combination of digital, optical and replaceable zoom lens systems. StorageAs discussed in the previous chapter, when a picture is taken, light from the subject is focused on a film where a chemical change occurs and a picture of the image is formed on the film. The film is then processed in a lab to obtain a photograph. The digital camera stores the picture taken of the image in a totally different way. Most digital cameras have a LCD (Liquid Crystal Display) screen, which allows the user to view the subject, instead of using the viewfinder, and view the photo of the image. However, it would be of little use only being able to view the picture on the LCD screen. As a result the digital computer uses electronic memory sources to store the photographs. The early generations of digital cameras had only fixed Read Only Memory (ROM) that could only be transferred to a computer, by means of a cable. The present generation of digital cameras now use a number of storage devices both internally (fixed) and removable types. Today’s generation of digital cameras use solid-state memory, known a flash memory, both as internal memory and removable memory. Digital cameras are now equipped with internal flash drives and a slot for accommodating removable flash memory devices such as SmartMedia cards, CompactFlash cards and memory sticks. Figures, 2.5 and 2.6 displays a typical flash card and memory stick that are used in digital cameras.
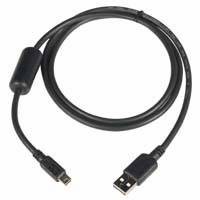
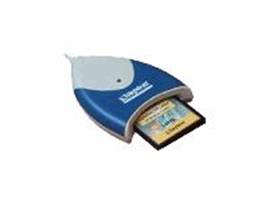
Having these images stored on a flash card of internally on your camera will only allow you to view the pictures on your camera’s LCD screen. Therefore, a medium is needed to transfer the images from the camera to the desired location. There are several means of transferring the images from the camera. These include: Serial, Parallel, Small Computer System Interface (SCSI), Universal Serial Bus (USB) and Firewire connections that transfer the images directly from the camera’s internal memory and the portable storage device, if it is in the camera, to a personal computer or even directly to a printer. Some digital cameras can also be connected to a Television or VCR via an AV (Audio-Video) Jack. The removable storage itself can also be directly connected to a computer or printer via a caddy or card reader. The figures below show examples of a USB connector and a Flash Card reader.
Digital photographs tend to need a lot of memory to store all the data that it is comprised of. As a result digital cameras as well as the external memory devices need a lot of memory to store the pictures. They usually store images in one of two formats, TIFF, which is uncompressed, and JPEG, which is compressed. Most cameras use the JPEG file format for storing pictures, and they sometimes offer quality settings, such as medium or high. The chart on the next page will demonstrate compares both formats with respect to the file sizes that result from different picture sizes.
To capitalize on storage space, digital cameras use some form of data compression to minimize the file size. There are two features of digital images that make compression possible: repetition and irrelevancy. To illustrate these two techniques, imagine a picture in which a blue sky takes up 30 percent of the photograph, you can be certain that some shades of blue are going to be repeated over and over again. When compression routines take advantage of patterns that repeat, there is no loss of information and the image can be reconstructed exactly as it was recorded. Unfortunately, this doesn't reduce files any more than 50 percent, and sometimes it doesn't even come close to that level. Irrelevancy is a bit more complex. A digital camera records more information than the human eye can easily detect. The processor in the camera takes advantage of this fact and discards some of the more meaningless data, thus reducing the file size even more. SummaryThe topics discussed in this chapter gave a somewhat in depth explanation of how a typical digital camera works. To reinforce the material covered in this chapter we can summarize what happens when a picture is taken, using a digital camera, in the following steps:
[TOP]
|