|
|
21
|
Distributed Rendering
|
|
Distributed rendering refers to rendering that is distributed over several computers. Using distributed rendering you can render one or several SDL files on a network of computers. For example, you can divide an animation into sequences and render each sequence on a different computer. You can also control when, and on which computer, rendering takes place. For large render farm environments, however, you should use Dispatcher instead of Distributed render (see Dispatcher Online Help).
In this Section:
Distributed Render Overview
|
|
|
|
|
Distributed rendering uses the Rendering Control window to control the rendering of one or several SDL files on a network of computers. This window is a stand-alone application that you can access either within Alias or from a UNIX shell.
|
|
See Appendix B: NFS
Overview on page 245 of the
Release and Installation Notes.
|
The Rendering Control window uses the NFS (Network File System) to communicate with computers connected via a network. NFS must be installed on all computers on the network in order to use Rendering Control.
In addition, all paths and file names used within the Rendering Control window must be NFS accessible from all computers. For example, the following path is NFS accessible from all computers:
/nfs/machine/usr/people/awdemo/user_data/demo/sdl
However, the following path is not NFS accessible from all computers:
/usr/people/awdemo/user_data/demo/sdl
All paths and file names used within the Rendering Control window must also be readable and writable from all computers. You can make a file or directory of files readable and writable from all computers using the UNIX command chmod. For example, to make a directory of files readable and writable from all computers you would type the following in a UNIX shell:
chmod a+rwx /usr/people/awdemo/user_data/demo/sdl
Pix files created by the Rendering Control window are readable and writable by all computers. In addition, the Rendering Control window does not protect its job queues from unauthorized modification.
The Rendering Control window requires a control directory (control_location_path) in which to store its control files. This directory can be located anywhere; however, it must be NFS accessible, and readable and writable, from any computer on which you want to render. The default control directory is:
/usr/aw/alias9.0/render_control
|
Render > Distributed
render
|
Using Distributed Render
|
|
|
|
|
Opening the Rendering Control Window
You can open the Rendering Control window either within Alias or from a UNIX shell.
- If you open the Rendering Control window within Alias, make sure that the Control Location in the Alias Preferences window is NFS accessible, and readable and writable, from all computers. If you change the Control Location, you must exit and re-start Alias for the change to take effect. See Distributed Render Control Options in the Basic Tools in Alias book.
- If you open the Rendering Control window from a UNIX shell, you must specify the path to the control location when you enter the rndctl command.
To open the Rendering Control window from within Alias:
- Select Render > Distributed render.
To open the Rendering Control window from a UNIX shell:
|
|
See rndctl in the Alias
Standalone Utilities Guide
online documentation.
|
- Type rndctl -l <control_location_path>.
Creating a Job
Once you have opened the Rendering Control window, you must create a job. A job is an SDL file that you want to render. You can create one or several jobs.
To create a job:
|
|
See Add on page 463.
|
-
1
-
Select Job Maint > Add to open the File Requestor.
-
2
-
Use the File Requestor to select the SDL file you want to render, and click SDL filename. The job appears in the Jobs section of the Rendering Control window.
|
|
See Jobs on page 453.
|
-
Edit the parameters in the Jobs section of the Rendering
Control window to change the job's name, its rendering
priority, its SDL file name, or the number of frames to
render. Make sure the path to the SDL file is NFS
accessible from all computers that you want to render on.
|
|
See Output Paths on
page 455.
|
-
Edit the parameters in the Output Paths section of the
Rendering Control window to change where and how the
job's pix files are saved. Make sure the Output Paths are
NFS accessible, and readable and writable by all
computers you want to render on.
|
|
See Input Paths on page 456.
|
-
Edit the parameters in the Input Paths section of the
Rendering Control window to change where the job's source
image files can be found. Make sure that the Input Paths are
NFS accessible from all computers that you want to render
on.
|
|
See Job Scheduling on
page 457.
|
-
Edit the parameters in the Job Scheduling section of the
Rendering Control window to change the times when you
want the job to render.
Assigning a Resource to a Job
You must assign at least one resource to each job. A resource represents a computer that a job can render on. (Different resources can represent different processors on the same computer.) By default, there is only one available resource that uses the local computer. You can assign a single resource to several jobs. You can also add additional resources to the Rendering Control window, and then assign one or several resources to each job.
To add a resource:
|
|
See Add on page 465.
|
- Select Resource Maint > Add. A new resource appears in the Available Resources section of the Rendering Control window. By default, the resource is named new_resource_#.
|
|
See Current Resource on
page 460.
|
-
Edit the parameters in the Current Resource section of the
Rendering Control window to change the resource's name,
its host name, the maximum number of frames that can be
rendered on the resource, and the times when the resource
is available to render jobs.
To assign a resource to a job:
-
1
-
In the Jobs section of the Rendering Control window, select the job you want to assign a resource to.
-
2
-
In the Available Resources section of the Rendering Control window, select the resource you want to assign to the job.
|
|
See Add a Resource on
page 459.
|
-
3
-
In the Resource List section of the Rendering Control window, select Add a Resource. The resource appears in the Resource List section of the Rendering Control window.
-
To assign another resource to the job, select the resource in
the Available Resources section of the Rendering Control
window, and then select Add a Resource.
To remove a resource from a job:
-
1
-
In the Jobs section of the Rendering Control window, select the job you want to remove a resource from.
|
|
See Remove a Resource on
page 459.
|
-
2
-
In the Resource List section of the Rendering Control window, select the resource you want to remove from the job, and select Remove a Resource. The resource disappears from the Resource List section of the Rendering Control window.
Rendering a Job
Once you have a job with at least one resource assigned to it, you can then render that job.
To render a job:
-
1
-
In the Jobs section of the Rendering Control window, select the job you want to render.
|
|
See Raycast, Raytrace,
Powercast, Powertrace,
HiddenLine on page 465.
|
-
2
-
Select Render > Raycast in the Rendering Control window (or Raytrace, Powercast, Powertrace, or HiddenLine).
-
The Rendering Control window launches a daemon
rendering program ($ALIAS_LOCATION/bin/
alias_render_demon) on each resource (computer)
assigned to the job. Each daemon program controls the
rendering process on a particular resource, and relays the
status of rendering by writing files to the control location.
The Rendering Control window reads these files, and
displays the status of rendering that is occurring on all
resources.
|
|
See Pause Job on page 457
and Availability on page 461.
|
-
Daemon programs are only launched if the job is available
to render (Pause Job in the Job Scheduling section of the
Rendering Control window) and the resource is available for
rendering (Availability in the Current Resource section of the
Rendering Control window).
-
You can render several jobs simultaneously by repeating
steps 1 and 2 above. The order that jobs are rendered is
based on their Priority setting (in the Jobs section of the
Rendering Control window).
-
Once you have begun rendering a job (or a series of jobs),
you can exit the Rendering Control window, and restart it at
any time, without affecting the jobs currently rendering.
To abort a job that is currently rendering:
-
1
-
In the Jobs section of the Rendering Control window, select the job you want to abort.
|
|
See Abort on page 463.
|
-
2
-
Select Job Maint > Abort in the Rendering Control window.
Monitoring Rendering
|
|
See Job Status on page 453,
Rendering Log on page 458,
and Image Grid on page 464.
|
Once you have begun rendering a job (or a series of jobs), you can use the Rendering Control window to monitor the progress of each job. During rendering, the Job Status (in the Jobs section of the Rendering Control window) updates: first to pending, then to the percentage completed, and finally to finished. The Rendering Log also updates to display information on each frame as it renders. For a graphical representation of the status of each frame of the job, open the Image Grid by selecting Job Maint > Image Grid.
Viewing a Rendered Job
You can view either the frame currently rendering, or the rendered animation (all frames rendered so far).
To view the frame currently rendering:
|
|
See Wrl Active on page 465.
|
- Select Render > Wrl Active.
To view the rendered animation:
|
|
See Flipbook on page 465.
|
- Select Render > Flipbook.
Rendering Control Window
|
|
|
|
|
The Rendering Control window lets you control the rendering of one or several jobs on a network of computers.
To open the Rendering Control window:
|
|
You can also open the
Rendering Control window
by typing rndctl -l
<control_location_pat
h> in a UNIX shell. See rndctl
in the Alias Standalone
Utilities Guide online
documentation.
|
- Select Render > Distributed render.
Rendering Control Parameters
|
|
|
|
|
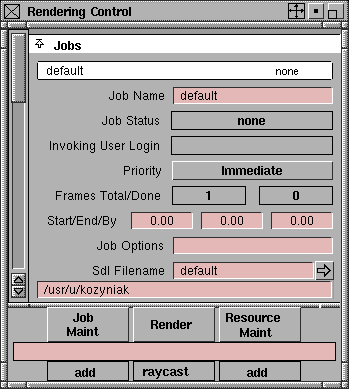
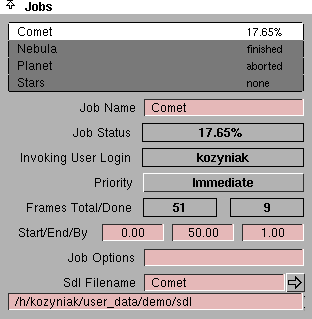
Jobs
|
|
A job is an SDL file that you
want to render.
|
The Jobs section of the Rendering Control window contains a job list and several job parameters. The job list lists the current status of each job. The job parameters are those of the selected (highlighted) job in the job list. To select a job and display and edit its parameters, click on the job in the job list.
|
|
See Add on page 463 and
Delete on page 463.
|
To add a job to the job list, select Job Maint > Add in the Rendering Control window. To delete a job, click on the job in the job list and select Job Maint > Delete.
Job Name
-
- The name of the rendering job. You can change the Job Name at any time without affecting the status of the job.
Job Status
-
- The current status of the selected (highlighted) job in the job list: aborted, finished, stopped, failed, pending, or percentage completed. You cannot edit this parameter.
-
- A running job is divided into tasks. A task consists of a number of frames of a job. The size, or the number of frames of the task is determined by the Max Frames value under Current Resource (see Max Frames on page 461).
-
- When a running task fails, it is subdivided into two tasks. Completed frames are put in one task, which is marked as finished. The remaining frames are put in a second task, which is reset to pending. Failed tasks are set to pending three times before they are left as failed.
Invoking User Login
-
- The login name of the user who starts the selected (highlighted) job in the job list (that is, when the user selects a renderer from the Rendering Control window's Render menu). You cannot edit this parameter.
|
|
|
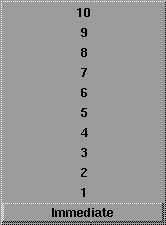
Priority
-
- The priority of the selected (highlighted) job in the job list: immediate, 1 to 10. Jobs with immediate Priority are rendered before jobs with Priority 1; jobs with Priority 1 are rendered before jobs with Priority 2, and so on. Multiple jobs that have identical Priority are rendered concurrently on a machine.
Frames Total/Done
-
- The total number of frames and the number of rendered frames in the selected (highlighted) job in the job list. You cannot edit these parameters.
|
|
Do not edit these
parameters for a job that is
currently rendering.
|
Start/End/By
-
- The first frame (Start), last frame (End), and frame increment (By) to render of the selected (highlighted) job in the job list. These parameters have no effect if the job's SDL file does not have animation on. The default setting is 0.
|
|
See Rendering Options on
page 433.
|
Job Options
-
- Render command options for the selected (highlighted) job in the job list. A list of render command options are in the Rendering Options window (Render > Render
 ). You can add render command options by entering them in this field. ). You can add render command options by entering them in this field.
|
|
See SDL Files on page 437.
|
Sdl Filename
-
- The file name (the upper field) and path (the lower field) of the SDL file for the selected (highlighted) job in the job list. You can enter the file name and path by typing in the fields, or you can click the arrow on the right side of the file name field to open the File Requestor, and select the SDL file using the File Requestor.
Output Paths
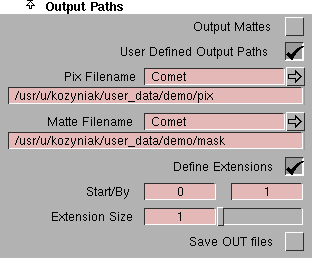
The Output Paths parameters describe pix and matte file names and their extensions for the selected (highlighted) job in the job list.
Output Mattes
-
- Causes the renderer to produce a mask file (in addition to the pix file). If Output Mattes is OFF, the renderer does not produce a mask file unless the SDL file itself contains a matte = <filename> statement in the Definition section or a mask = <filename> statement in the Camera section. The default setting is OFF.
-
- If there is a matte = <filename> or mask = <filename> statement in the SDL file, and these statements were created by Alias (for example, during File > Export > SDL), the <filename> is relative to the current project directory. Because the distributed render daemon requires an absolute path, the renderer will not be able to write the mask file to the correct directory.
User Defined Output Paths
-
- Lets you specify the output file names and paths for pix and mask files using the Pix Filename and Matte Filename parameters. If User Defined Output Paths is OFF, the pix and mask files are saved relative to the SDL Filename path (not in the paths specified in the SDL file, because these paths are relative to the current project and the distributed render daemon requires absolute paths). For example, if the SDL file is located in /usr/tmp/sdl, the pix file will be saved in /usr/tmp/pix and the mask file (if Output Mattes is ON) will be saved in /usr/tmp/mask. If User Defined Output Paths is ON, the Pix Filename and Matte Filename parameters become available. The default setting is OFF.
Pix Filename, Matte Filename
-
- The file name (the upper field) and path (the lower field) for the output pix file and mask file. These parameters are only available if User Defined Output Paths is ON.
Define Extensions
-
- Lets you set the starting number (Start) and the amount by which the extension is incremented (By) for the rendered pix files' extensions. If Define Extensions is OFF, the extensions are defined by the settings in the SDL file. If Define Extensions is ON, the Start/By and Extension Size parameters become available. The default setting is OFF.
Extension Size
-
- The total number of characters in file name extensions. If the frame number is less than the Extension Size value, then leading zeros are added to the extension. For example, if the frame number is 25 and the Extension Size value is 4, the pix file name would be <filename>.0025. The slider range is 0 to 100. The default setting is that in the SDL file.
Save OUT Files
-
- Saves the out files (out.<filename>) that are generated during rendering. The default setting is OFF.
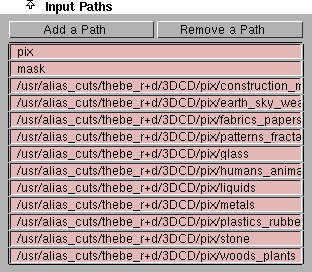
Input Paths
The Input Paths section contains an editable list of search paths that the renderer uses to find pix files it needs for input. When you create a job (by selecting Job Maint > Add), this list defaults to the paths defined in the environment variable ALIAS_PIX_SEARCHPATH (see ALIAS_PIX_SEARCHPATH (Rendering) on page 210 of the Release Notes and Installation book).
To edit a path, click or double click it, type in the new path and press Enter. Because the Input Paths list is moved into an environment variable for use by the renderer, the length of a path cannot exceed the maximum length of an environment variable. Remove any paths from the list that you know will not be needed during rendering.
Add a Path
-
- Adds a blank line to the Input Paths list.
Remove a Path
-
- Deletes the selected (highlighted) path in the Input Paths list.
Job Scheduling
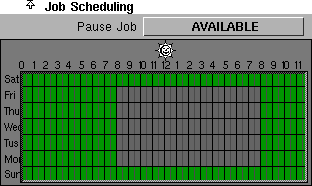
The Job Scheduling section lets you specify if and when a job can be rendered.
|
|

|
Pause Job
-
- Determines if a job is available for rendering. The default setting is AVAILABLE.
| PAUSE
| the job is not available to run
|
| AVAILABLE
| the job is available to run
|
| USE SCHEDULE
| the job is available to run during days and times indicated in the Job Scheduling Chart
|
-
- If you set Pause Job to PAUSE for a job that is still rendering, the currently active task will complete normally. The next task, if any, will run either when you set Pause Job to AVAILABLE, or when you set Pause Job to USE SCHEDULE and an available time (as indicated in the Job Scheduling Chart) occurs.
Job Scheduling Chart
-
- The Job Scheduling Chart lets you specify exactly when a job can be rendered. The chart lists the five days of the week along the left and the 24 hours of each day along the top (the sun represents 12:00 o'clock noon).
-
- The grid formed by these two axes represents the 24 hours of each day of the week in half-hour increments. By clicking or click-dragging within this grid, you can toggle the days and times when a job is available for rendering (indicated by green blocks). In order for a job to use the Job Scheduling Chart, you must set Pause Job to USE SCHEDULE.
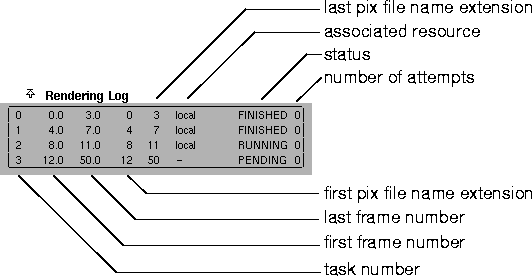
Rendering Log
The Rendering Log maintains a record of errors encountered in the render job, and a record of all the tasks that a render job produced. This record is only listed if a job is running or completed. You cannot edit this information.
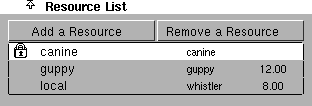
Resource List
|
|
A resource represents a
computer (and number of
processors) that a job can
potentially render on.
Several resources can use the
same computer. You can also
control the maximum
number of frames that can
render on resource.
|
The Resource List lists the resources (computers) that a job can render on. The list contains the Resource Name, the Host Name, and if the job is running, the current frame of the task on this resource. You can add or remove resources from this list using the Add a Resource and Remove a Resource buttons. When you start a job and its status becomes pending, resources from the Resource List are used as they become available.
When you start a job (by selecting an option from the Render menu in the Rendering Control window), daemons are launched for that job on all resources listed in the Resource List (if they are not already running). If a job is already running when you add a resource to that job's Resource List, a daemon is not launched for that resource. To launch a daemon for the new resource, start the job again (by re-selecting the option from the Render menu); this launches the daemon on the new resource without affecting the running job.
Add a Resource
-
- Adds the resource that is selected (highlighted) in the Available Resources list to the Resource List.
Remove a Resource
-
- Deletes the resource that is selected (highlighted) in the Resource List.
Available Resources
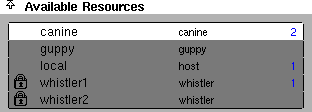
|
|
A resource represents a
computer (and number of
processors) that a job can
potentially render on.
Several resources can use the
same computer. You can also
control the maximum
number of frames that can
render on resource.
|
The Available Resources list lists those resources that are potentially available for use by any job. The list contains the Resource Name and Host Name for each available resource.
If a resource is selected by someone else running Rendering Control, that user's login name appears to the right of the resource's Host Name.
If a resource has its Availability set to LOCKED, or set to USE SCHEDULE and the Resource Schedule Chart does not allow rendering at the present time, a lock icon appears to the left of the Resource Name.
A number may appear to the right of the Host Name, indicating the number of jobs that contain that resource in their Resource List. A red number indicates that the resource is currently rendering a job. A blue number indicates that the resource is not currently rendering a job.
Current Resource
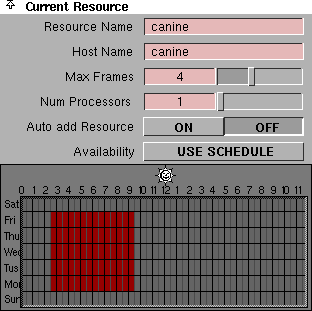
The Current Resource section describes the resource that is currently selected (highlighted) in the Available Resources list.
Resource Name
-
- The name you want to use to describe the resource.
Host Name
-
- The machine name of the resource. This is the name returned by the UNIX hostname command.
Max Frames
-
- The maximum number of frames per task for this resource. Adjust the Max Frames value to control the load balance on the network. The slider range is 0 to 10.
Num Processors
-
- The maximum number of processors that the resource will allocate to a job. The slider range is 1 to 8. The default value is 1.
Auto add Resource
-
- Automatically adds this resource to the Resource List of any jobs added to the Jobs list. The default setting is OFF.
|
|
|
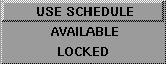
Availability
-
- Determines if the resource is available for use. The default setting is USE SCHEDULE.
| LOCKED
| the resource is not available for use
|
| AVAILABLE
| the resource is available for use
|
| USE SCHEDULE
| the resource is available for use during days and times indicated in the Resource Scheduling Chart
|
Resource Scheduling Chart
-
- The Resource Scheduling Chart lets you specify exactly when a resource can be used. The chart lists the five days of the week along the left and the 24 hours of each day along the top (the sun represents 12:00 o'clock noon). The grid formed by these two axes represents the 24 hours of each day of the week in half-hour increments. By clicking or click-dragging within this grid, you can toggle the days and times when a resource is not available for use (indicated by red blocks).
-
- In order for a resource to use the Resource Scheduling Chart, you must set Availability to USE SCHEDULE.
-
- If a daemon is running on a machine and that machine becomes locked, the daemon kills all running tasks on that machine. These tasks are added to the pool of pending tasks and run on another machine if one is available.
-
- If a machine is not scheduled for use, none of the resources having this machine as its Host Name are available for rendering.
Associated Jobs
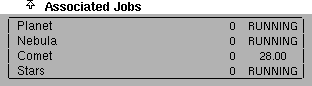
The Associate Jobs list lists any jobs that are pending to use the current resource. The job status is indicated on the right side of the list.
Control Options
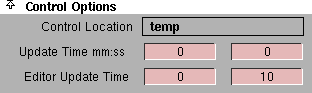
The Control Options control the overall operation of the distributed Rendering Control window.
Control Location
-
- The control_location_path. You cannot edit this field.
Update Time mm:ss
-
- The number of minutes (mm) and seconds (ss) between job status updates. The default setting is 0:0.
Editor Update Time
-
- The interval time between the GUI editors' updates, to reflect the current state of the control files. The default setting is 0 and 10.
Rendering Control Menus
|
|
|
|
|
The Rendering Control menus contain tools to activate, manage, and monitor the distributed rendering process.
|
|
|
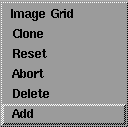
Job Maint Menu
Add
-
- Opens the File Requestor and lets you select an SDL file to add to the Jobs list and render.
Delete
-
- Deletes the job that is currently selected (highlighted) in the Jobs list. A confirm box is displayed before the job is actually deleted.
Abort
-
- Stops the rendering of the job that is currently selected (highlighted) in the Jobs list. A confirm box is displayed before the job is actually aborted.
Reset
-
- Restarts the job that is currently selected (highlighted) in the Jobs list. Use Reset to restart a daemon that has died and left tasks in an undetermined state. A confirm box is displayed before the job is actually reset.
Clone
-
- Creates a new job based on the job that is currently selected (highlighted) in the Jobs list. All job parameters for the new job are the same as the original job except for Job Name and Sdl Filename which have .clone appended as a reminder that you should edit these fields. A confirm box is displayed before the job is actually cloned.
Image Grid
-
- Displays the Image Grid.
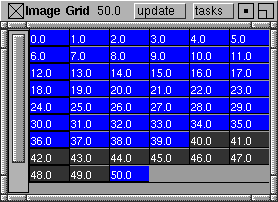
-
- The Image Grid represents the job that was selected (highlighted) in the Jobs list when you selected Job Maint > Image Grid. Each cell of the grid represents an output image file (that is, a frame of the animation), and the cell color represents the current status of that file.
|
Cell Color
|
Description
|
|---|
| dark grey
| the file cannot be found
|
| blue
| the file is incomplete; the shade of blue represents the stage of completion (for example, dark blue means the file is almost complete)
|
| medium grey
| the file is not present
|
-
- Because the Image Grid has to read and decode each entire file to determine if it is present and/or complete, the window can be slow to load and/or update. To load the Image Grid as fast as possible, open it on the machine where the image files reside. To change the job that the Image Grid displays, you must re-select Job Maint > Image Grid from the Rendering Control window.
update
-
- Updates the display in the Image Grid.
tasks
-
- Outputs a list of tasks that remain to be completed to standard out. You can then use this list as a reference for creating new jobs to complete the animation.
|
|
|
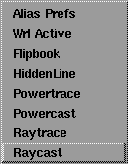
Render Menu
Raycast, Raytrace, Powercast, Powertrace, HiddenLine
-
- Raycasts, raytraces, powercasts, powertraces, or hidden line renders the job currently selected (highlighted) in the Jobs list (see Renderer Type on page 433).
|
|
See Previewing Rendered
Animation in the Animating
in Alias book.
|
Flipbook
-
- Opens the Flipbook for the job currently selected (highlighted) in the Jobs list.
|
|
See wrl in the Alias
Standalone Utilities Guide
online documentation.
|
Wrl Active
-
- Displays the image file that is currently being rendered for the job selected (highlighted) in the Jobs list. Wrl Active uses the UNIX wrl command to display the image file.
|
|
See Distributed Render
Control Options in the Basic
Tools in Alias book.
|
Alias Prefs
-
- Opens the Alias Preferences window and lets you set the Distributed Render Control Options (for example, Control Location).
|
|
|
Resource Maint Menu
Add
-
- Adds a new resource to the Available Resources list. The new resource's default Resource Name is new_resource_#.
Delete
-
- Deletes the resource that is selected (highlighted) in the Available Resources list.
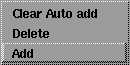
Clear Auto add
-
- Sets Auto add Resource OFF for all resources listed in the Available Resource list.
|


