Animation > Flipbook

Previewing Rendered Animation


To use Flipbook as a standalone utility, see flipbook in the Utilities Guide (available on-line only).

Flipbook lets you preview animation in rendered form, and is capable of viewing multiple sequences of PIX, SGI, TIFF or TIFF16 files simultaneously or in sequence while maintaining a specified frame rate. A variety of advanced compression options are also offered.

How to use the FlipBook Editor

1
To display the FlipBook Editor, select Animation > Flipbook. The Alias File Requestor is displayed.

2
Click Show List to display a list of available files. From the File Lister, you can select a PIX, SGI, TIFF, or TIFF16 file. Select one of the files and click the Show button.

Alias automatically determines which files make up the animation from the file you select, and loads all related files, which are present on the disk into the FlipBook editor.

The FlipBook editor creates a Book and displays the animation while it is being loaded. Once loading is complete, the FlipBook editor window cycles through the animation.

>
Note: FlipBook is available both inside the Alias package, and as a standalone utility suitable for presentation use. Compressed FlipBook animations can be saved as single files for subsequent quick loading.

Flipbook Icons and Controls

The FlipBook editor contains a set of icons and controls in the title bar that you can use to control its behavior.

From left to right, the controls are:

Close Box

Closes the FlipBook editor window.

Filename

Displays the name of the animation currently playing in the FlipBook editor.

Current Frame

Displays the current frame in the FlipBook editor, and counts up or down as the animation proceeds. To change it, click on the Shuttle Controls or type in a new value.

Shuttle Controls

The left-facing arrow starts the animation counting down from the last frame. The black square in the middle pauses the animation. The right-facing arrow starts the animation counting up from the first frame.

Push Pin

Locks the window to the current animation. This prevents the master FlipBook Editor window from cycling through all selected animations, and instead stays within the current animation.
>
Note: This icon is only available on the master FlipBook editor window.

Display Control window

Displays the FlipBook control window.

Minimize

Turns the FlipBook editor into an icon.

Full Screen

Toggles the FlipBook editor window between its current size and full screen size.
Tip: Size the flipbook at any time by clicking and dragging the standard drag border surrounding the editor. The FlipBook editor window continues to display the animation, and zooms the animation to fit within its new size.

FlipBook Keyboard and Mouse controls

The FlipBook editor has a number of mouse and keyboard controls that can be used as an alternative to the menu bar controls:

Action taken Keyboard or mouse
Display next frame Left mouse click, Right arrow, l key
Display previous frame Right mouse click, Left arrow, h key
Play animation forward Drag mouse right, Shift Right arrow, L key
Play animation backwards Drag mouse left, Shift Left arrow, H key
Display previous animation Up arrow, k key
Display next animation Down arrow, j key
Pause animation (while playing) Any mouse click
Toggle between playing in the current direction and pausing the animation space bar
Display the FlipBook Control window M key
Close the FlipBook Q key

Tip: Because the FlipBook editor uses hardware zooming, not all resolutions are available. The FlipBook editor does its best to fit the animation exactly inside the window borders, but may surround the animation with a grey border when an exact zoom is not possible.

The FlipBook Control Window

The FlipBook control window lets you perform functions such as loading additional animations into the FlipBook editor, and altering playback and compression settings. This window can also be opened by clicking the control icon on the FlipBook editor's title bar.

The FlipBook control window is broken up into several sections. If you click the black arrow to the left of a heading, a new window is displayed containing options specific to the parameter heading. These are described in the following pages.

Control Panel Parameters

The Control Panel provides shuttle controls and frame readout for any of the currently displayed FlipBook editor windows.

Frame

Displays the number of the currently visible frame. If you click in the Frame field and type a number, it sets the current animation to the specified frame.

Rate

Displays the current frame rate for the animation currently running.

Timecode

Displays the current frame number, converted to timecode using the current frame rate, and calculated assuming that frame 0 occurs at 00:00:00:00.
By clicking in any of the Timecode fields and typing a number, you can set the current frame of the current animation to the specified frame.

Playback slider

Lets you view the progress of an animation sequence from the first frame (at the left side of the slider) to the last frame (at the right side of the slider).
Click, or click and drag in the slider to alter the frame displayed in the active FlipBook.

Shuttle

Lets you control the animation being displayed using standard shuttle controls.

Book List Parameters

The Book List options let you load, delete, unload, and reload animation sequences. You can switch FlipBook editor windows by clicking in the name of an animation in the Book List, and also change the animation sequence that the master FlipBook editor window is showing.

Book icons

These are on the left of the window. Use them to open or close FlipBook editor windows. The master FlipBook editor window is the first icon in the Book List options, and is the window displayed when the FlipBook editor is first run.
>
Note: The master FlipBook editor window can display any of the currently loaded animations, and you can change which animations are displayed by using the keyboard or mouse commands.
If more than one book is selected (by clicking and dragging in the Book List), the master FlipBook editor window cycles through all selected animations. As you select the list items, a number is displayed to the right of the icon. The items displayed are in the order of the numbers.

One or more FlipBook editor windows can actively display animation sequences concurrently.

Additional Book Icons are displayed for each FlipBook that has been loaded. Clicking these icons opens up additional FlipBook editor windows specific to these animation sequences.

Book Management

Click and hold on the Book Management heading to display a menu that lets you load, delete, unload, or reload animation sequences into books, and also lets you save books out to FlipBook files.

The active books are represented as highlighted items in the list of FlipBooks.

    • New Book - loads a new animation sequence. You are prompted for a PIX, SGI, TIFF, or TIFF16 file, which you can select from the File Requestor. The FlipBook control window loads the additional animation sequence and the FlipBook determines the frame range used.
    • Delete Active - deletes the currently selected FlipBook (s) from memory. New books are selected by default.
    • Reload Active - reloads the current animation from disk. This lets you change the compression options and frame ranges and then quickly reload the FlipBook.
    • Unload Active - unloads the current FlipBook from memory, which lets you reload the unloaded flipbook at any time. The books are not removed from the list of flipbooks, their data is just unload.
    • Write Active - writes out the active flipbook as a single FlipBook file containing the compressed versions of the source files.

FlipBook List

The FlipBook list shows each FlipBook that has been loaded in the FlipBook control window. For each FlipBook, the following information is displayed:
    • Drag Handle - the position of a flipbook within the list can be changed by clicking on its drag handle and dragging it to a new position.
    • Book Icon - toggles a FlipBook editor window that displays this animation sequence alone.
    • Selection number- shows the order of sequencing (if the book is active).
    • File name - displays the name of the FlipBook. Click on this field to select the FlipBook and make it active.
You can also drag up or down in this field to make multiple FlipBooks active. The master FlipBook editor window cycles between displaying all active flipbooks.
    • Start - sets the first frame to be used when playing the animation.
    • End - sets the last frame to be used when playing the animation.
    • By - sets the frame interval to be used when playing the animation.

Options Parameters

The FlipBook Options let you change basic display options for the current FlipBook.

Name

Displays the file name of the current FlipBook animation. You can edit the name of a FlipBook by double-clicking on the current name (it turns grey), typing in a new name, and pressing Enter.

Frame Rate

Lets you set the number of frames to be displayed per second. Match must be toggled on. The FlipBook editor window will wait, or skip frames as necessary, to maintain the specified frame rate.
This field is also used to compute the timecode display for the current animation.

Match

Toggle this option on to specify whether FlipBook should attempt to maintain the frame rate specified by the Frame Rate field. If it is toggled off, the FlipBook editor displays each frame in sequence regardless of the frame rate specified.

Oscillation

Toggle this option off to specify that the active FlipBook loops when the end of the animation is reached. Toggle it on to have it oscillate between forward and reverse play. Note that this option is only applicable if you are viewing a single animation.

Dbl Buffed

Toggle this option on to specify that the active FlipBook be displayed in double-buffered display mode. Turn it off for single-buffered mode. This field is only read when a book is initially opened.
>
Note: On 12-bit machines, you will not have enough bit planes to display double-buffered images properly. For these machines, make sure Dbl Buffed is toggled off.

Load Options Parameters

The Load Options let you specify the properties used when loading or reloading FlipBooks from their corresponding animation sequences on disk.

Path

Displays the current FlipBook animation file path.

Range Min/Max

Displays the range of images in the currently active flipbook.

This is also called "padding".

Extension Width

Lets you specify how many digits are used in the numeric extensions of the files that make up the animation sequence.
For example, if one of the component files is called filename.023, the extension width should be set to 3, because all numeric extensions need at least 3 digits.

Compression Options

Once the Load Options are opened, the Compression Options appear.

The Compression methods used by the FlipBook take advantage of both time and spatial coherency with a definable loss limit. The FlipBook compression options let you adjust the amount of compression used.

Space Compress

Compresses files by taking advantage of pixel coherency over space.

Lossy compression: a compression method that drops (loses) some of the data during compression to take up minimal space.

If pixel values remain the same over a length of space, the value is stored once and a "per pixel" count is kept. This is standard runlength encoding. However, to this is applied a weighted form of lossy compression.
The value you enter in this field serves as a position on a ramped curve. While an image is decoding, as a pixel run gets longer, the amount of acceptable loss is reduced. This helps reduce streaking with values above 10. The values are used as follows:
0 = no space compression
1 = standard runlength encoding (no loss)
>1= weighted lossy compression

Time Compress

Compresses files by taking advantage of pixel coherency over time.
If a pixel does not change from frame to frame, its value is only stored once and a "per pixel" counter is incremented. This method can provide great memory savings for most animations. The only exception is where there is a complex stage with a moving camera.
The disadvantage of this form of compression is that in some cases, sync rate MATCH may not work well. In this form of compression, all frames must be decoded, even if you skip frames. This can result in a very jumpy animation. The values are used as follows:
0 = time compression off
1 = time compression with no loss of information
A value greater than 2 defines the amount of acceptable loss on ether side of the pixel value. For example, if the pixel value is 100 and the time compression value is 4, the range of the pixel could be anywhere between 96 and 104. Values greater than 8 could result in a washing out effect as the animation plays through.

Sample Rate

Lets you specify a supersampling or pixel skipping rate when loading animation sequences into a flipbook.
For example, setting this field to 2 causes 512x512 images to be loaded at 256x256 resolution. This decreases the visual quality of the preview, but saves drastically on memory.

Filter

Setting this toggle on forces the more time-consuming, but better looking supersampling to be performed as the animation frames are loaded.

Toggle this option on to specify that animation sequences, as they are being loaded, are supersampled by the factor specified in the Sample Rate option. Toggle it off for sampling to use a simple pixel-skipping method for reducing the image size.

Image Crop Parameters

The Image Crop options appears once the Load Options are opened

The Image Crop options let you specify that only a region of each component file of an animation should be loaded, as opposed to the entire file. This is useful when concentrating on one portion of an image, and may enable you to load a longer sequence into memory.
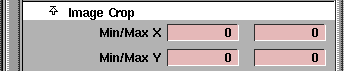
Min/Max X

The horizontal range of pixels to be loaded from each file in the animation sequence.

Min/Max Y

The vertical range of pixels to be loaded from each file in the animation sequence.

Compression View Parameters

These toggles let you view the amount of compression you are achieving graphically with the Load Options specified for any FlipBook.

You can use this information to optimize the amount of memory each flipbook uses, while maintaining the best possible visual quality.

Color

Toggle on or off to view spatial runspans in blue with the start of a span displayed in red. The more red, the less spatial compression is being attained.

Time

Toggle on or off to view time spans in green with yellow starts. The more yellow, the less time compression is being attained.

Advanced Options Parameters

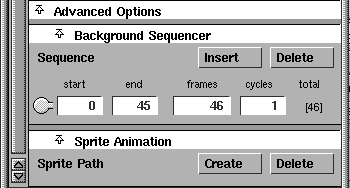
Background Sequencer Parameters

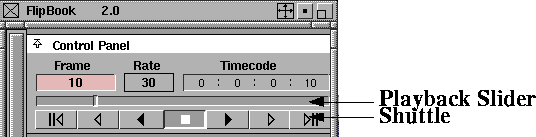
The sequencer lets you play back the pages of a background book in any order by specifying a series of sequences. Each sequence tells the FlipBook to play a certain interval of pages at a given speed, and repeat the playback a given number of times.

There are four editable fields for each sequence:

start

The starting page number of the segment.

end

The ending page number of the segment.

frames

The number of frames over which the segment is to be played.

cycles

The number of cycles to repeat the segment.
Note that:
    • If the ending page number is less than the starting page number, the segment is played backwards.
    • The number of frames affects the speed of playback- pages are skipped or held (uniformly, in a linear fashion) to occupy the specified number of frames. In the Background Sequencer, a small number is displayed to the right of each sequence indicating the running total of the number of frames allocated so far.
    • The entire list of sequences constitutes a mapping of pages onto frame numbers. Page means pages in a sprite or background book, and frame means one of the images you see (after sequencing and compositing).

Insert/Delete

Click the Insert button to add a sequence, or the Delete button to delete a sequence.

Sprite Animation Parameters

The Sprite Animation options are used to composite sprite books onto background books in real-time (during book playback), using the system's alpha-blending abilities. Also provided is a simple facility for interactively editing 2D keyframe animation. See the next section for more information on sprites.

Using Sprites

The following diagram shows the Sprite Animation section of the FlipBook control window.

The FlipBook is designed to associate keyframe animation information with the background book, because it makes sense for animation to be relative to a sequenced background, and because it lets you easily try different sprites on the same motion path.

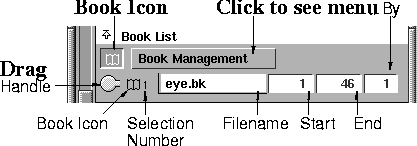
Each background book contains a list of sprite paths. You can assign a sprite to any particular sprite path: type in the name of the sprite next to the desired path.

Just as with other editor lists, you can select items in the Sprite Path list, or create and delete them with the Create and Delete buttons.

Sprite Path Editor Parameters

You can set behavior for a sprite path with the following parameters:

Sprite Path Name

This field displays the name of the current sprite path.

Keyframe

Each spritepath consists of a list of keyframes. Each keyframe has eight components:
    • frame number of the sequenced background
    • X coordinate of the sprite's hot spot
    • Y coordinate of the sprite's hot spot
    • visibility flag
    • horizontal flip flag
    • vertical flip flag
    • sprite page number
    • sprite page to loop at

Using the Keyframe Lister

The keyframe lister in the Sprite Path Editor includes a single temporary Keyframe edit area above the actual list. In this area, you can make changes to the various editable fields before committing to your changes. When you are finished, click the Set button.

If there are any keyframes in the list, and if there is a loaded sprite's name assigned to the spritepath, you should see the sprite on top of the background book, and the temporary editable fields will change to reflect the sprite's position as you change frames in the book.

You can edit the temporary keyframe either by typing in the editable fields, or by clicking on the sprite in the book and dragging it to a new location. To pick the sprite, you must click on a pixel that is part of the mask (that is, has a non-zero alpha).

As soon as you click on the sprite and modify its position or other qualities, the sprite shows up as a negative mask on the background to reflect the fact that it is not part of the current animation (as determined by the currently set keyframes). To make your change permanent, either click the Set button or press Enter, and a new keyframe will be set.

You can also pick from the list of keyframes. This causes the book to jump to the appropriate frame, and the keyframe is copied into the temporary fields. To change the keyframe, edit the fields again or manipulate the sprite, and then click Change.

If you click Set to set a keyframe when another keyframe exists at the same frame number, FlipBook asks for your confirmation before replacing the old frame. Likewise, if you click Change to change a keyframe so that its frame number now matches that of another keyframe, a confirmation box is displayed before deleting the old keyframe. You can delete the keyframe you picked with the Delete button.

Using the Keyframe Buttons

The three flags correspond to the three checkboxes in each keyframe list entry.

If the Loop page is -1, it shows up as none in the keyframe list and the page number of the sprite is linearly interpolated (just like a sequence interval) until it reaches the page number of the next keyframe. Otherwise, the sprite cycles through the frames from the starting number to the loop page number until the next keyframe is reached (like the sequencer, cycling backwards if the loop page number is less than the starting page number).

The -1 is never actually visible, but this means that you can set the loop to none by dragging all the way to the left over the Loop cell.

More on Using Sprites

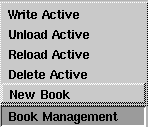
FlipBook can load its own book files or can load a series of.pix images and convert them into a book file. When you want to load a sprite, click the Load as Sprite check box in the load confirmation window (the one that asks: Load foo as a series of images? ).

FlipBook assumes that the mask files have the same names as the corresponding pix files, but in the mask directory of the project rather than the pix directory. If you don't specify a path, FlipBook looks for the../mask sibling path from the location of your pix files (this is usually correct under the user_data tree).

Using the Mouse

Clicking and/or dragging on a displayed book can have a number of effects on the sprite and on the background:

If your click lands on a visible sprite :

  • to decrement the sprite page, click the left button.
  • to increment the sprite page, click the right button.
  • to flip the sprite (cycling through the four possible directions), click the middle button.
  • to move the sprite, drag the left or right button.
  • to slide to a sprite page, drag the middle button.

If your click misses all visible sprites:

  • to decrement the frame number, click the left button.
  • to increment the frame number, click the right button.
  • to restore the current frame, click the middle button.
  • to slide to a new frame number, drag any button.
  • to begin forward or reverse playback, drag and release in either direction.

All of these operations, combined with the ability to set keyframes using the Enter key, makes it possible to set up entire animation paths while working entirely in a book frame.The only exception is that you cannot enter a loop page number anywhere but in the temporary editable fields.

>
Note: Using the mouse in an open sprite book has the same behavior as using the mouse in an open background.

Additional Information on Sprites

Sprites cannot be compressed. Also, the master book only plays backgrounds, and does not play sprites. Your freshly loaded sprite can be saved, in which case it turns into a book file, retaining information about its options and window geometry like any other book.

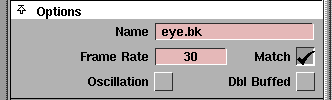
In the editor under Sprite Options, there is an extra attribute. These two editable fields let you specify the hot spot on the sprite that you want the rest of the coordinates in the animation to refer to. In addition, clicking and dragging the middle mouse button in an open Sprite window will drag the hot spot around the sprite.


Copyright © 1998, Alias|Wavefront, a division of Silicon Graphics Limited. All rights reserved. Please send questions or comments regarding the documentation to:
[email protected]