|
|
Windows > ASBD
|
The ASBD Window
|
|
|
|
|
The Advanced Scene Block Diagram (ASBD) window lets you view a complex scene as a hierarchical block diagram, annotate the diagram, and arrange the nodes in a way that is meaningful to you.
Summary
Overview
The ASBD window is a hierarchical representation of the objects, lights, textures, and cameras that make up a scene. It provides a convenient way to change specific attributes of a complex scene.
DAG nodes positioned in the ASBD workspace appear differently according to what they represent. They represent, in one compressed node, both transformation of the node and the geometry, spline, surface, and so on.
For example, a sphere primitive is composed of geometry and a surface. However, it is displayed as one node in the ASBD window:

Special Features
- A layout you can customize.
- View-dependent relationships.
- Grouping and ungrouping using the mouse.
- You can pick and change the display mode without modifying the pick list.
- Annotate the representation in the ASBD window using the pencil tool.
- Move the ASBD window anywhere on the screen and resize it.
|
|

|
-
1
-
To open the ASBD window, select Windows > ASBD or click the ASBD icon.
-
2
-
The following window is displayed:
|

|
|
-
The workspace area is empty if there is no model or
window layout.
-
3
-
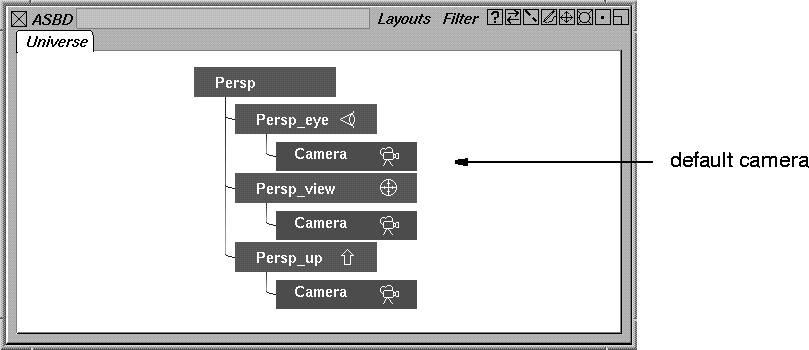
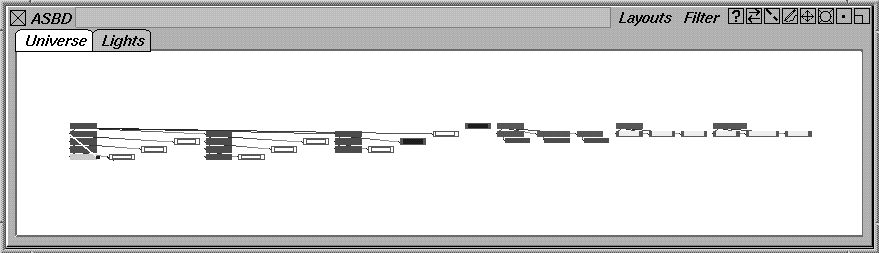
Select a window layout. (For example Layouts > All windows > Default windows.) The default camera is displayed in the ASBD window.
|
|
|
-
4
-
Place a few primitives and curves in any modeling window.
-
The ASBD window is automatically updated to show the
objects in a graphical representation.
Using the ASBD Workspace
The workspace is the open area in the middle of the ASBD window where nodes are placed.
This space has two modes: select and edit. To switch between these two modes, press the Tab key.
Select Mode
When you are in select mode, the workspace has a normal border around it (as opposed to a red border).
In this mode, you can:
- pick nodes using any of the pick tools
- move nodes in Freeform layout using Xform > Move
- move nodes using the swap button
- make annotations on any of the character pages
- erase annotations from any of the character pages
- change node or page tab names
- use any of the Filter menu commands
Note the following limitations
- You cannot edit the Freeform layout unless you use one of the pick tools and then Xform > Move.
- You cannot move nodes into new pages.
Edit Mode
When the workspace is in edit mode, it has a red border around it.
In edit mode, you can:
- use any of the Filter menu commands
- move nodes into other pages
- pick nodes using any of the pick tools
- move nodes using the Swap button
- make annotations on any of the character pages
- erase annotations from any of the character pages
- change node or page tab names
- use any of the commands in the hidden node menu
- compress and uncompress hierarchies using the buttons beside each node
- group and ungroup nodes using the mouse
Using the mouse buttons in select and edit modes
You can use the mouse buttons to perform functions interactively in the ASBD window.
In select mode:
- To toggle the pick mode, use the left mouse button.
- To replace the picked DAG node, use the middle mouse button.
- To remove the picked DAG node from the pick list, use the right mouse button.
In edit mode:
- To toggle the pick mode or position the DAG node, use the left mouse button:
- To pick the node, hold the left mouse button while the cursor is positioned on a node and let go.
- If the window is in Freeform layout you can move the whole DAG node by moving the cursor while holding the left mouse button.
- To move a DAG node independently, hold the Shift key during this operation.
- To drag and drop DAG nodes to create a copy of the DAG representation in the tab layout, use the middle mouse button:
- When you click and drag, a red line is displayed. When you release the mouse button, the drop target is established and a line extends with the cursor. Valid targets are displayed as yellow boxes as you drag the cursor over nodes.
- When you release the middle mouse button while on a page's tab, a copy of the representation of the DAG node is created in the page. The page name is highlighted in yellow indicating that it is a valid drop target.
-
Using this method, you can place specific elements of your
scene on a different page for future reference.
- To control display modes, use the right mouse button.
|
|
|
-
If you click and hold the right mouse button while on a
DAG node, a pop-up menu appears where you can control
display modes for the DAG node. These modes are
consistent with the SBD window.
-
You can also use the items in this menu to remove
hierarchies from additional pages. See Hidden Node Menu
on page 372 for information about these menu items.
Grouping and ungrouping
Group and ungroup using the middle mouse button. If you also press the Shift key, preserve position is turned OFF and the grouped object will move as well. If you do not press the Shift key, then preserve position is kept ON. This is the default setting.
Navigating in the ASBD Workspace
To move around in the ASBD workspace, you can use the track and dolly buttons on the title bar of the ASBD window, or keyboard shortcuts:
|
|

|
Tracking
-
- Press and hold the Alt and Shift keys together and then use the middle mouse button to move around.
-
- This is like using the left mouse button with the track button.
|
|

|
Dollying
-
- Press and hold the Alt and Shift keys together and then use the right mouse button in a sideways movement. Move the mouse to the left to dolly out and to the right to dolly in.
Sliding on Lines
-
- Sometimes you cannot see the destination node in the workspace. In this situation, you can move along a hierarchy line from one DAG node to another by pressing the Ctrl key and the left mouse button at the same time. Then move the cursor on the line in the direction of the node you want to move to.
-
- The line turns red and the workspace automatically moves so that the node at the end of the line is visible. The destination node is also zoomed to the maximum size.
Picking CVs
To pick CVs, set the pick mode appropriately and pick the DAG. A pick highlight of only the text representing picked CVs is displayed.
ASBD Window Layout
The default ASBD window is displayed as follows:
|

|
|
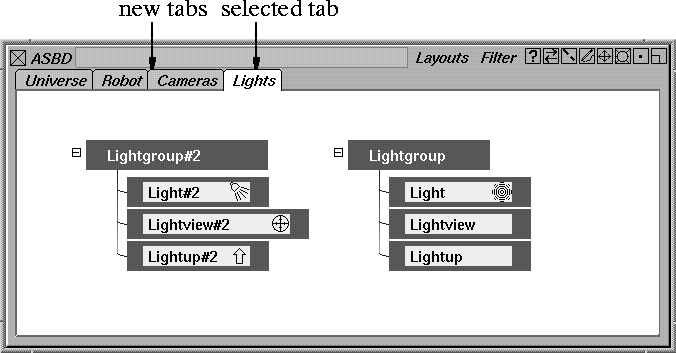
Tabs
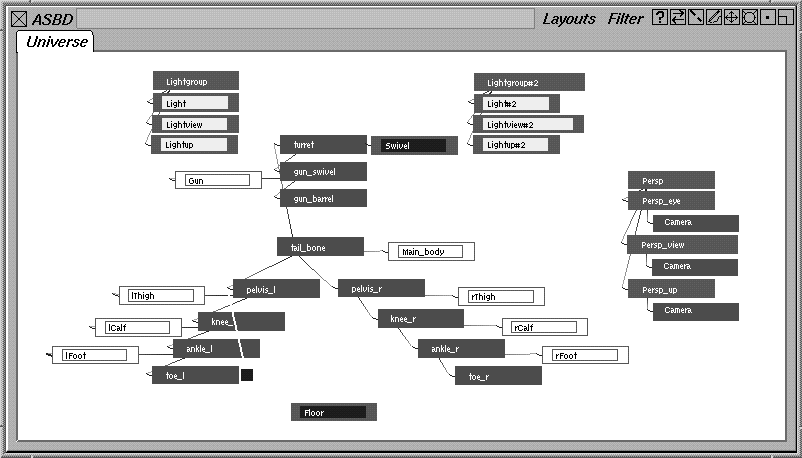
Tabs represent the different character pages in the ASBD window. You can use the character pages to organize the information in your scene. For example, you can put the character in one page, the cameras in another, and the lights in a third as shown in the following:
|
|
|
The default tab, Universe
, represents all the items in the modeling windows. When you move parts of the scene from the Universe
page to another page, the Universe
page still shows all the elements in the scene in their former locations.
>
|
Note:
|
Moving geometry to a different page does not affect the
geometry in the modeling windows.
|
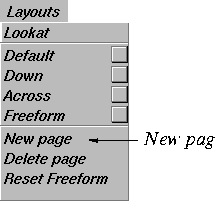
Creating a New Tab
|
|
|
You can create a maximum of 10 new tabs.
-
1
-
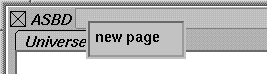
To create a new tab, select Layouts > New page
. A new tab called new page
is displayed:

-
The default layout of a new tab is Freeform
.
-
2
-
To rename the tab, press Ctrl and double-click with the left mouse button on the tab name. The name changes to an edit field:
-
Highlight the text you want to change by click-dragging
with the mouse, then type the new tab name and press
Enter.
-
The new tab name appears in the tab space:

Copying Objects to Another Tab
To organize your models, you can copy nodes from one tab to another. Although the geometry appears in two places, you have not duplicated it.
To copy an object to another tab:
-
1
-
Make sure there is a red outline around the workspace, indicating you are in Edit mode.
-
(If necessary, press the Tab key to change from Select
mode to Edit mode.)
-
2
-
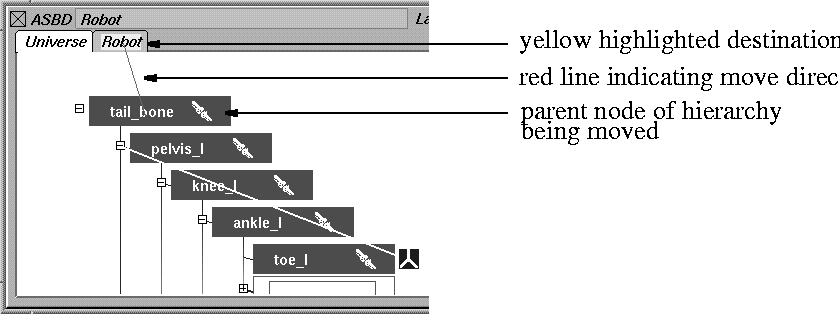
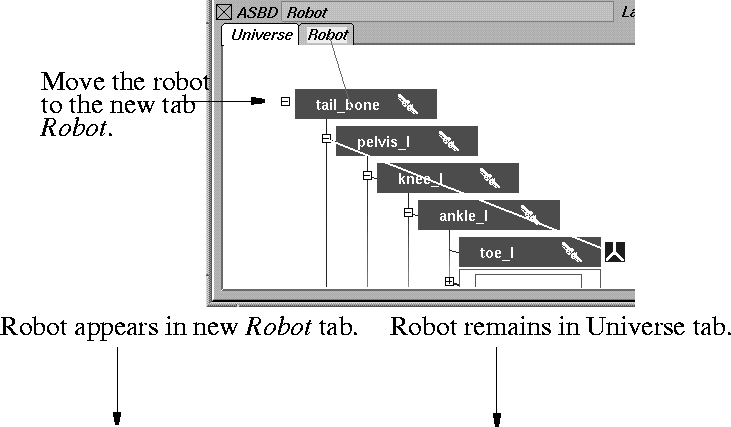
Click the node or parent node of the hierarchy you want to move with the middle mouse button. Drag the node to the tab you want to move the node to.
-
A red line is displayed as you drag to connect the node to
the tab. The tab name is highlighted in yellow when the
red line reaches it.
|
|
|
-
3
-
Release the mouse when the tab is highlighted. The object remains in its original location. However, if you click the tab you moved the object to, the object is also there.
Example of Copying an Object in the ASBD window
|
|
| |
|
|
Deleting an object from a tab
If you move an object to a tab and then decide you do not want it there, you can delete it.
-
1
-
Make sure that you are in edit mode, indicated by a red outline around the workspace.
-
2
-
Click the right
mouse button while the cursor is over the node you want to delete, or over the parent node of the hierarchy you want to delete.
|
|

|
-
A pop-up menu appears.
-
3
-
Select Remove Node
from the menu. The node or hierarchy disappears from only that page. The node does not disappear from the modeling windows.
>
|
Note:
|
You cannot remove a node from the Universe tab except by
deleting it in the modeling windows.
|
Deleting a tab
To delete an existing tab, click on the tab to highlight it. Select Layouts > Delete page. The tab disappears.
You cannot delete the default page, Universe.
Information Line
The information line in the ASBD window changes as you move the cursor over elements in the ASBD window. If the cursor is over a DAG node, the name of the node is displayed.
This feature is useful if you are zoomed out to view many DAG nodes at once and cannot see their names.
If the cursor is directly over a connecting line between two nodes (a branch line), the relationship between the nodes is displayed:

In the example above, the information faceE: parent: cube indicates that the node faceE is a child of the parent node cube.
>
|
Note:
|
You cannot use the information line to enter information in
the ASBD window.
|
Menus
The ASBD window provides the following menus:
- Two menus in the menu bar - Layouts and Filter
- A hidden node menu in the workspace
Layouts Menu
|
|
|
This menu controls the arrangement of the nodes in the ASBD window and contains tools to help you organize your model.
The selected layout option is indicated by a check mark. You can only choose one of the layout options at a time.
Lookat
-
- If you have a complex model and pick something in a modeling window, but can't immediately see it in the ASBD window, select Lookat
. The picked node zooms to an easily readable size and comes into view.
-
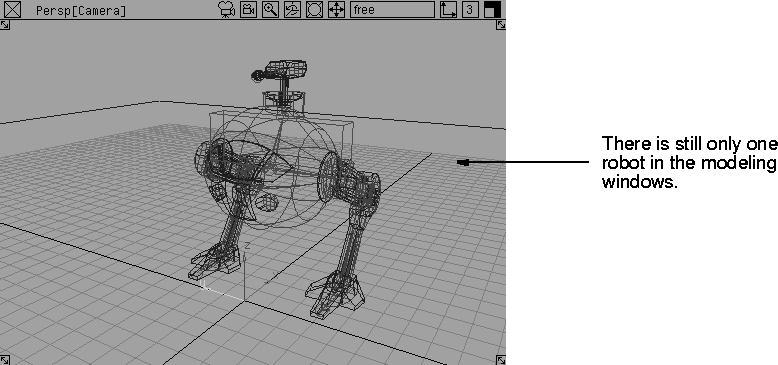
- For example, if you have picked the toe of the robot in the modeling window, and you really want to pick the robot's surface at that area, it is much easier to do in the ASBD window. However, you are zoomed out and looking at lights on the other side of the ASBD window.
|
|
|
-
-
-
- To quickly see the picked toe, select Layouts > Lookat. The view immediately changes to the following:
|

|
|
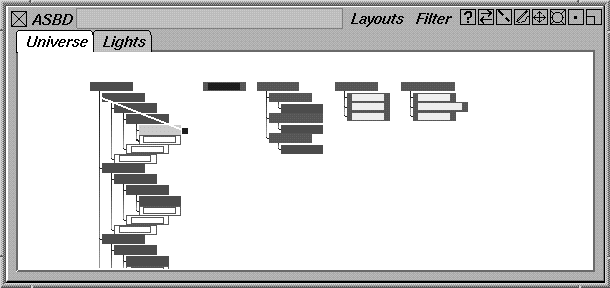
Default
-
- Arranges single nodes and parent nodes in a horizontal line. Child nodes are arranged below their parent nodes.
-
- This arrangement is useful for large models.
-
- The following example shows the arrangement:
|
|
|
Down
-
- Places all nodes in a vertical line. Child nodes are placed slightly to the right of the parent nodes.
-
- The following example shows the arrangement:

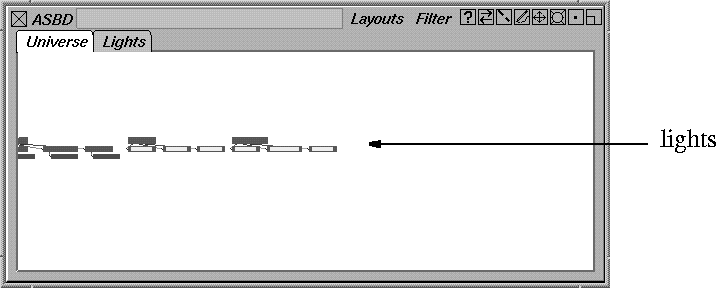
Across
-
- Places all nodes of an equal level in the hierarchy parallel on a horizontal line. The child nodes are placed directly under their parent nodes.
-
- This arrangement requires the most space and is therefore most suitable for small models.
-
- The following example shows the arrangement:
|
|
|
Freeform
-
- When you select this choice, it appears to do nothing; the nodes remain in their last position. However, you can move any of the nodes into any position that makes sense to you.
-
- To create a freeform layout:
- Select Layouts > Freeform.
- Make sure you are in edit mode. Press the Tab key to switch to the edit mode if necessary.
- Click-drag the nodes to locations you find useful. For example, place the head of a character at the top, the left limbs on the left, and the right limbs on the right:
|
|
|
Now you can switch to another layout and then back to Freeform
and the model is still in the arrangement you created.
New page
-
- Creates a new tab called new page.

-
- To rename a tab, press Ctrl and double-click with the left mouse button on the tab name, then type the new tab name and press Enter.
Delete page
-
- Deletes an existing tab. Click the tab to highlight it, and select this choice.
-
- A dialog box appear asking if you want to delete the pages. If you are sure you want to delete the page, click OK and the tab disappears. (If you do not want to delete the page, click CANCEL.)
-
- Note that you cannot delete the default page, Universe.
Reset Freeform
-
- Lets you change the freeform arrangement of the DAG nodes to one of the standard layouts.
-
- This option is useful if you have rearranged the nodes extensively and then decide that you don't like the new appearance and want to return to a standard layout.
-
- To use this choice:
- Select one of the standard layout such as Layouts > Default. The nodes move into the default arrangement.
- Select
Layouts > Reset Freeform. A confirmation box is displayed asking if you want to reset all freeform origins. If you like the arrangement of the nodes, click OK and the arrangement is saved as the Freeform layout.
>
|
Note:
|
The Layouts menu automatically defaults to Freeform if you
click OK. If you don't want to save the new arrangement of
the nodes, click CANCEL.
|
Filter Menu
|
|
|
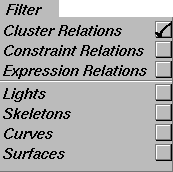
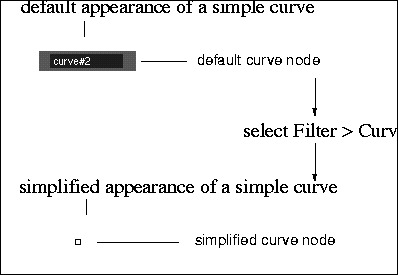
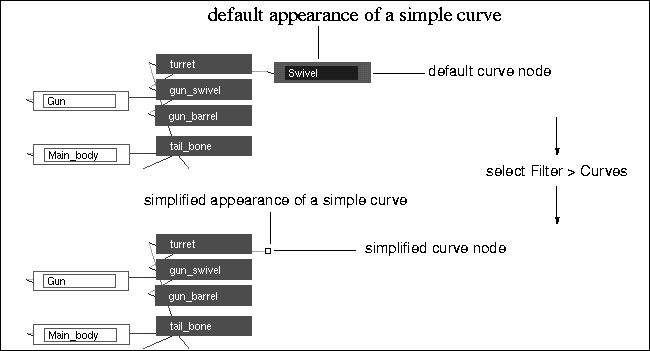
The Filter menu lets you turn off the display of certain elements in the ASBD window.
This is useful if you are working on a very complex model and want to simplify its appearance to make picking easier.
Selected options are indicated by a checkmark. You can choose as many of the options as you want.
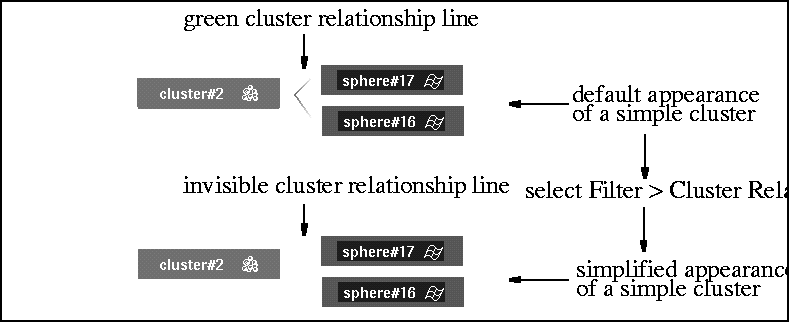
Cluster Relations
-
- All clusters in the ASBD window lose the green relationship lines that join the cluster node and the nodes that form the cluster. By default, cluster relationship lines are turned OFF.
|
|
|
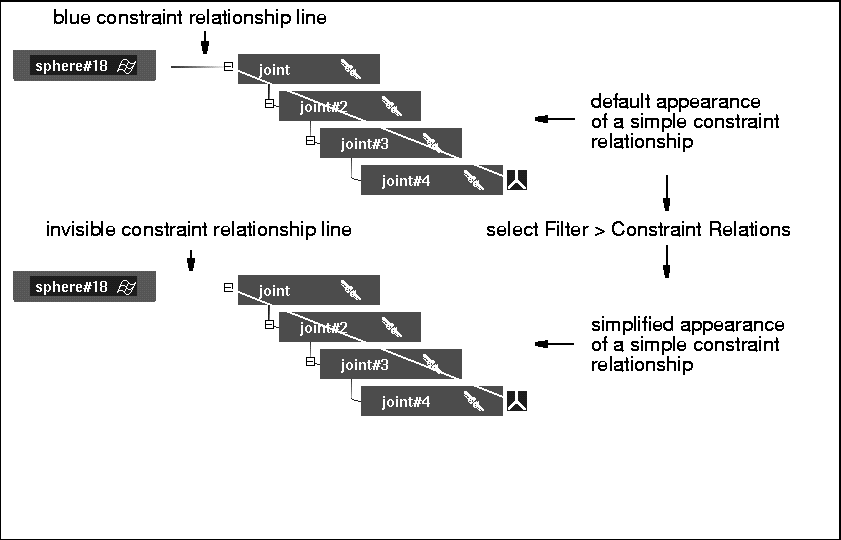
Constraint Relations
-
- All constraints in the ASBD window lose the blue relationship lines that join the objects that are constrained to each other.
-
- By default, constraint relationship lines are turned OFF.
|
|
|
Expression Relations
-
- All expressions in the ASBD window lose the brown relationship lines that join the objects that are affected by the expression relationships.
-
- By default, expression relationship lines are turned OFF.
|
|
|
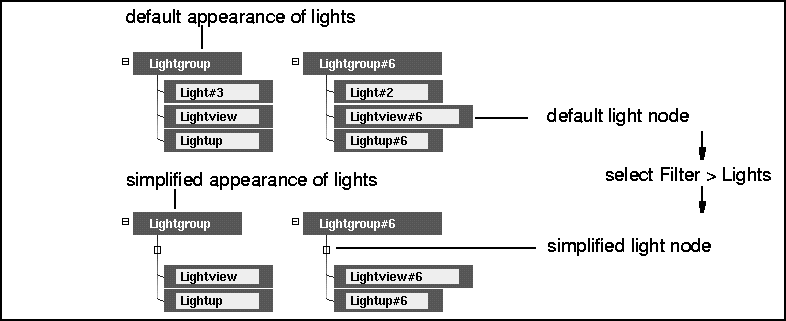
Lights
-
- All light nodes in the ASBD window are simplified to small squares. By default, light nodes are turned ON.
|
|
|
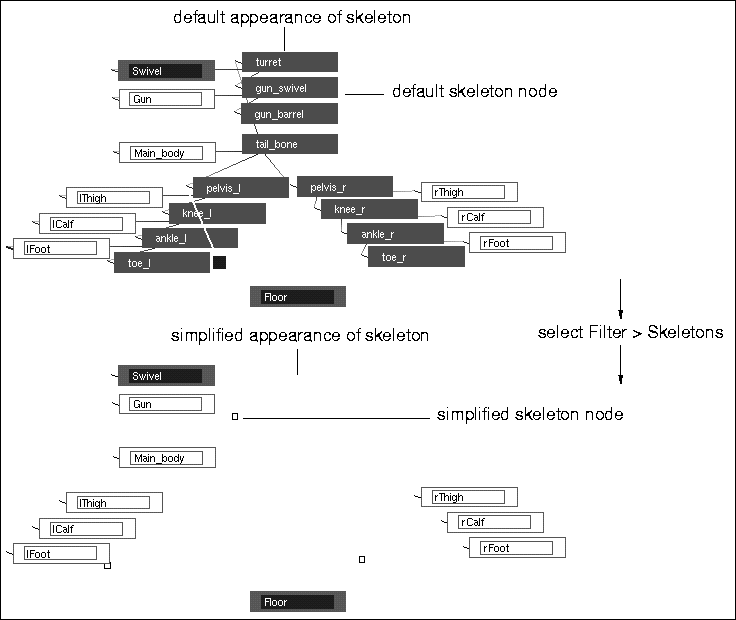
Skeletons
-
- All skeleton nodes in the ASBD window are simplified to small squares. By default, skeleton nodes are turned ON.
|
|
|
Curves
-
- All curve nodes in the ASBD window are simplified to small squares. By default, curve nodes are turned ON.
Surfaces
-
- All surface nodes in the ASBD window are simplified to small squares. By default, surface nodes are turned ON.
|
|
|
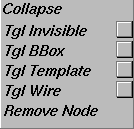
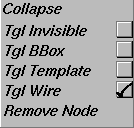
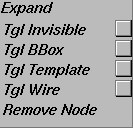
Hidden Node Menu
|
|
|
The hidden node menu contains tools to help you manage DAG nodes in the ASBD window and to control the display of individual nodes in the modeling windows.
You can only use these functions while in edit mode.
To display the hidden node menu, position the cursor over the node you want to affect and click the right
mouse button.
The selected display option is indicated by a check mark.
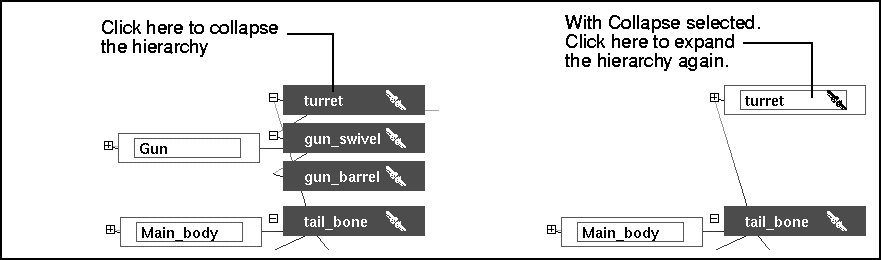
Collapse
-
- All child nodes below a selected parent node are collapsed into the parent node.
-
- The following example shows a robot head expanded and collapsed:
|
|
|
-
- Alternatively to selecting Collapse, you can click the small box containing a minus sign (-).
|
|
|
-
- When you have collapsed a section of the hierarchy, the hidden menu for the collapsed node is displayed. Select its Expand choice to return the hierarchy to its previous appearance.
-
- Alternatively to selecting Expand, you can click the small box containing a plus sign (+
).
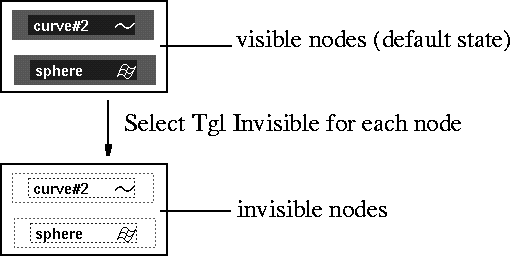
Tgl Invisible
|
|
Alternatively, select
ObjectDisplay > Invisible or
ObjectDisplay > Visible.
|
-
- The selected node and all child nodes under it change appearance and the corresponding part of the model becomes either invisible or visible.
-
- The appearance of the node change is displayed in the following example:
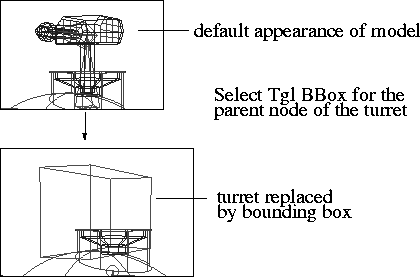
Tgl BBox
|
|
Tip: Displaying some of the
geometry as bounding boxes
speeds up modeling
operations and makes a
significant difference for
complex models.
|
-
- The portion of the model represented by the selected node and all child nodes under it are replaced by a bounding box.
-
- For example, the turret part at the top of a robot can be replaced by a bounding box:
|
|
Alternatively, select
ObjectDisplay >
Tgl bounding box.
|
>
|
Note:
|
The bounding box encompasses the hulls as well as the
actual geometry of the object. Consequently, the bounding
box may have dimensions larger than those of the geometry.
|
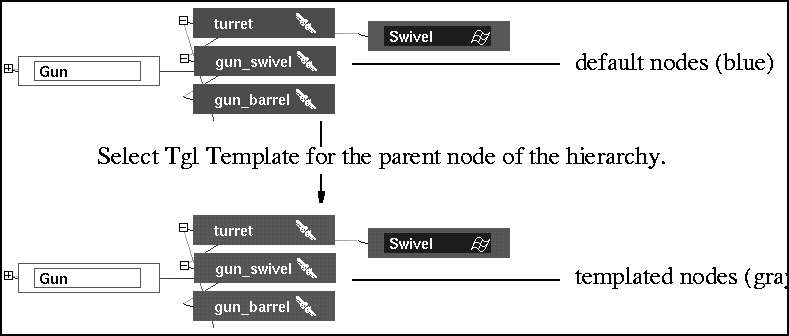
Tgl Template
-
- The node and all child nodes under it change appearance and the corresponding part of the model becomes templated so you cannot make any changes to it.
|
|
Alternatively, select
ObjectDisplay > Invisible or
ObjectDisplay > Visible.
|
-
- This choice is useful when you have a complex scene that contains many objects. You can alternately manipulate all objects distinctly, or only one at a time. Objects that are templated are still visible, but will not be pickable using the standard pick operations.
-
- The appearance of the node change is shown in the following example:
|
|
|
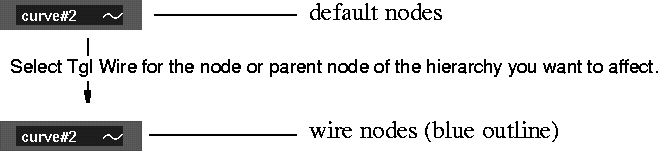
Tgl Wire
|
|
This option is useful for
protecting sections of the
model from changes and for
increasing the refresh rate.
|
-
- The node changes appearance and the corresponding part of the model is simplified.
-
- When you change the appearance of a model to the wire format:
- all CVs and edit points disappear
- all curve on surface elements disappear
|
|
Alternatively, select
ObjectDisplay > Tgl quick
wire.
|
- it is displayed in a lighter color in the modeling windows
- you cannot move CVs, hulls, or edit points while in this mode.
-
- The appearance of the node change is displayed in the following example:
|
|
|
Remove Node
-
- Deletes a node or hierarchy from a tab or character page. The Universe
tab is not affected by this choice.
-
- To use this choice:
- Make sure that you are in edit mode, indicated by a red outline around the workspace.
- Click the right
mouse button while the cursor is over the node you want to delete or the parent node of the hierarchy you want to delete.
- Then select Remove Node.
The node or hierarchy disappears from only that page. (It does not disappear from the modeling windows.)
>
|
Note:
|
You cannot remove a node from the Universe tab except by
deleting it from the modeling windows.
|
Marking Menus in the ASBD window
|
|
For more information about
using and customizing
marking menus, see Using
Marking Menus on page 34.
|
The ASBD window has three marking menus which each correspond to a mouse button.
To use the marking menus, press the Shift and Ctrl keys simultaneously and then press and hold one of the mouse buttons.
To select a command, while still holding the mouse button, drag in the direction of the command. As you drag, a rubber band line is drawn from the center of the menu that follows the cursor. Release the mouse button over the option you want to select.
Button Bar
The button bar is to the right of the menus in the upper right corner of the ASBD window:
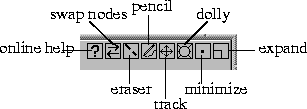
Online Help Button
|
|
For more information about
using online documentation,
see Getting Help on page 59.
|
-
- Displays a window that describes the ASBD window and all its functions.
Swap Nodes Button
-
- Lets you rearrange the order of the nodes in the ASBD window.
-
- This re-arrangement is only for organizational purposes and does not affect the geometry in the modeling windows.
-
- To swap nodes, pick the DAG node you want to move and make sure that one of the following layouts is selected: Default
, Down
, Across
. (This button has no effect in the Freeform
layout.) Then:
|
|
Alternatively, press and hold
the Alt key and use the left
or right arrow keys to swap
the picked DAG nodes with
their left or right siblings
respectively.
|
- To swap the node with its left or (for the Down layout) its upper sibling, click on the Swap Nodes button with the left mouse button.
- To swap the node with its right or lower sibling, click on the Swap Nodes button with the right
mouse button.
Eraser Button
|
|

|
-
- The eraser button deletes any annotations you have made on a character page.
-
- When you click on the eraser button, the cursor changes to a black circle.To use the eraser, swipe over the area you want to erase. The annotations are erased one complete stroke at a time.
-
- To deselect the eraser, click the button again.
-
- The following example shows the effect of this button:
Pencil Button
|
|

|
-
- Lets you make annotations on character pages. You can make sketches of what a character is going to look like, make notes about what shaders you want to use later, or type any information you find helpful.
-
- When you select the pencil button, the cursor changes to a pencil shape. Click and drag with the left
mouse button to make your annotations.
-
- (If you are making a lot of annotations or doing extensive drawing, you may prefer to use a stylus.)
-
- To deselect the pencil, click the button again.
Track Button
-
- Lets you track around the ASBD window.
|
|
Alternatively, press and hold
the Alt and Shift keys
together and then use the
middle
mouse button to
track. (This is like using the
left mouse button with the
Track button.)
|
-
- To use the track button, point the cursor over it and click and hold down one of the mouse buttons. Any movement of the mouse then manipulates the view in the ASBD window for as long as you hold down the mouse button.
-
- Each mouse button provides specific movement control:
- The left
mouse button allows free view manipulation along both the horizontal and vertical axes.
- The middle
mouse button constrains view manipulation to the horizontal axis.
- The right
mouse button constrains view manipulation to the vertical axis.
Dolly Button
-
- Lets you dolly into and out of the ASBD window.
-
- To use the dolly button, point the cursor over it and click and hold down any of the mouse buttons. It doesn't matter which mouse button you use with this button.
-
- Alternatively, press and hold the Alt and Shift keys together and then use the right mouse button in a sideways movement. Move the mouse to the left to dolly out and right to dolly in.
|
|
|
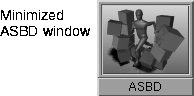
Minimize Button
-
- Minimizes the ASBD window into an icon at the top of your screen.
-
- Click this icon with the left mouse button to have the ASBD window reappear.
Expand Button
-
- Expands the ASBD window to fill the entire screen. This function is useful if you are trying to organize a very complex model and need to see more of it.
-
- To return the ASBD window to its former size and location, click the Expand window button again.
|


