|
|
File > Save as/Save
|
Saving Files
|
|
|
|
|
Purpose
Stores wireframe scene information to a selected disk file either in Alias Wire
format, or in another supported format.
>
|
Note:
|
The following terms are used in this section:
|
|
|
High Degree-Curves or surfaces that are higher than degree
3 in either parametric direction. Such objects may exist as a
result of data transfer from other systems.
|
|
|
Rational/Non-rational-Rational curves or surfaces are those
on which some CVs have weight values less than or greater
than 1. (The weight of all CVs has a value of 1 for non-
rational curves.)
|
How to Use
-
1
-
To store a file, select File > Save as, File > Save,
or
File > Export > Active as.
The Alias File Requestor is displayed.
|

|
|
|
Tip:
|
The File Browser contains a button labelled either
Save
Wire, or the last file format you selected in the Save Options
window (for example, Save DXF).
|
|
|
If the file format displayed is not the one you want to save
in, select Cancel and then File > Save as- to display the
corresponding Save All Options window. (See Save All
Options Window on page 106.) to display the
corresponding Save All Options window. (See Save All
Options Window on page 106.)
|
-
2
-
Click the Show List button to display the File Lister.
-
3
-
To overwrite an existing file, click the file's icon in the File Lister. If you prefer, you can type the filename and/or the path in full, without selecting anything in the File Lister.
-
The filename and its path appear in the File Requestor.
-
4
-
Click the Save Wire button. The following message is displayed:
-
Saving...
The entire scene is stored. If you are storing in Wire format, this includes all information in your model, including surface shaders, lights, windows, cameras, and animation. The message clears when storing is complete.
Notes
- Not all file formats are capable of storing all the information in an Alias model. Files stored in formats other than WIRE
only store a subset of the Alias model. To store your model for later retrieval into the Alias system, choose the Wire format.
- The filename should not contain spaces or other invalid characters such as `$<>'.
- If you select a file from the list, or enter the name of a file that already exists, a confirmation box is displayed asking if it is OK to overwrite the file:
- To erase the old file and replace it with the new file, click OK .
- To cancel File > Save as and restore the prompt, click CANCEL.
How Save Works
The Save
function saves only in native Alias wire format. If you are saving files to formats such as IGES or DXF, you must use the Save as function each time you save. If you change the file format with Save as and then use Save, the file is still saved as a wire file with the same name, but without the .suffix that is applied to the data exchange file.
|
|
A stage is an Alias wirefile
that you have opened and
can work on. You are always
working on a stage
whenever you are in Alias.
For more information on
stages and how to use the
Stage Editor, see Using Stages
on page 404.
|
When you use Save
to save a wire file, the File Requestor displays the stage name as the default name for the file. If it is a new file and you have not yet named it, the name is displayed as Stage
.
How Save as Works
Save as is different from Save, the only similarity being the file's name. All the save functions will save the files with the same root name and an appropriate suffix if the file is a transfer data format.
However, if you choose Save as to save a previously saved transfer data file and do not change the name of the file, the file is saved as a wirefile of the same root name and the suffix is deleted.
For instance, an IGES file named text.iges is saved as a wirefile when saved using Save as and the name changes to text.
This behavior applies to the Stage Editor as well. If you select File > Save as with the option set to IGES, the following is displayed in the Reference Path
:
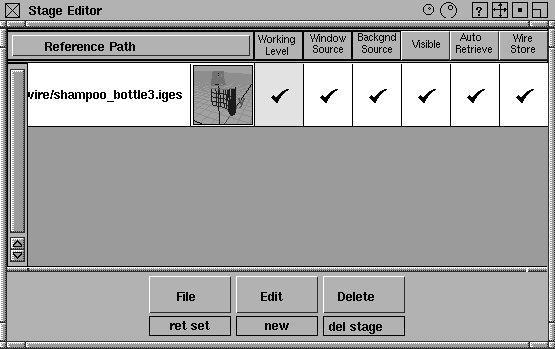
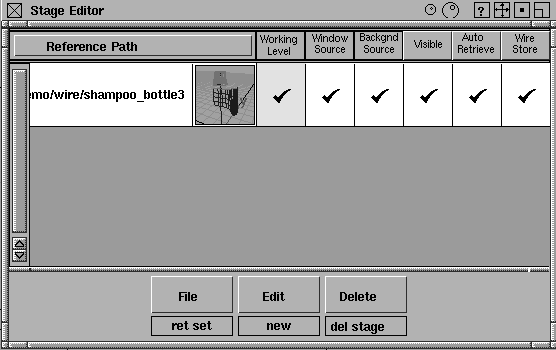
The next time you save the stage using File > Save (selected) stage in the Stage Editor, the reference will be changed to the wirefile text
and the .iges
suffix is not displayed in the Reference Path.
|
|
|
To save a file to a particular format, select File > Save as-. The Save All Options window appears.
|
|
The selections available from
the File Formats menu
depend on the Alias options
you have purchased.
|
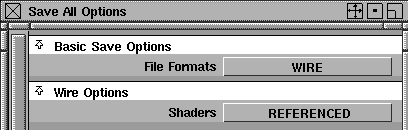
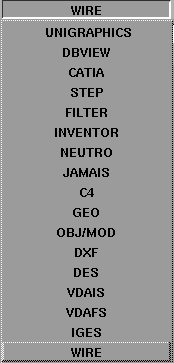
To store wireframe scene information in a different format from the default Alias Wire file format, click in the File Formats box. A menu appears where you can select a format from this menu (see the summary below).
When you enter suitable values, click the Save button at the bottom of the window. A message is displayed indicating that the file was saved successfully (sometimes, statistical information is also provided depending on the file format you chose).
|
|
|
|
|
|
|
File Format
|
For more information...
|
|---|
|
CATIA
|
See the Data Transfer for CAD and Solid Imaging manual.
|
|
C4
|
See the Data Transfer for CAD and Solid Imaging manual.
|
|
DES
|
See the Data Transfer for CAD and Solid Imaging manual.
|
|
DXF
|
DXF Options on page 108
|
|
Filter
|
External Filter Options on page 120
|
|
GEO
|
GEO Options on page 115
|
|
IGES
|
See the Data Transfer for CAD and Solid Imaging manual.
|
|
Inventor
|
See the Data Transfer for CAD and Solid Imaging manual.
|
|
JAMA-IS
|
See the Data Transfer for CAD and Solid Imaging manual.
|
|
OBJ/MOD
|
OBJ/MOD Options on page 110
|
|
STEP
|
See the Data Transfer for CAD and Solid Imaging manual.
|
|
Unigraphics
|
See the Data Transfer for CAD and Solid Imaging manual.
|
|
VDAFS
|
See the Data Transfer for CAD and Solid Imaging manual.
|
|
VDAIS
|
See the Data Transfer for CAD and Solid Imaging manual.
|
|
Wire
|
Wire Options on page 108
|
Notes
- Purchasable options include:
- The DES, VDAIS, VDAFS file formats are available in AutoStudio and are purchasable Designer and Studio options.
- The IGES and JAMA-IS file formats are available in AutoStudio and are purchasable PowerAnimator, Designer, and Studio options.
- The C4 file format and CATIA file formats are purchasable Designer, Studio, and AutoStudio options.
|
|
|
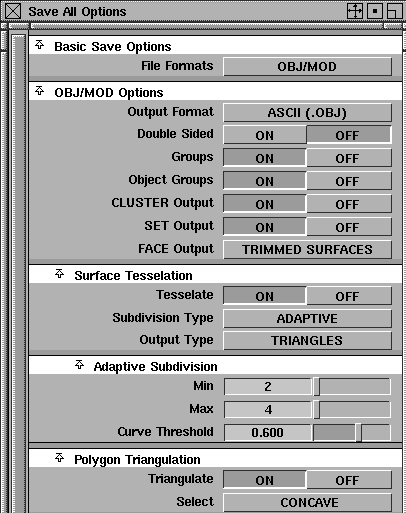
The default Save option selection is WIRE, which is the normal Alias binary file format. The Wire Options section is displayed by default.
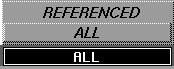
ALL
-
- Stores all shaders, whether they are assigned to specific objects or not.
-
- This option is useful if you are building a rendered scene and are not sure which shaders you want to keep.
REFERENCED
-
- (The default.) Only shaders that are assigned to objects are saved.
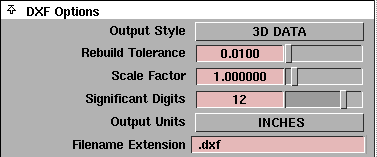
The DXF options let you store files in the commonly used DXF file transfer format. This format is useful for interchanging data with many CAD and Modeling systems.
Alias POLYSETs are written out as DXF 3DFACE entities (for triangles or quads), or closed POLYLINE entities (for polygons with greater than 4 points). All DXF entities that result from the translation of a single Alias object are assigned to a layer named after the Alias objects node name.
Output Style
-
- When storing a DXF
file, you can store three-dimensional output (3D DATA) or a flat orthographic view (2D VIEWS).
>
|
Note:
|
DXF does not support high degree or rational geometry.
Therefore, when using this format, any high degree and/or
rational geometry is automatically rebuilt to be at most
cubic and non-rational.
|
Rebuild Tolerance
-
- Lets you adjust tolerances so that the rebuilt curves and surfaces are guaranteed to be within the specified tolerance distance from the original curve or surface.
Scale Factor
-
- Lets you save the wire model at a scale other than it was constructed. 1.0 is the default value.
Significant Digits
-
- Determines the number of significant digits for coordinate data in the exported file. The minimum number is 1 and the maximum number is 15.
Output Units
-
- Lets you choose from the following data unit types: miles, feet, inches, mils, microinches, kilometers, meters, centimeters, millimeters, and microns.
-
- The exported coordinate data is converted from the current linear units set in Alias to the unit you select.
-
- Since DXF does not store the name of the units used for the coordinate data, a comment is written at the top of the DXF file stating the units of the coordinate data in the file.
Filename Extension
-
- Some receiving systems require that CAD files have a specific filename extension before they can be recognized. The filename extension you specify here is automatically appended to the filename of the exported file. The default is
_dxf.
|
|
|
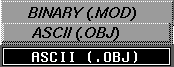
Output Format
-
- By default the translator outputs ASCII (.OBJ) files. If this option is set to BINARY (.MOD), the model is output in binary format as a MOD file.
Double Sided
-
- When set ON, surfaces and polygonal objects are saved so that they can be visible from the front and back.
-
- When set to OFF (the default), surfaces and polygonal objects are saved in single-sided mode - they are visible from the front only.
Groups
-
- When set ON (the default), all material groups are written to the file.
-
- When set OFF, no material group information is written, and all objects will have the same information.
Object Groups
-
- When set ON (the default), a group named "Obj_<objectname>" is automatically created for each object. This naming convention allows multiple objects to be stored in one OBJ/MOD
file, and is necessary for 3Design and Alias to be able to re-create separate objects on import.
-
- When set OFF, no object groups are written to the file.
CLUSTER Output
-
- When set ON (the default), cluster membership information is translated to vertex groups in the OBJ/MOD file. Only membership is translated. For example, percentage effect will be lost.
-
- When set OFF, clusters are not translated.
SET Output
-
- When set ON (the default), set membership information is translated to vertex groups in the OBJ/MOD file.
-
- When set OFF, sets are not translated.
|
|

|
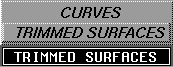
FACE Output
-
- When set to CURVES, the curves that define Alias FACE objects are represented as curves in the OBJ/MOD file. This means it is no longer a renderable object.
-
- When set to TRIMMED SURFACES (the default), Alias FACE objects are represented as trimmed surfaces in the OBJ/MOD file. For this translation to work properly, the curves of the FACE must be co-planar. If the curves are not co-planar, the face curves are translated as curves.
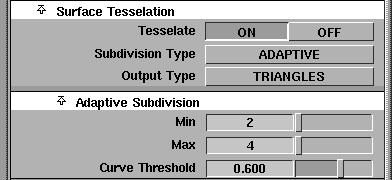
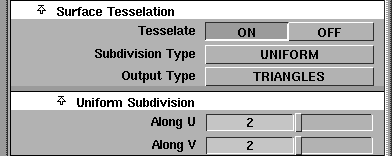
Surface Tesselation
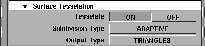
Tesselate
-
- When set OFF ( the default), no tesselation of surface information occurs.
-
- When set ON
, surfaces are converted to polygons in the OBJ/MOD file. The tesselation can be controlled using the other options in this section, which become available when this option is ON
.
|
|
|
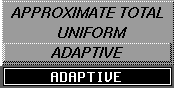
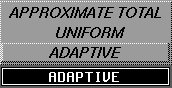
Subdivision Type
-
- This menu lets you select from the following tesselation subdivision methods:
- Adaptive, the default. See the following section.
-
-
-
- When a Subdivision Type
is chosen, associated options become available, as described in the following sections. In each case, the Polygon Triangulation section is also available (see Polygon Triangulation on page 115).
Adaptive Subdivision
Subdivides the surface into polygons as determined by the amount of curvature the surface has. Each surface is converted into the minimum allowable number of polygons that satisfy the curvature parameter. If the curvature parameter cannot be satisfied by subdividing within the maximum subdivision parameter, the maximum subdivision value is used.
>
|
Note:
|
This is the only method available for trimmed surfaces.
|
Min/Max
-
- Min
specifies the minimum number of times each patch on the surface must be subdivided in either the U or the V parameter direction. The default is 2.
-
- Max
specifies the maximum number of times each patch on the surface must be subdivided in either the U or the V parameter direction. The default is 4.
Curve Threshold
-
- Specifies how close an approximation the resulting polygons must be to the original surface. Higher values give a better approximation of the surface than lower values, given the constraints set by the minimum subdivision parameters. The default is 0.600.
Uniform Subdivision

Subdivides the surface into polygons uniformly (each patch is converted into a fixed number of polygons).
>
|
Note:
|
The UNIFORM setting is not available for trimmed surfaces.
To achieve a uniform subdivision on trimmed surfaces,
select the ADAPTIVE Subdivision Type
and set both the Min
and Max parameters to be equal to the number of times the
surface is to be subdivided.
|
Along U
-
- Specifies how many times to subdivide each patch on the surface in the U parameter direction. The default is 2.
Along V
-
- Specifies how many times to subdivide each patch on the surface in the V parameter direction. The default is 2.
Approximate Total
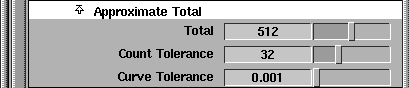
Repeatedly tessellates each surface with different adaptive subdivision parameters until the settings that produce a total polygon count close to the requested number of polygons are found.
If the requested polygon count cannot be satisfied within the given search tolerance, either the closest tesselation that is found below the requested total, or the minimum number of polygons that possibly can be created, is generated.
Total
-
- This value is used to specified the total number of polygons that should result after tesselation. To prevent the search from becoming infinite, use the Count Tolerance
and Curve Tolerance
parameters to specify the number of tolerance matches that can end the search when they have been satisfied. The search continues until one of the tolerances is satisfied.
-
- The default is 512.
Count Tolerance
-
- Specifies how close the number of polygons created is to the total (see Total for details). When a test tesselation finds parameter settings that give a polygon count between (Total - Count Tolerance) and (Total + Count Tolerance), the search is stopped.
-
- The default is 32.
Curve Tolerance
-
- Since it may not be possible to find a tesselation that satisfies the requested total within the given count tolerance, this parameter stops the search when the changes to the adaptive subdivision curvature threshold parameter fall below its specified value.
-
- The number of created polygons can get close to the requested total, depending on the type of surface being tessellated and its variations in curvature. In general, you get closer to the requested total for surfaces whose curvature varies widely and continually.
-
- The default is 0.001.
|
|
|
Output Type
-
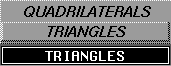
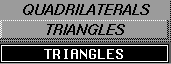
- Lets you select the type of polygons created by the tesselation process. If TRIANGLES
(the default) is selected, 3-sided polygons are created. If QUADRILATERALS
is selected, 4-sided polygons are created.
-
- When a trimmed surface is being tessellated, some 3-sided polygons may be created along the trimmed edge, even if the option is set to QUADRILATERALS
.
-
- Tip: When using QUADRILATERALS
and the ADAPTIVE Subdivision Type
, it may be necessary to set the Min
and Max
values to the same value to avoid cracks from appearing in the polygonal surface.
Polygon Triangulation

Triangulate
-
- When set ON
, the default, each polygon of the selected type will be converted to triangles. When set OFF
, polygons are not triangulated.
|
|
|
Select
-
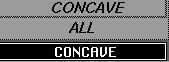
- These options allow you to choose to triangulate only CONCAVE
polygons or ALL
polygons. CONCAVE
is the default.
GEO Options
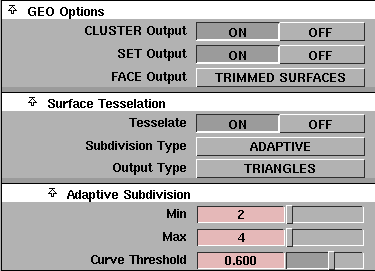
CLUSTER Output
-
- When set ON
, the default, cluster membership information is translated to vertex groups in the GEO
file. Only membership is translated. For example, percentage effect will be lost.
-
- When set OFF
, clusters are not translated.
SET Output
-
- When set ON
, the default, set membership information is translated to vertex groups in the GEO
file. When set OFF
, sets are not translated.
|
|
|
FACE Output
-
- When set to CURVES
, the curves that define Alias FACE objects are represented as curves in the GEO file. The object can no longer be rendered.
-
- When set to TRIMMED SURFACES
(the default), Alias FACE objects are represented as trimmed surfaces in the GEO file. For this translation to work properly, the curves of the FACE must be co-planar. If the curves are not co-planar, the face curves the translated as curves.
Surface Tesselation
Tesselate
-
- When set OFF
(the default), no tesselation of surface information occurs.
-
- When set ON, surfaces are converted to polygons in the GEO file. The tesselation can be controlled using the options that become available when this option is ON. They are described in the following.
|
|
|
Subdivision Type
-
- This menu lets you select from the following tesselation subdivision methods:
- Adaptive, the default. See the following section.
-
-
-
- When a Subdivision Type
is chosen, associated options become available, as described in the following sections.
Adaptive Subdivision
Subdivides the surface into polygons determined by the amount of curvature the surface has. Each surface is converted into the minimum allowable number of polygons that satisfy the curvature parameter. If the curvature parameter cannot be satisfied by subdividing within the maximum subdivision parameter, the maximum subdivision value is used.
>
|
Note:
|
This is the only method available for trimmed surfaces.
|
Min/Max
-
- Min
specifies the minimum number of times each patch on the surface must be subdivided in either the U or the V parameter direction. The default is 2.
-
- Max
specifies the maximum number of times each patch on the surface must be subdivided in either the U or the V parameter direction. The default is 4.
Curve Threshold
-
- Specifies how close an approximation the resulting polygons must be to the original surface. Higher values give a better approximation of the surface than lower values, given the constraints set by the minimum subdivision parameters. The default is 0.600.
Uniform Subdivision
Subdivides the surface into polygons uniformly (each patch is converted into a fixed number of polygons).
>
|
Note:
|
The UNIFORM
setting is not available for trimmed surfaces.
To achieve a uniform subdivision on trimmed surfaces,
select the ADAPTIVE Subdivision Type
and set both the Min
and Max
parameters to be equal to the number of times the
surface is to be subdivided.
|
Along U
-
- Specifies how many times to subdivide each patch on the surface in the U parameter direction. The default is 2.
Along V
-
- Specifies how many times to subdivide each patch on the surface in the V parameter direction. The default is 2.
Approximate Total
Repeatedly tessellates each surface with different adaptive subdivision parameters until the settings that produce a total polygon count close to the requested number of polygons are found.
If the requested polygon count cannot be satisfied within the given search tolerance, either the closest tesselation that is found below the requested total, or the minimum number of polygons that possibly can be created, is generated.
Total
-
- Specifies the total number of polygons that should result after tesselation. To prevent the search from becoming infinite, the Count Tolerance
and Curve Tolerance
parameters let you specify the number of tolerances that end the search when they have been satisfied. The search continues until one of the tolerances is satisfied.
-
- The default is 512.
Count Tolerance
-
- Specifies how close the number of polygons created is to the total (see the description of Total for details). When a test tesselation finds parameter settings that give a polygon count between (Total - Count Tolerance) and (Total + Count Tolerance), the search is stopped.
-
- The default is 32.
Curve Tolerance
-
- Since it may not be possible to find a tesselation that satisfies the requested total within the given count tolerance, this parameter stops the search when the changes to the adaptive subdivision curvature threshold parameter fall below this value.
-
- The number of created polygons can get close to the requested total, depending on the type of surface being tessellated and its variations in curvature. In general, you get closer to the requested total for surfaces whose curvature varies widely and continually.
-
- The default is 0.001.
|
|
|
Output Type
-
- Lets you select the type of polygons created by the tesselation process. If TRIANGLES
(the default) is selected from the menu, 3-sided polygons are created. If QUADRILATERALS
is selected, 4-sided polygons are created.
-
- When a trimmed surface is being tessellated, some 3-sided polygons may be created along the trimmed edge, even if the option is set to QUADRILATERALS
.
|
Tip:
|
When using QUADRILATERALS and the ADAPTIVE
Subdivision Type, it may be necessary to set the Min and Max
values to the same value to avoid cracks from appearing in
the polygonal surface.
|
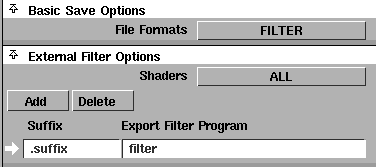
By setting the External Filter
Options
, you can enable Alias to automatically pipe data through a user-defined filter program during store operations. The filter program is generally a user-written or third party-written Alias OpenModel program.
Shaders
-
- Enables you to specify whether all shader information or only shaders that are referenced by the current model are saved via the filter program.
Since filter programs are generally written by software developers other those at than Alias|Wavefront, it's up to the user to add new filter definitions to the system. To add a filter, do the following one-time setup steps:
-
1
-
Click the Add button to add a row to the filters list.
-
2
-
Double-click in the Suffix entry of the new row, and type the file name extension associated with the filter program.
-
3
-
Double-click in the Export Filter Program field and type the path of the program (if any) to be used to convert the wire data to foreign file format.
Saving data using filters
When you have a least one filter defined and you save your model with the File Formats option set to FILTER, any file extension you specify when naming your output file is compared to the list of extensions in the filter list. If a match is found, the Alias wire data is piped to the filter program for storage.
|


