Tessellations
Goal:
The student will create 10 shapes, all identical, which fit together
with no negative space between the pieces. This is called a tessellated
shape.
Tessellation-
A tessellation is a shape which when repeated will fit together
side-by-side with NO negative space between pieces. Any parallelogram
will tessellate. Think of a tile floor. Any triangle will tessellate,
as it is merely ½ of a parallelogram.
Materials:
pencil
stiff paper for the template scissors
clear tape
9” X 12” scratch
paper 9” X 12”white paper
Steps:
1. Watch the
demonstrations and take notes at all times. Much of what is taught
here is visual and not written down yet. Your job is to write it down
to learn it.
2. We will use only
the triangle to make our tessellations.
* You must always have
perfectly straight edges.
* Be sure to color one side to
indicate the back of the template so as not to accidentally turn over
the shape when taping it to a new space.
3. Label one edge
as A, with hatch marks, one as B, with cross hatch marks, and one as C,
with spirals.
4. Find the middle
by folding one corner to the other corner, or by using a piece of paper
to duplicate the dimension and then folding that. This bisects the side
A, now all you need do is draw a line at the midpoint. Do this on both
remaining sides, as well.
5. Draw a shape from the left corner of side A to the midpoint of
side A. Cut it out and rotate it about the midpoint. Use the tape to
firmly reattach it at its new location, ON THE SAME SIDE of the
triangle, on side “A”. (This piece is rotated 180 degrees and placed at
the other end of side “A”.)
6. Do the same
thing on sides B and C.
7. Keep all
measurements from the midpoint exact and there should be no problems
with your shape tessellating. Creativity is the name of the game with
this assignment.
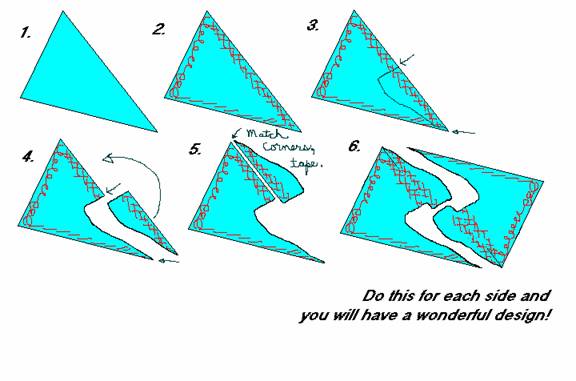
A special note:
Remember the scribbling from step #2 above? At any
time you can turn your shape over and see how the
lines match. They will always match each other EXCEPT where you’ve
matched the sides of the
shape as in step #5.
Items required for
your grade:
Your proper original
pattern, the template
Your 10 shapes cut
properly
Your shape traced to
cover all
Your 10 shapes colored
neatly
Grading Rubric:
A
All 10 shapes in and neatly cut, no sloppiness anywhere.
They must fit and have
no gaps, or practically none.
The design must fit
the shape well with the coloring done neatly. Your hard work must be
plainly visible.
The student would have
no trouble teaching another how to do this assignment.
B
All 10
shapes in and neatly done, little sloppiness (if any). They must fit
very well, with little room to spare. Done neatly. The design must fit
the shape coloring done well.
Your work must be
plainly visible. The student could probably teach the project to
another.
C
All 10
shapes in and done, average to poor neatness, so-so design. The student
understands but couldn’t teach it to another very well, if at all.
D
All or
some shapes in, but poorly done, or only some of the shapes in. The
student is lost.
F
No
shapes in, or one shape in but done so poorly that it is wrong! The
student has not learned.
- - - - - - - - - - -
- - - - - - - - - - - - - - - - - - - - - - - - -
FOLLOWING DIRECTIONS
is the primary criteria for this assignment, followed closely by
correct time use. Original and creative designing of the resulting
tessellated shape is also a must. Enjoy and learn!
back
to top
17 October 2008
|