Sierra Middle School
Riverside, California
(951) 788-7501
Mr. J. Myers
Art Teacher
[email protected]
http://www.rusd.k12.ca.us/ourschools/sms/
Date assigned: ?
Date Due: ?
| Home |
| Parent Letter and Information |
| Classroom Rules |
| Grading |
| Extra Credit |
| Links of Special Interest |
| 7th Grade |
| 8th Grade |
| General Class Objectives | Syllabus | Worksheets | Work to Date |
MosaicsGoal: The student will create their own, original, idea and present it via the mosaic medium. Materials: 9” X 12”
newsprint pencil crayons
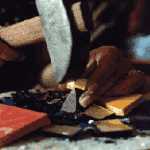
Steps: 1. Design 4 to 5 ORIGINAL thumbnail sketches, quickly, to get started. Design an idea that is both creative and pleasing to the eye. Be sure to include bold imagery. Keep the design simple! NO LETTERS OR NUMERALS ARE ALLOWED, PERIOD!! 2. Remember that a tessera is an individual mosaic tile and that the plural is tesserae. Divide each area into tesserae, keeping them about 1/2 inch in size. Then color the design lightly. Pictured below are artisans making stone mosaics. Notice that it takes much patience to carefully size the tessera and to then place it carefully.
3. DO NOT EVER DRAW ON YOUR WHITE PAPER!! Carefully refer to the demonstration, in your mind, as you select the main subject’s colored paper. The first area to start with is the picture’s center of interest. That means that you will begin cutting your most important subject. I ask you to do this because you may not have time to do everything and you might as well have your subject done! Special note:
*From your sketch trace onto the colored
construction paper ONLY the main shape. AS EACH PIECE IS CUT OFF, CUSTOM TRIM IT AND GLUE IT NOW. CUT, AND GLUE . . . CUT, AND GLUE . . . CUT, AND GLUE . . . CUT, AND GLUE . . . CUT, AND GLUE . . . CUT, AND GLUE . . . CUT, AND GLUE . . . CUT, AND GLUE . . .
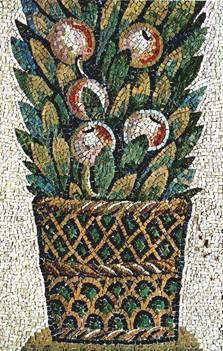
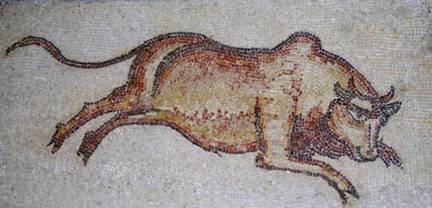
You are required to put in a background. The bull below right fails to meet those criteria, whereas the flower/fruit basket below left succeeds. Note how many different colors are used for the shapes in these two mosaics. The bull's hide of many hues, leaves, fruit and basket of just as many too. It is this attention to detail that makes these mosaics beautiful. And to think that they are both well over 1,500 years old!
4.
Once the center of interest is completed, it is time to do the background.
Select a fairly large piece of paper and cut it following the contours in
your sketch. Custom fit each piece. This step “makes or breaks”
your entire visual appearance and grade, so be careful! Ideas to keep in mind are: Be original Keep the pieces about 1/2" in sizeKeep a consistent negative space Keep it neat and clean Keep colors highly contrasting No outlines No pencil should show
No overlapping Planning now, and doing it as Demonstrated, Saves you time and your sanity! *Don’t forget to put your first and then last name, date, and period number on the lower, back, right-hand corner to EARN your full grade!!
Want to go to a terrific site that has many photos of real mosaic work done? Well then, try this: http://www.hannacroismosaics.com/ I have not been to all of the links listed, nor to those links' links, but I am pretty sure you will find only quality art work there. Be sure to contact me should there be any improper examples. Grading Rubric: Keep in mind that the grading criteria below is a guide to help you become a successful student. Remember that the absence of a sketch can cause one full grade to be deducted. A Both the sketch and mosaic are turned in and complete. The tesserae shown are neat and crisp with fairly consistent negative spaces between them. Originality of design is apparent. An “A” is an excellent grade! This means that you understand the goals desired and have done them well. You have used your time wisely and understand the project so well that you are probably able to help others to succeed as well. B Any one area noted here may cause an “A” work to become a “B”. The work turned in is correctly done but may be a bit sloppy on the shapes of the tesserae and/or negative spaces may be inconsistent. A “B” is a good grade, but a few areas do need additional work. You are probably able to help others to achieve “A” quality work even if you yourself have not. C The work shows not just ONE but several areas of concern as noted above. The general quality of the tesserae are very rough and/or are intermittent. (That last italicized word means “some is, and some isn’t”, in this case it means that the edges of the tesserae, or shapes, or negative spaces are inconsistent.) A “C” is an average grade, not great, but not poor either. Try to do better next time. You probably aren’t sure how to improve your work and will need to talk to others to see how it can be improved or may even have to try to talk to the teacher, don't be afraid to come after school for one-on-one assistance. D This grade means that the work does NOT show much control with the materials and/or the negative spaces. This probably means that the tesserae are very poorly cut, shaped, and/or glued, the paper isn’t covered, the mosaic isn’t finished, or that the work is NOT original. Maybe even ALL of these areas are present in your work. A “D” is a below average grade and should not be earned by you! You haven’t done enough work on this, keep going, finish this as soon as you can. You probably haven't given up though, so that is a good sign. F This means that you have NOT done enough to pass; you have FAILED to do as asked. You haven't done enough for your self. You are living your life, so take charge! If you check the directions again and follow the steps in the order listed you will not earn this low of a grade. Please note that an “F” is a failing grade. You have earned NO CREDIT for this assignment. Come after school or at lunch for additional assistance.
Last updated on 19 April 2006 |
|||