Tutorial #1:
In this tutorial, I'll show you how to create a real simple navigation bar with various colored tabs like the one below. It's best to follow the tutorials in order, since each one will build on skills learned in the earlier ones, but if you'd rather skip to another Navigation Bar Tutorial, you can go directly to one of the following:
The navigation bar below uses tabs for the various links to other pages. You see variations of this on a lot of web sites, including this one. As I said earlier, you'll need to create an image map to isolate the "hot spots" of each tab so that they link to their respective destinations.

This would look good either at the top or the bottom of a page, and you can change the color of the main bar at the bottom, as the user goes to that page. For instance, the navigation bar for the "Products" page might look like this:

You could carry the color thing a little further and tie in some of the other graphic elements on each page to coincide with the color of the tab for that page. For instance, the "Services" page could have a background with a brown border and brown horizontal rules, just to give each page it's own unique identity. Check out MotherNature.com to see how they did it.
The image below shows you what the menu bar looks like in NetStudio. A lot of the icons are probably already familiar to you if you've used other graphics, word processing, or page layout programs before. That's another thing that makes NetStudio so easy. You can jump right into it without having to learn a lot of new concepts.

In the top row of icons, just to the
right of the A,
is the INSERT SHAPE ![]() icon that allows you to... insert a shape. See, I
told you this program was intuitive! Click on that icon and it brings up a menu
that will allow you to choose from different types of shapes.
icon that allows you to... insert a shape. See, I
told you this program was intuitive! Click on that icon and it brings up a menu
that will allow you to choose from different types of shapes.
Choose BUTTON SHAPES. That will bring up a box that will allow you to choose which type of button you want. Click on the one that looks like this:
![]()
Now that you've created your first tab, you can modify the color or proportion of it to get it to look the way you want. When you open it in NetStudio it will have a box around it to let you know that it is a selected object. You can click-and-drag the sides of the box to make it longer, like this:
![]()
Or, you can click-and-drag the top or bottom or top of the box to make it look like this:

Or, you can drag the corners of the box to resize the object without changing its proportions. But, for now, lets make it look like this:
![]()
Now, let's color it. Select the Fill
Color Icon from the menu bar. ![]() It's the Icon to the right of the U.
You can select one of the colors that appear
in the box, or you can click on the button that says MORE COLORS, which
shows you...more colors! For now, click on the MORE COLORS button. This
will open up a box like the one below that shows all the web-safe colors that are available in
NetStudio. Click on the thumbnail below to see the full size image. Use your
BACK button to return here.
It's the Icon to the right of the U.
You can select one of the colors that appear
in the box, or you can click on the button that says MORE COLORS, which
shows you...more colors! For now, click on the MORE COLORS button. This
will open up a box like the one below that shows all the web-safe colors that are available in
NetStudio. Click on the thumbnail below to see the full size image. Use your
BACK button to return here.
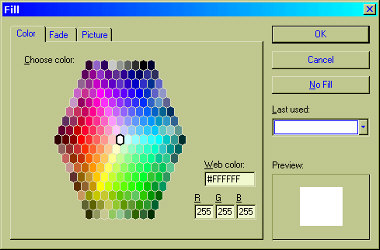
You'll also notice two tabs; one that says FADE and one that says PICTURE. Choosing the FADE tab will allow you to apply a fade effect to the selected object (we'll do this later) and choosing the PICTURE tab will allow you to fill the object with an image. More on this later.
For now, lets just select one of the colors in the original color palette. I've gone with orange for the first tab. Now I want to make four other tabs the same size and shape as the first one. Click somewhere outside of the image you've created in order to de-select the image. Now click on the INSERT SHAPE icon again and choose the same button shape. Click on it, and NetStudio has created another tab just like the one you have. NetStudio remembers the size, shape and color and creates another one exactly like it. Now, color the second tab the same way you chose the color for the first one. In this case, I made the second one blue, so now I have this:
![]()
When you have the above images open in NetStudio, you'll notice that only one of the tabs will have a box around it, indicating which one is selected. Any changes you make to the selected object will not affect the de-selected objects.
Now create a couple more tabs until you get enough for your navigation bar. In my case, I created five total. Next, choose the INSERT SHAPE icon again, only this time, choose BASIC SHAPES and select the rectangle shape from the box that pops up. When you do that, you'll notice that NetStudio still remembers the color of your last object, and it has applied that formatting to the new object. Now stretch the width out on the rectangle by clicking and dragging one of the sides of the selection box until the rectangle is wide enough to accommodate all of your navigation tabs that you've created. So now you have all the objects you'll need for this project, and you should have something that looks like this:

You've probably discovered by now that you can move a selected object by clicking and dragging the bar at the top of the selection box that surrounds the image. You've probably also learned that, in order to select an image, you just need to click on it, right? Okay, so now that you know how to select and move objects, then you know all you need to know to put the pieces of this little puzzle together. Arrange all of the tabs so that they rest on top of the rectangle, like so:

If you need more precise control for moving an object, rather than simply dragging, you can use the arrow keys to move a selected object one pixel at a time. Now, let's finish it up...


![]()
![]()
Home Navigation Bars Buttons Backgrounds Cool Tricks Next Page