
Navigation Bar Tutorial #1, Page 2:
Now we're going to take this boring looking series of navigations tabs and add a drop shadow to them to make them look a little more three dimensional.

In your NetStudio workspace, select one of the colored tabs by clicking on it. You'll now apply a shadow to it, then apply the same exact shadow to the other objects. Once you've selected the object, choose FORMAT > SHADOW... from the menu bar. This opens what I call the Shadow box, allowing you to apply a shadow to the image.
You can also choose to
apply a shadow by simply clicking on the shadow icon ![]() in the toolbar,
but selecting it from the menu gives you more options for determining the
direction, color, and amount of blur of the shadow. Below is a thumbnail of what
it looks like in NetStudio. Click on the thumbnail to see a larger version, then
use your browser's BACK button to return here.
in the toolbar,
but selecting it from the menu gives you more options for determining the
direction, color, and amount of blur of the shadow. Below is a thumbnail of what
it looks like in NetStudio. Click on the thumbnail to see a larger version, then
use your browser's BACK button to return here.
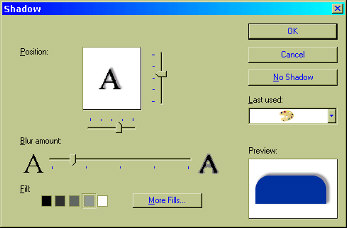
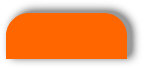
You'll notice that you can adjust the direction of the shadow using two slider bars. For the purpose of this exercise, I've decided to make the shadow slightly to the right and above the object, and I've chosen the light gray color for the shadow. You can play with it to get the look you want, and any changes that you make are immediately shown in a little test window showing the letter A. The changes can also be seen in the actual image in the workspace. Now one of my tabs looks like this:
I can quickly apply the exact same formatting to the other objects, since NetStudio remembers what formatting I've used and it will allow me to apply the "Last Used" format to the next object. Select the next navigation tab that you want to modify, then choose Format > Shadow... from the menu bar to open the shadow box again. This time, instead of manually adjusting the shadow, I can simply choose the "Last Used" menu that appears within the shadow menu box.
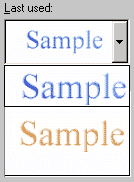
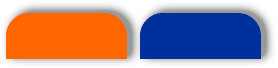
Clicking on it brings up a menu that will allow you to scroll down and select the last format that you applied to an object. It may sound confusing as I'm describing it, but if you're following along with NetStudio open in another window, it's obvious. Select the "Last Used" image (the one just below the top one). Note that NetStudio shows a little picture of a paint palette, and not the actual image that you're modifying. Click OKAY and now you've got two navigation tabs with the exact same shadow formatting, like this:
Now do the same for the other navigation tabs and the rectangle below them until your image looks like this:

I've reduced the image size for the purpose of demonstration, just so this page will load faster.
With the rectangle still selected, we're now going to apply a fade effect to it, by choosing the Fade to Transparent icon from the bottom row of the toolbar. It's the one directly below the letter A.
![]()
Don't worry, if you goof and select the wrong icon and do something you didn't want to do, you can always reverse it by selecting the Undo arrow on the top line of the toolbar. You can do this many, many times if you find that you've made a lot of changes to an object and you end up wanting to go back to a previous version. NetStudio is very forgiving of mistakes. Anyway, by selecting the FADE TO TRANSPARENT icon, you can then choose which direction you'd like the fade to go. You can also click on the MORE button to allow even more options. I've chosen to make it fade from top to bottom so that it blends into the white space of the page below, like this:

Now it's time to apply some text. Next page, please....


![]()
![]()
Home Navigation Bars Buttons Backgrounds Cool Tricks Next Page