Perhaps the most common navigation device on web sites, aside from text hyperlinks, is the button, like those at the bottom of the pages on this site. There are lots of sites on the web that allow you to download different types of buttons that someone has created for you, but why not create your own? NetStudio makes it really easy. The options for changing a button's appearance are unlimited when you consider how easy it is to fill an object with a texture; something I showed you in the Navigation Bar tutorials. NetStudio also allows you to easily create hover buttons that change appearance when you put the mouse over them, like the one below:

If you haven't taken the time to at least scan through the tutorials on the Navigation Bars pages, you may still be unfamiliar with some of NetStudio's more powerful features. I'll go over some of those things again, for those of you who haven't read that section yet. If you've already worked through those tutorials, you may get bored with me showing you how to make simple buttons.
The menu bar below is what you'll see when you open NetStudio. A lot of the icons may already be familiar to you if you've used any word processing, page layout, or paint programs before.

The icon I'll be using to create buttons will be the INSERT
SHAPE ![]() icon.
icon.
You can also use the INSERT BUTTON ![]() icon, but it doesn't immediately give you as many options; it simply creates a
rectangular button. However, if you create a button this way, you can always
change the shape of it later by selecting it, then choosing FORMAT >
CHANGE SHAPE TO... from the menu. This opens a box giving you the same
choices you're offered with the INSERT SHAPE option. One advantage to
using the INSERT BUTTON option, however, is that your text is linked to
the button if you decide to move or resize the button in your NetStudio
workspace. This eliminates having to move or resize your text separately.
icon, but it doesn't immediately give you as many options; it simply creates a
rectangular button. However, if you create a button this way, you can always
change the shape of it later by selecting it, then choosing FORMAT >
CHANGE SHAPE TO... from the menu. This opens a box giving you the same
choices you're offered with the INSERT SHAPE option. One advantage to
using the INSERT BUTTON option, however, is that your text is linked to
the button if you decide to move or resize the button in your NetStudio
workspace. This eliminates having to move or resize your text separately.
By clicking on the INSERT SHAPE icon or by choosing CHANGE
SHAPE TO..., you'll bring up
another box that will allow you to choose what sort of shape you want.
You can make a button from any of these shapes. For instance, from the BLOCK ARROWS choices, I made the arrows you see at the bottom of this page and created buttons from them.
For now, click on the oval shape so that you open up an image in your NetStudio workspace that looks like this:
![]()
You'll noticed that NetStudio has created a rectangle around your image. This lets you know that the object is selected and that any changes you make will be applied to the selected object only. There are times when you'll be creating images in NetStudio that are made up of more than one object, such as the banner at the top of this page. Even a simple button is made up of at least two objects in NetStudio: the button itself, and the text that goes on top of it. The box around your selected object also allows you to resize and move your object easily. As you move your cursor over the selected object, you will see the cursor change from a two sided arrow to a four-sided arrow.
The four-sided arrow looks like this: ![]()
The two-sided arrow looks like this: ![]() or this:
or this: ![]()
By clicking and dragging the object when you see the four-sided arrow, you can move it around in your workspace. When the cursor is near the edge of the selection box, it becomes a two-sided arrow which allows you to resize the object, also by clicking and dragging. To stretch the image out horizontally, click and drag one of the vertical edges of the selection box and move it out away from the object. To make it smaller, move it in towards the object. You can do the same for the height of the object by clicking and dragging the horizontal edges of the selection box and moving them vertically. If you want to simply resize the object, without changing its proportions, then click and drag one of the corners of the object's selection box, being careful to move the cursor diagonally, and not horizontally or vertically.
Now that you have your button the size you want it. you can color it or fill it with an image.
Choose the FILL COLOR ![]() icon. You can choose one of the 20 colors shown, or you can choose MORE.
Go ahead and choose MORE. That brings up a box that looks like the
one below. Click on it to see a larger version, then use your browser's BACK
button to return here.
icon. You can choose one of the 20 colors shown, or you can choose MORE.
Go ahead and choose MORE. That brings up a box that looks like the
one below. Click on it to see a larger version, then use your browser's BACK
button to return here.
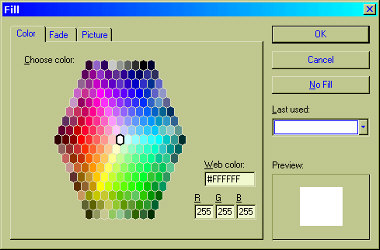
Now you have many more colors to choose from, or you can even plug in the hexadecimal value of a color, if you know it. Pick a color you like, choose OK, and you have your button. You can also make your object fade from one color to another. See Page 3 of the Navigation Bar tutorial to learn more about how to do a fade.
Now let's see what else you can do. Click the NEXT button to continue.


![]()
![]()
Home Navigation Bars Buttons Backgrounds Cool Tricks Next Page