Main Page / An overview of MT / File Menu / Bank Account View / Bill Tracking View / Auto Entries View / Plan Ahead View / Search Bank Account View
This section of the help file will talk about File Menu Overview.
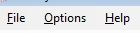
The file menu area of Money Tracer is broken up into three sections:
File
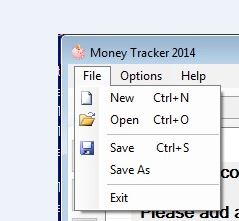
- New - New basically takes the program back to when you first installed Money Tracer, New also allows you to keep specific accounts and bills and data separate if you are in need of this.
- Open - This is how you can keep your accounts seprate and bills and such if need be. This options basically saves saved files of Money Tracer.
- Save - This allows you to save the current file you are working on quickly.
- Save As - This allows you to specify a name, and save your current work.
- Exit - Allows you to close the program
Options
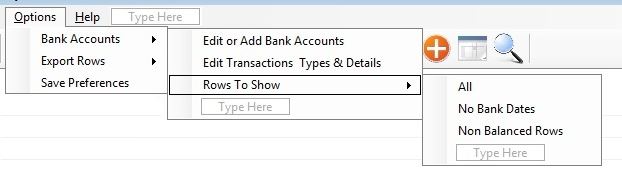
- Bank Accounts - These options here are used for the view *Bank Account*
- Edit or Add Bank Accounts - This is the area were you can Add \ Edit \ Delete your selected Bank Accounts.
The following screen will appear when you click this option: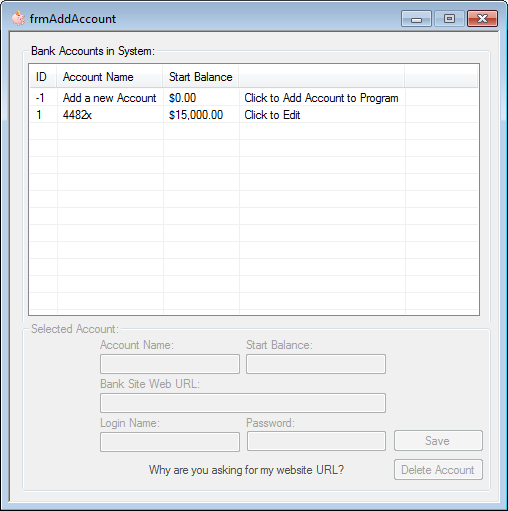
How to add your first account- If the program has not already detected you are in need of creating a new account please select the item in the list view that reads "Add a New Account"
- Here is what the following areas of the screen are for:
Account Name: This is what your account will be called, and what you will select from Account Viewing.
*Please Note: If you have multiply account names they all must be distinct and can not be the same*
Start Balance: This is your current account balance or the amount of money you had in your account before you started adding transactions
Bank Site Web Url: You can store your bank accounts website here, and launch it with a button on the main screen.
Login Name: You may chose to save your login in Money Tracer, by doing this, when you use quick link you will be able to copy your login.
Password: You may chose to save your password in Money Tracer also, by doing this, when you use quick link will be able to copy your password.*Please Note: Passwords are not visible from the Money Tracer screen, and are also encrypted in the data file* and if you would chose the copy option your password is only available in the clipboard for 20 seconds. If this time expires you have to re click "Copy"
Also to use the copy login \ password feature you simply click a link, your data gets copied to the clipboard for 20 seconds, and then in the corresponding website text box login or password, you can Ctrl + V or Right Mouse Click -> Paste it to the box.After you have created your first Account with Money Tracer you may return here later to Edit any of the fields described above. You may also delete your account if you wish.
- Click save and your ready to go.
- Edit Transactions Types & Details - This section allows you to edit transaction type and details quicker if you decide to change how you named some transaction.
The following screen will appear when you click this option: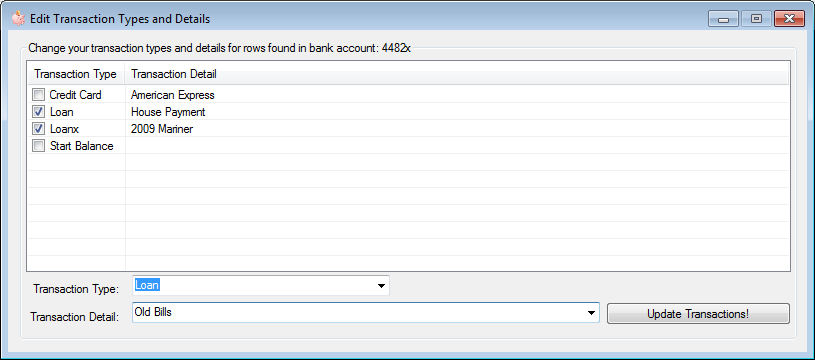
The above screen will display all distinct bank rows found in your bank account. It looks at your transaction type and details and if it finds them not in list it adds it to the list.
What this screen will allow you to do is check the transaction type & detail you are looking to rename.
After you have checked all rows that apply, you may go to the bottom and fill in your new Transaction Type and Detail.
After you are sure you want to make this change you may click Update Transaction! and you will see your list change and you should notice your previous transaction names have changed.
After I clicked *Update Transactions*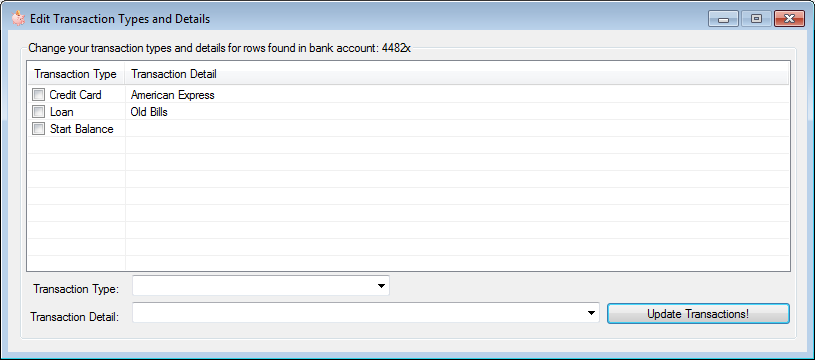
- Rows to Show - Rows to show allows you to check one of the following options *All, No Bank Dates, or Non Balanced Rows* by default ALL is checked.
This area allows you to change the rows that you view when you are in the Bank Account View section.
ALL - Does what the name states and shows you every single bank account row you have entered
No Bank Dates-Shows only rows that do not have a bank date associated to them.
Non Balanced Rows-Shows rows that are not considered *Balanced* with your current or last bank statement.
*Note: These three options determine how many rows get displayed when in Bank Account View mode, you may change these at anytime.
- Edit or Add Bank Accounts - This is the area were you can Add \ Edit \ Delete your selected Bank Accounts.
- Export Rows - This option is used to export any visible rows in the data row area to a CSV file. A csv file can be viewed in notepad or Microsoft Excel if you have it installed on your computer.
- Save Preferences - This area has options for how you can automatically save your work, and make sure if a power outage or shut-down should occur your work will be saved.
The following screen will appear when you click this option: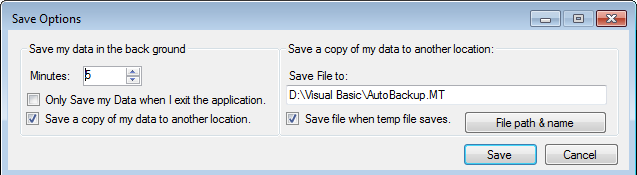
-Minutes: The minutes here is how often the data in this program is saved, it's a good idea to have it save at least every five minutes, in case anything happens while your working. You do not have to chose this option and may leave this set to zero, and it will automatically save every time you shut the program down.
-Only save my Data when I Exit the application: Check this box if you only wish for your data to be saving when you exit the program.
-Save a copy of my data to another location. When check this option allows you to automatically save a copy of your data to a different location that you chose, you may also chose the file name to save it as.
-Safe File To: This is the location and name you wish to have a back up copy of your data automatically saved to. Try make sure this is a place that can always be accessible(IE a back up \ second hard driver)
-Save file when temp file saves: This option allows your automatic back up to be saved the exact same time the data for the program is being saved.*Tip* It is recommend that you either save a file somewhere every time you are done with the program, or use this automatic backup of your data. So that if anything happens you can have a copy of your data to fall back on. ***All data files are encrypted***
- Bank Accounts - These options here are used for the view *Bank Account*
Help - This is the section you are currently reading now.