Main Page / An overview of MT / File Menu / Bank Account View / Bill Tracking View / Auto Entries View / Plan Ahead View / Search Bank Account View
This section of the help file will talk about Bank Account view.
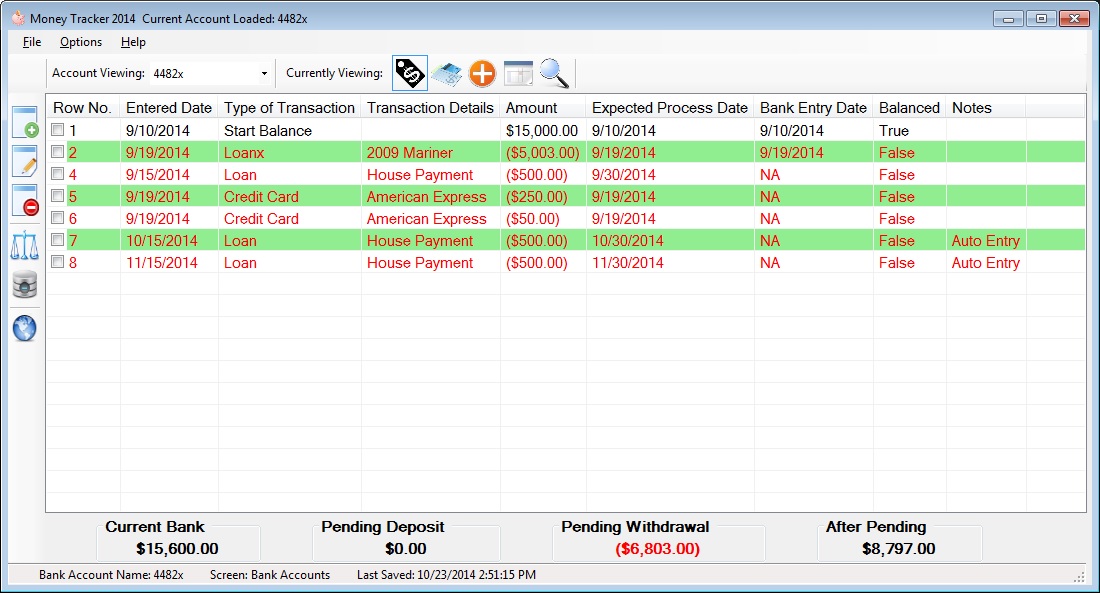
The following icons will appear when Bank Account View is selected.
![]() (Add Row): allows a user to add a bank row to there selected account viewing bank account.
(Add Row): allows a user to add a bank row to there selected account viewing bank account.
![]() (Edit Row(s)): allows a user to edit a bank row after you have added a rows.
(Edit Row(s)): allows a user to edit a bank row after you have added a rows.
![]() (Delete Row(s)): allows a user to delete a bank row from there selected account viewing bank account.
(Delete Row(s)): allows a user to delete a bank row from there selected account viewing bank account.
![]() (Balances your rows with bank statement): When clicked this feature will mark all the bank rows in the column *Balanced* to true providing a bank date has been added.
This option should only be clicked when Money Tracer's Current Bank Total matches with your current bank account statement. This allows a user to know the rows marked true, match with what was entered into your bank account.
(Balances your rows with bank statement): When clicked this feature will mark all the bank rows in the column *Balanced* to true providing a bank date has been added.
This option should only be clicked when Money Tracer's Current Bank Total matches with your current bank account statement. This allows a user to know the rows marked true, match with what was entered into your bank account.
![]() (New Pending Total): This option should be used for bank rows were balanced is marked false, you may use it with true but it won't help you as much. This feature simply takes the items you checked and adds back up
entries from the after pending total, a message box will pop up with your new after pending total if these rows were to be removed. This feature is useful sometimes when your in a pinch and you have rows that have not processed in the bank yet.
It'll allow you to quickly see you can maybe use X amount of your money for X amount of days before you have to pay it back.
(New Pending Total): This option should be used for bank rows were balanced is marked false, you may use it with true but it won't help you as much. This feature simply takes the items you checked and adds back up
entries from the after pending total, a message box will pop up with your new after pending total if these rows were to be removed. This feature is useful sometimes when your in a pinch and you have rows that have not processed in the bank yet.
It'll allow you to quickly see you can maybe use X amount of your money for X amount of days before you have to pay it back.
![]() (Bank's Website Launcher): providing this feature was set up when you added your bank account, and you can always go back and re set it up, this allows user to launch the web site url to your current account viewing selected.
An additional screen will pop up with a link, so you can click to copy your login or your password providing you have added them to the Money Tracer program. Please note all items get copied to your clipboard and the data is
cleared from your systems clipboard with in twenty seconds. So after the Copy Login / Password link has been clicked you have 20 seconds to either Ctrl + V or Right Mouse Click -> Paste. It into the desired login text box on your banks login screen.
(Please note passwords are never visible on screen, and are encrypted when saved by the program)
(Bank's Website Launcher): providing this feature was set up when you added your bank account, and you can always go back and re set it up, this allows user to launch the web site url to your current account viewing selected.
An additional screen will pop up with a link, so you can click to copy your login or your password providing you have added them to the Money Tracer program. Please note all items get copied to your clipboard and the data is
cleared from your systems clipboard with in twenty seconds. So after the Copy Login / Password link has been clicked you have 20 seconds to either Ctrl + V or Right Mouse Click -> Paste. It into the desired login text box on your banks login screen.
(Please note passwords are never visible on screen, and are encrypted when saved by the program)
When clicking one of these three icons  (Add Row)
  (Edit Row(s))
  (Delete Row(s))
Here is a picture of the screen that will pop up:

This screen allows you to add or edit the following:
-Entered: (This is the date you placed it into the program)
-Process: (This is the date you think the item with show up in or on your bank account)
-Bank: (This is the actual date this item was entered into your bank account) *To access this date you must check the *Add Bank Date* checked box.*
-Row No. (This is a number used by the program)
-Dollar Amount: (This is the entry amount for the transaction row)
-Transaction Type: (This is what you classify this transaction as (Credit Card, Loan, Bill, etc etc)
-Transaction Detail: (This is where you can type the detail of the transaction if you like (ex American Express, Discover, etc etc)
-Note:(Generally this is use to keep track of your confirmation numbers when you pay a bill, but you can put anything in here you like)
-is Balanced?: (This check box simply indicates the status of the column *Balanced*)
*Tip* - You may select multiply bank account rows to Edit, after you checked all the bank account rows you wish to modify, the screens will load one by one