Main Page / An overview of MT / File Menu / Bank Account View / Bill Tracking View / Auto Entries View / Plan Ahead View / Search Bank Account View
This section of the help file will talk about Bill Tracking view.
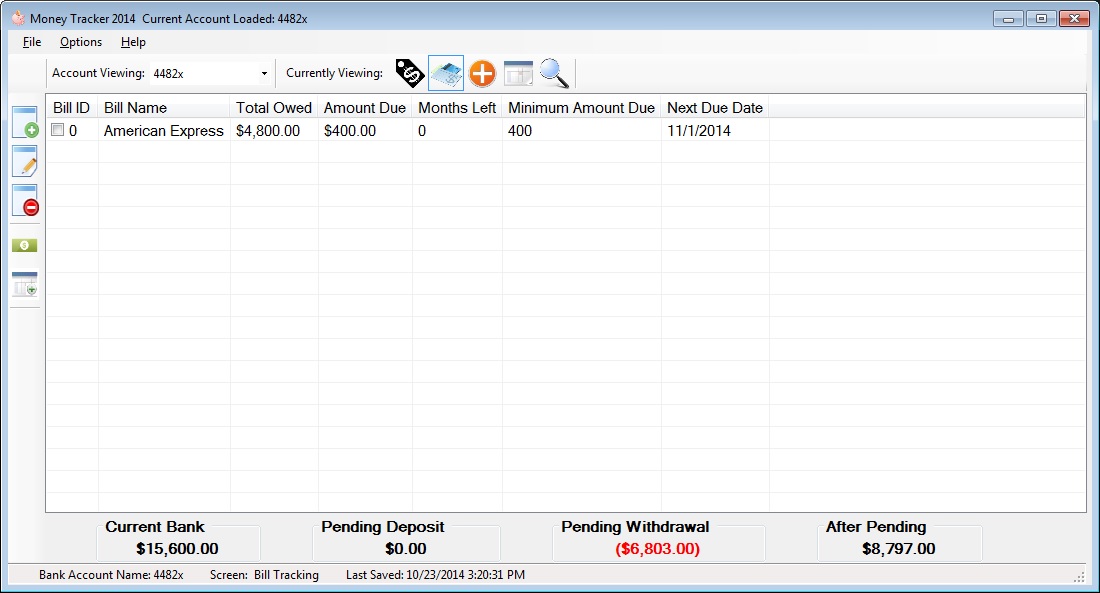
The following icons will appear when Bill Tracking View is selected.
![]() (Add Row): allows a user to add a bill row to the program.
(Add Row): allows a user to add a bill row to the program.
![]() (Edit Row(s)): allows a user to edit a bill row.
(Edit Row(s)): allows a user to edit a bill row.
![]() (Delete Row(s)): allows a user to delete a bill row from the program.
(Delete Row(s)): allows a user to delete a bill row from the program.
![]() (Pay \ View \ Edit your Bill Amount): This screen is a screen you'll want to have open when your actually paying a bill. More detail about this screen that opens will be provided later on.
(Pay \ View \ Edit your Bill Amount): This screen is a screen you'll want to have open when your actually paying a bill. More detail about this screen that opens will be provided later on.
![]() (Add to Plan Ahead): If your looking to use the plan ahead feature of Money Tracer, this item will automatically add items to that screen. You simply check the bill rows you wish
to add to the plan ahead screen and then select this button. This will automatically add entries into plan ahead mode, please note the amount, it takes over to the plan ahead view is the amount found in the *Amount Due* column.
(Add to Plan Ahead): If your looking to use the plan ahead feature of Money Tracer, this item will automatically add items to that screen. You simply check the bill rows you wish
to add to the plan ahead screen and then select this button. This will automatically add entries into plan ahead mode, please note the amount, it takes over to the plan ahead view is the amount found in the *Amount Due* column.
When clicking one of these three icons  (Add Row)
  (Edit Row(s))
  (Delete Row(s))
Here is a picture of the screen that will pop up:
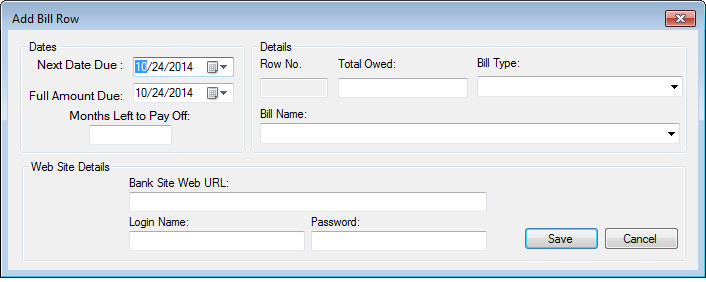
This screen allows you to add or edit the following:
-Next Due Date: This is the date of the next time your bill is actually due by
-Full Amount Due: This is the date of when total owed is to be paid by, this can be used sometimes if you have a total amount due in the future. For example you decided to add 0% interest on a balance to a credit card, and the balance is all due
in 18 months. You would place that date in this spot, so now after words the bill account view can tell you the minimum amount of money you should pay this bill per month, if your wanting to pay it off on time.
-Months Left to Pay Off: This calculates from today's date to your Full Amount Due date and determines how many payments or months you have left to pay off your Total Owed.
-Row No.: This is a number that gets generated by the program
-Total Owed: This is the total amount owed currently on your bill.
-Bill Type: This lets you indicate what type of bill it is (Credit Card, Loan, etc etc)
-Bill Name: This is the place to put the actual companies name you are paying.
-Bank Site Web URL: You may place the URL of the login page to your bill if you wish. (This will help you quicker access your bill, using the *Pay \ View \ Edit your Bill Amount* button)
-Login Name: You may place the login to your Bill's website here if you wish.
-Password; You may place the password to your Bill's website here if you wish. (Please note passwords are never visible on screen, and are encrypted when saved by the program)
When clicking the following icon ![]() (Pay \ View \ Edit your Bill Amount)
(Pay \ View \ Edit your Bill Amount)
Here is a picture of the screen that will pop up:
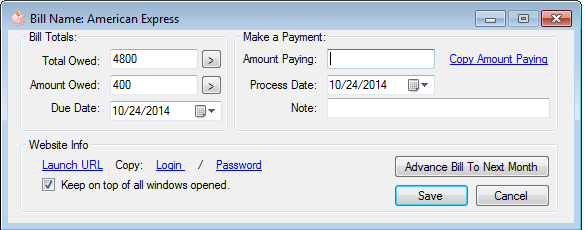
This screen allows you to quickly go to your Bill's website and keep the total owed on the bill up to date, along with keeping the amount you owed and when its due in check.
You may also *Make a Payment* from this screen which will allow you to subtract the amount your are paying from the *Total Owed*. Once you click save and a Amount Paying is present, you will be prompt
and ask if you want to add a bank row to your current bank account you are viewing.
-Total Owed: This is simply the amount your currently owe on the selected bill.
-Amount Owed: This is the amount that you will owe the bill for the next due date.
-Due Date: This is the date the money is owed.
*You may use the button with a *>* on them to automatically copy over the amount found in the text box to the Amount Paying: textbox*
-Amount Paying: This is the amount you wish subtract from your total owed and possibly enter into your bank account rows.
-Process Date: This is the date you believe the bill payment will be processing.
-Note: This is normally used for confirmation numbers, but you may use it for whatever you like.
-Launch URL: If set up this will launch the web site of the bill into your default browser.
-Login: If set up this will copy your login to your clipboard so you may (Ctrl + V or Mouse Right Click -> Paste) this item into your website login text box. (Note you only have 20 seconds after clicking this item, to paste it over,
if this time elapse you'll have to re click login)
-Password: If set up this will copy your password to your clipboard so you may (Ctrl + V or Mouse Right Click -> Paste) this item into your website password text box. (Note you only have 20 seconds after clicking this item, to paste it over,
if this time elapse you'll have to re click password)
-Keep on top of all windows opened. - This simply means this screen will always be seen, if you do not wish for this to happen, simply un check the box. This is helpful because you can leave the screen on top of your bill website and easily
update your current bills amount.
-Advance Bill To Next Month: This button is used a lot of times when you don't have anything due for this particular bill for this month, so it simply takes the due date and advances the month +1.
*Please note: If your Amount Paying is over or equal to your Amount Owed: text box your Due Date will automatically be updated to the next months due date.
*Tip* - You may select multiply bill rows to either Edit or Pay \ View, after you checked all the bills you wish to modify, the screens will load one by one, this is particular helpful if you chose the pay option rather then having to go back to money tracer
and click the next bill you wish to pay, it will automatically load the screen and it's data.