 | |
|
|
King Arthur Blouse 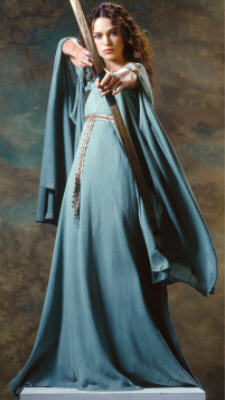 This costume was an attempt to use something from the stash. I found this pretty varigated blue silky material on clearance and bought everything that was left on the bolt (approximately 2 yds). After seeing Maggie's fantastic recreation, I decided to give this costume a try since it was relatively simple and the remaining materials were easy to get. I had to make a top since I had little fabric to work with. Long story short - I bought more fabric and still don't know what to do with the blue silky stuff. :D This costume was an attempt to use something from the stash. I found this pretty varigated blue silky material on clearance and bought everything that was left on the bolt (approximately 2 yds). After seeing Maggie's fantastic recreation, I decided to give this costume a try since it was relatively simple and the remaining materials were easy to get. I had to make a top since I had little fabric to work with. Long story short - I bought more fabric and still don't know what to do with the blue silky stuff. :D
[Skip to in-progress costume.]
Materials
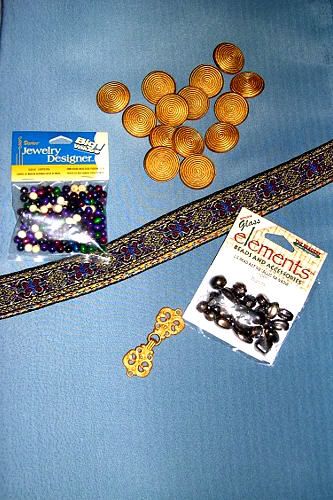
I decided to make a top since I had little fabric to work with. However, after making a muslin and attempting to fit everything onto my two yards of fabric, I didn't like the compromises I had to make and instead bought more fabric. The sleeves easily took up the two yards by themselves, let alone with the rest of the bodice. It just wouldn't be the same without the big drapey sleeves! The fabric is a nice satin, not really the right color, but close enough. :) I found the buttons at Walmart and painted them gold. Walmart was cheaper than Joanns, which had ones that were already gold, but you do need 14 of them. The beads and trim I also found at Walmart and the front clasp was something I already had, and was also painted gold.

Left to Right: old fabric, new fabric [up] [finished costume] Muslin v.1.0
I draped the basic shape of the blouse on my dressform. There's an empire waist and the front and back top pieces are on the bias in order to create the cowl drape. I ran a piece of elastic along the back empire seam to gather it in nicely. The sleeves I sort of mushed together, cutting away and shaping the muslin until I got a shape close to what I wanted. They are sewn partially into the armscye then veer off into a raglan point at the neckline yet meet at the top of the bodice strap. Clear as mud? :) The bodice strap is hidden by the drape of the sleeve, but we can see it in extreme closeup pictures of the costume. 


Left to Right: front, 3/4, side [up] [finished costume] Trimming
Every so often down the length of the sleeves are blue thread circles that are only partially attached. Taking a cue from Maggie, I used the eyelet option on a pre-programmed embroidery machine. Spaced evenly between these 'eyelets' are multi-colored beads. The empire waist is trimmed with a two layer 'belt' - a combination of a tapestry trim and a losely woven gimp trim, both of which I found at Joanns. When I purchased it, the gimp trim was threaded through with matching ribbon, which I removed first before cutting the gimp trim apart and attaching it to the tapestry trim. The ends of the belt have stone beads to give it some weight. The clasp is non-functioning, as the belt actually closes in back. I also repeated the same eyelet/bead pattern on the hem of my bodice, though this wasn't done on the actual costume, because I don't have to worry about dragging it on the ground! :)

Left to Right: trims [up] [finished costume] The Finished Costume
For more pictures of the costume, on me and on a dressform, click [here]. COMING SOON Left to Right: - [up] To see the reference images used to make this costume, check out The Costumer's Guide. |
|
| |