|








|
BOBA
FETT
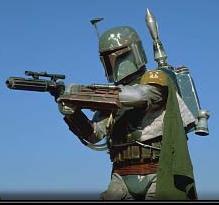 AFTER THE BATTLE OF
YAVIN
Shortly after the Battle of Yavin, the
acrachnoid-like creature, Kud'ar Mub'at, convinced Fett to
take a job that involved breaking up the Bounty Hunter's
Guild. Unknown to Fett, the contract was actually part of a
plot developed by Black Sun crime lord Prince Xizor, who
convinced Emperor Palpatine and a skeptical Lord Vader that
breaking up the powerful guild would benefit the Empire.
Xizor's plan, if successful, would eliminate Fett as well.
Boba Fett had become the galaxy's most successful
Bounty Hunter by almost always working alone, so the guild
members were surprised when he agreed to join their ranks.
Bossk, whose father headed the guild, suspected Fett's new
attitude was less than genuine, but the elder members
rejected his theory. Later, Fett convinced Bossk to join him
on a job that led them to the planet of the Shell Hutts.
Zuckuss, IG-88, and the Bounty Hunter D'harhan joined them.
The hunt ended in disaster, and Bossk swore
vengance on Boba Fett. Impatient by nature, the
cold-blooded, vicious, young Trandoshan killed his old
father and became head of the Bounty Hunter's Guild.
Shortly after the breaking up of the Bounty
Hunter's Guild, Luke Skywalker took R2-D2, C-3PO, and a
Y-wing fighter to go look for Han Solo. The Corellian was
due back from his search for an invisibility talisman, a
mystic item the Empire also sought. When Luke crashed-landed
on a red-water moon in the Panna system, he was rescued by
the mysterious Boba Fett. Fett was planning on turning the
Rebels over to the Empire for a reward. Both Skywalker and
Han were felled by a strange sleeping virus. So Fett and
Chewbacca snuck into the Imperial-guarded city to get an
antidote. While there, Boba contacted Darth Vader about the
Rebels.
It was at this point that the two droids
intercepted Fett's message that he planned to capture the
Rebels and claim the talisman. After a narrow escape from
stormtroopers, Fett and the Wookiee made it back to the
Millennium Falcon and administered the cure to Han and Luke.
Still groggy, Han didn't recognize Boba Fett, and didn't
object when Luke offered the Bounty Hunter a place in the
Rebellion. C-3PO and R2-D2 interrupted, telling the Rebels
of Fett's transmission to Vader. Fett rocketed away, vowing
vengeance.
Just prior to the Rebels' establishment of the
Hoth base, Fett was in pursuit of 'THE MOLE', a man wanted
for deserting the service of the Empire. Piloting a TIE
fighter, Fett was chased down by Luke Skywalker in an X-wing
through the ice canyons of the frozen world of Ota. Both
ships crashed and Fett and Skywalker were captured by the
ape-like Snogars. The Snogars' city was growing colder, and
they were convinced the humanoids could restore their
heat-providing machines.
Han, Chewie, Leia Organa, C-3PO, and R2D2 had
come to Ota to find Luke. While Luke and Fett escaped from
the Snogars, Han himself was captured. Seeing a chance to
finally capture Han, Boba Fett agreed to help Luke rescue
Han, In the wild events that followed, the Rebels and the
Mole were caught between the Snogars and Fett. When Fett
tried to take both the Mole and Han prisoner, the Mole used
a giant magnet to pin Boba Fett to the wall. The Rebels and
the Mole escaped, leaving Boba Fett to swear vengeance once
again.
Shortly before the Battle of Hoth, Jabba the Hutt
raised a bounty on Han Solo's head. Wanting both Jabba's
reward plus the reward the Empire wanted for Executive
Officers of the Rebel Alliance, Boba Fett went to find Solo.
Fett met with Darth Vader, mask to mask, in
person, for the first time.
AFTER THE BATTLE OF
YAVIN
Shortly after the Battle of Yavin, the
acrachnoid-like creature, Kud'ar Mub'at, convinced Fett to
take a job that involved breaking up the Bounty Hunter's
Guild. Unknown to Fett, the contract was actually part of a
plot developed by Black Sun crime lord Prince Xizor, who
convinced Emperor Palpatine and a skeptical Lord Vader that
breaking up the powerful guild would benefit the Empire.
Xizor's plan, if successful, would eliminate Fett as well.
Boba Fett had become the galaxy's most successful
Bounty Hunter by almost always working alone, so the guild
members were surprised when he agreed to join their ranks.
Bossk, whose father headed the guild, suspected Fett's new
attitude was less than genuine, but the elder members
rejected his theory. Later, Fett convinced Bossk to join him
on a job that led them to the planet of the Shell Hutts.
Zuckuss, IG-88, and the Bounty Hunter D'harhan joined them.
The hunt ended in disaster, and Bossk swore
vengance on Boba Fett. Impatient by nature, the
cold-blooded, vicious, young Trandoshan killed his old
father and became head of the Bounty Hunter's Guild.
Shortly after the breaking up of the Bounty
Hunter's Guild, Luke Skywalker took R2-D2, C-3PO, and a
Y-wing fighter to go look for Han Solo. The Corellian was
due back from his search for an invisibility talisman, a
mystic item the Empire also sought. When Luke crashed-landed
on a red-water moon in the Panna system, he was rescued by
the mysterious Boba Fett. Fett was planning on turning the
Rebels over to the Empire for a reward. Both Skywalker and
Han were felled by a strange sleeping virus. So Fett and
Chewbacca snuck into the Imperial-guarded city to get an
antidote. While there, Boba contacted Darth Vader about the
Rebels.
It was at this point that the two droids
intercepted Fett's message that he planned to capture the
Rebels and claim the talisman. After a narrow escape from
stormtroopers, Fett and the Wookiee made it back to the
Millennium Falcon and administered the cure to Han and Luke.
Still groggy, Han didn't recognize Boba Fett, and didn't
object when Luke offered the Bounty Hunter a place in the
Rebellion. C-3PO and R2-D2 interrupted, telling the Rebels
of Fett's transmission to Vader. Fett rocketed away, vowing
vengeance.
Just prior to the Rebels' establishment of the
Hoth base, Fett was in pursuit of 'THE MOLE', a man wanted
for deserting the service of the Empire. Piloting a TIE
fighter, Fett was chased down by Luke Skywalker in an X-wing
through the ice canyons of the frozen world of Ota. Both
ships crashed and Fett and Skywalker were captured by the
ape-like Snogars. The Snogars' city was growing colder, and
they were convinced the humanoids could restore their
heat-providing machines.
Han, Chewie, Leia Organa, C-3PO, and R2D2 had
come to Ota to find Luke. While Luke and Fett escaped from
the Snogars, Han himself was captured. Seeing a chance to
finally capture Han, Boba Fett agreed to help Luke rescue
Han, In the wild events that followed, the Rebels and the
Mole were caught between the Snogars and Fett. When Fett
tried to take both the Mole and Han prisoner, the Mole used
a giant magnet to pin Boba Fett to the wall. The Rebels and
the Mole escaped, leaving Boba Fett to swear vengeance once
again.
Shortly before the Battle of Hoth, Jabba the Hutt
raised a bounty on Han Solo's head. Wanting both Jabba's
reward plus the reward the Empire wanted for Executive
Officers of the Rebel Alliance, Boba Fett went to find Solo.
Fett met with Darth Vader, mask to mask, in
person, for the first time.
 Fett agreed to work with Dengar, Bossk, and Skorr
as a team. They captured Han Solo, Chewbacca, and Luke
Skywalker and took them to the planet Ord Mantell. But Fett
underestimated the power of the Force and was taken by
surprise by Luke's powers. So Han Solo escaped Fett again.
NEXT
PAGE - AFTER THE BATTLE OF HOTH
FETT'S
EARLY YEARS
AFTER
THE BATTLE OF YAVIN
AFTER
THE BATTLE OF HOTH
AFTER
THE BATTLE OF ENDOR
FETT'S
ARMOR
SLAVE I
AND SLAVE II
Fett agreed to work with Dengar, Bossk, and Skorr
as a team. They captured Han Solo, Chewbacca, and Luke
Skywalker and took them to the planet Ord Mantell. But Fett
underestimated the power of the Force and was taken by
surprise by Luke's powers. So Han Solo escaped Fett again.
NEXT
PAGE - AFTER THE BATTLE OF HOTH
FETT'S
EARLY YEARS
AFTER
THE BATTLE OF YAVIN
AFTER
THE BATTLE OF HOTH
AFTER
THE BATTLE OF ENDOR
FETT'S
ARMOR
SLAVE I
AND SLAVE II
|