Cutting and pasting pictures
To make sure you always keep an original version of a picture (such as the camera image), it's a good idea to cut out the sections that you want to use and place them into another canvas.
To cut out part of an image:
- With the camera picture displayed, select effects(TM)cut.
The cut tool is displayed.
- In the cut tool:
- select shape(TM)rectangle
- click uniform off
- click create
Starting in the lower -left corner of the screen, click and drag the pointer up to the upper-right corner, creating a rectangle surrounding the camera. Click to finish the rectangle.
An outline tool appears on the canvas surrounding the camera.
Using the outline tool handles, adjust the position and size for the cut.
Center the tool on the camera and size it so that it includes only about 1/8" of the background (see figure 76). 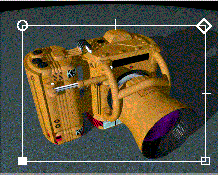
Figure 76 Specifying a cutout
Click cut.
VizPaint2D places the cutout in a canvas called cut_1.
A swatch of the cutout appears in the cut tool.
To paste the cutout down:
- Select picture(TM)create.
The create tool is displayed.
- In the create tool:
Select paste-up(TM)paste.
A list shows the canvases available.
Click cut_1 to choose it for the paste.
The paste tool shows the cut_1 swatch. A shaded outline tool appears on the canvas.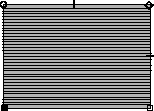
Figure 77 Paste outline tool
Click setup in the control panel.
The setup tool is displayed.
|
Tip: If the shaded outline tool covers the setup tool, use the outline tool's handles to move it out of the way. |
In the setup tool, click fine.
The green light on the fine button goes on and the fine adjustment tool is displayed in the lower-right corner of the screen.
In the setup tool, click undo.
Turning this option on gives you the ability to undo a step by pressing the undo button in the control panel. You must press undo immediately after performing the step you wish to undo. You can only undo the most recent step; you can undo only effects operations.
Press the close box in the upper-right corner of the setup tool.
Use the fine adjustment tool (see figure 78) to reduce the scale of the cutout as follows:
Again, using the fine adjustment tool, adjust the position of the cutout as follows:
Using the solid move handle on the outline tool, center the cutout in the canvas.
In the cut tool:
If you need to stop the tutorial, use the save tool described on page 423 to save the tutorial canvas.
On your own
Before moving on to the next part of the project, you might want to experiment some more with pasting pictures. To do this, open a new canvas with paint(TM)create. Using the cut_1 cutout:
- Try adjusting the perspective of the cutout with the horiz and vert buttons (see "Undoing a step" on page 412 for more information).
- Adjust the rotation, position, length, and width of the cutout using the fine adjustment tool.
- Try out the pattern and brush paste tools (see page 416 and page 393 for descriptions of these tools).
- Paste down the cutout using different modes and opacity settings.
Make sure that the tutorial canvas is selected before proceeding to the next section. (If the tutorial isn't the current canvas, use the select tool to make it the current canvas.)
[email protected]
Copyright © 1998, Alias|Wavefront, a division of Silicon Graphics Limited. All rights
reserved.