In this lesson you'll use VizPaint2D's shapes tool to create rectangles, ellipses, polygons, and freehand shapes. You'll also start using VizPaint2D's composition modes to layer elements and modify hue, saturation, and value.
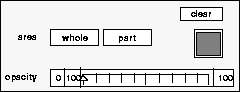
Figure 67 Using the clear tool
The palette tool updates to display the continuous palette.
The color swatch in the continuous palette tool updates to show the color you selected. You will use this color when you clear the canvas.
The entire canvas is cleared using the black color. When you perform the clear operation at a very low opacity, it acts like an erase operation.
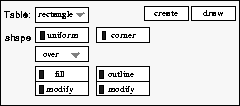
Figure 68 Using the shapes tool
A square outline tool is displayed on the canvas, showing the size and position of the newly created shape.
Once you've created a shape, you can adjust its position and size using the handles on the outline tool (described in figure 69) as follows:
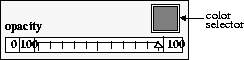
This activates the color selector. The color currently displayed in the palette tool's color swatch appears in the shapes fill color selector. To select a different color, click on a color in the palette tool.
Tip: The shapes fill tool is displayed to the right of the shapes tool. If it is not displayed, click the fill modify button. |
A square is drawn using the selected color.
The shapes outline tool is displayed.
This time, VizPaint2D draws the square with a white outline.
A circular outline tool is displayed on the canvas.
The shapes fill tool is displayed.
The shapes outline tool is displayed.
VizPaint2D draws the circle with the new fill and outline colors.
A new option, edges, is displayed in the shapes tool with a text box for entering the number of edges. The default is 3.
Your canvas should now look something like this.
Figure 72 Creating polygons with over composition mode
In the areas of overlap, new shapes were drawn over existing ones. (To demonstrate this, move the outline tool over a shape and click draw.) Until now, you have been using the over composition mode.
The new shape is visible only where nothing existed before.
The atop mode draws where the outline tool overlaps an existing shape. Erase mode clears everything that falls into the outline tool.
The hue, saturation, value, and watercolor modes work differently from other composition modes. To see the how they differ, you need to draw over existing shapes. These modes have no effect on transparent areas.
The shape is painted using the chosen hue. Note that while the hue changes, the saturation (or intensity) does not. Also note that areas where the existing shape's outline color is different from the fill color are still visible in the area where the hue has been changed.
Refer to "Composition modes" on page 362 for more information about these four composition modes.
Before moving on to the next section, try the following to become more proficient with the shapes tool: