


Before you start using VizPaint2D, we recommend that you review these key concepts:
You may already be familiar with these concepts from working with other paint software. Remember that each package implements basic concepts in different ways. You will find that some items discussed here, such as composition modes, are unique to VizPaint2D.
Just as you would with traditional art tools, you can compose pictures in VizPaint2D by painting freehand on a blank canvas. As a computerized tool, VizPaint2D goes beyond traditional tools by letting you create new work using images that already exist, either stored on disk or in a hard-copy form that can be digitized.
In VizPaint2D, the area on the screen where you work is called a canvas. Once a canvas has been created and saved, it is called a picture.
A picture is a data file that can come from many different sources. Pictures can be:
For an image to be used in VizPaint2D, it must be saved in a file format that VizPaint2D supports (see Table 1). Note that VizPaint2D can both read and write files in these formats. You can output images in the appropriate format for use with other software packages or peripheral devices.
VizPaint2D also supports a range of image sizes (or resolutions). An image's size is determined by the number of pixels spanning its height and width. Images can be any size up to 8192 x 8192 pixels, provided your workstation has sufficient memory.
VizPaint2D also supports plug-in architecture for image file drivers, so it will accept third party and user-written drivers.
With VizPaint2D, you can manipulate images that have either 32- or 64-bit pixels (that is, either 8 or 16 bits of data per color component).
When 64-bit images are manipulated, all reading, writing, copying, pasting, and so on is performed using 64 bits per pixel. However, any operations which use the palette effectively use only 32 bits per pixel. Such operations include brush pasting, creating grades, and most operations which use color from the color palette.
If you try to match a color from a 64-bit image, only the 32 most significant bits are used, even if that color is subsequently painted onto a 64-bit image. Note that full white always causes all bits to be on, regardless of whether you are using 32- or 64-bit pixels.
When you load an image into VizPaint2D, it becomes an open canvas to work on. You also create canvases when you perform certain paint operations, such as cut or zoom. A default (blank) canvas is also provided.
VizPaint2D displays canvases at the maximum possible size. If the picture is larger than the largest available canvas, it is compressed to fit in the canvas. Note that in this case you will not see all of the pixels in the picture, but you will be painting them.
You can open or create a new canvas at any time. The canvas you were working on is automatically saved in memory and the new canvas is displayed.
| als | - | Alias format1 |
| aurora | .im | Aurora |
| cin | .cin | Kodak Cineon |
| eps | .eps | Encapsulated PostScript |
| epsp | .epsp | Encapsulated PostScript with bounding box |
| jpg | .jpg | JPEG |
| msk2 | .msk | Wavefront mask |
| pic | .pic | Pixar |
| pict | .pict | PICT Version 2 |
| pxr | .pxr | Pixar |
| qnm | .qnm | Quantel PAL with matte component |
| qnt | .qnt | Quantel PAL |
| qtl | .qtl | Quantel NTSC |
| qtm | .qtm | Quantel NTSC with matte component |
| rgb | .rgb | Silicon Graphics |
| rla | .rla | Wavefront image |
| rlb | .rlb | Wavefront image |
| sga | .pix | Sega |
| sgi | .sgi | Silicon Graphics |
| si | .pic | Softimage |
| sony | .tim | Sony Playstation |
| tdi | - | Explore |
| tex | .tex | Wavefront scalar, color, and bump textures |
| tga | .tga | TARGA 24- or 32-bit format |
| tif | .tif | TIFF class R |
| txbc | .txb | Wavefront bump texture |
| txcc | .txc | Wavefront color texture |
| txs3 | .txs | Wavefront scalar texture |
| vst | .vst | VISTA 24- or 32-bit format |
Every pixel in a canvas has a precise location, defined by an xy coordinate system where the x axis runs from left to right and the y axis runs from bottom to top. The point of origin for both axes, where the values for x and y are zero, is at the lower left corner of the canvas. For any location on a canvas, the x and y coordinate values indicate how many pixels it is from the origin. 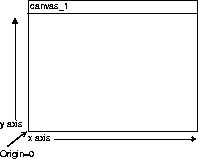
The range of possible values for a canvas's x and y coordinates is determined by the canvas size (or resolution). For a 640 x 486 canvas, the x values range from 0 to 639 and the y values range from 0 to 485.
VizPaint2D offers several different ways to choose colors.
The following paragraphs describe how you use the HSV, RGB, and CMY color models to specify colors in VizPaint2D.
The HSV model separates color into three components:
In VizPaint2D, you blend color by adjusting sliders or entering a value that corresponds to a slider's position. The range of values for HSV is as follows:
The HSV color model is also the basis for four VizPaint2D composition modes: hue, saturation, value, and watercolor. (See page 360 for a description of these composition modes.)
The RGB model uses varying amounts of three primaries-red, green, and blue-to create color. The RGB model is known as additive color because adding 100% of three primaries produces white, combining 0% of the three primaries creates black, and adding equal amounts of all primaries produces gray.
The CMY model uses varying amounts of cyan, magenta, and yellow as its primaries to create color. The CMY model is known as subtractive color because combining 100% of its primaries produces black and 0% of all three results in white.
If you have never edited color before, it helps to know the combinations for primary and secondary colors. Then you can start with the primary or secondary closest to the color you want to create and change one slider at a time to create an exact shade.
Table 2 lists the RGB values for primary and secondary colors.
| Red | 1 | 0 | 0 |
| Green | 0 | 1 | 0 |
| Blue | 0 | 0 | 1 |
| Cyan | 0 | 1 | 1 |
| Magenta | 1 | 0 | 1 |
| Yellow | 1 | 1 | 0 |
| White | 1 | 1 | 1 |
| Black | 0 | 0 | 0 |
Table 3 lists the CMY values for primary and secondary colors.
| Red | 0 | 1 | 1 |
| Green | 1 | 0 | 1 |
| Blue | 1 | 1 | 0 |
| Cyan | 1 | 0 | 0 |
| Magenta | 0 | 1 | 0 |
| Yellow | 0 | 0 | 1 |
| White | 0 | 0 | 0 |
| Black | 1 | 1 | 1 |
Just as you can vary the amount of paint when working with pigments and a brush, VizPaint2D lets you control the transparency of whatever you apply to the canvas, including paint, grades, text, pasted pictures, and even erasing.
Transparency and opacity are opposites. The higher the transparency value, the more the pattern, color, or design of any underlying picture is visible through it. Lower transparency values create more opaque effects, revealing less of the underlying picture.
VizPaint2D stores each component of the color on a separate channel-there is one channel for each color component and one channel for the transparency component. The channel that contains transparency information is called the alpha channel. (In other systems, the alpha channel may be referred to as the matte channel.)
VizPaint2D allows you to paint on the alpha channel, which is especially important when you will be layering (or compositing) two or more pictures. For more information, see "Compositing pictures" on page 363.
Masking is a way to block off portions of your pictures so that they are not affected by VizPaint2D operations.
In the areas where the mask exists, the picture is protected. In the areas where there is no mask, you can paint as usual. Since masks are anti-aliased, the edges of a mask are "soft."
You can control a mask's opacity so that the masked area is only partially protected.
You access masking with the paint mode tool. For information about the paint mode tool, see "Choosing paint and display modes" on page 386. To find out about generating masks from a picture, inverting masks, or reading and writing mask files, see "Undoing a step" on page 411.
When you work with a physical surface (like paper or canvas), you can only paint or paste over the existing layers. VizPaint2D's composition modes let you add new layers in eleven different ways:
By understanding the composition modes, you will be able to exercise the capabilities of VizPaint2D and achieve extraordinary effects.
Tip: Once you have integrated a layer with the layer on the canvas, you cannot remove just a single layer. |
When you create masks, the only composition modes available are over, erase, and replace.
Over mode applies any color, text, or picture directly on top of whatever already exists on the canvas. Combining the over mode with a 100% opacity setting completely covers the painted area. Using over mode with a lower opacity setting allows some of the existing layer to show through. (See figure 4.)
Under mode applies changes behind the existing layers. For changes made in under mode to be visible, part of the canvas needs to be either blank or filled with areas of low opacity. If your canvas is a completely opaque picture, you will not see anything painted using under mode.
Atop mode applies changes only over painted areas, not on blank portions of the canvas. (Painted areas are defined as those with partially or fully opaque alpha values.)
For example, if you were brushing pink strokes on a canvas that contained only a green rectangle, the pink would show only on the area covered by the rectangle.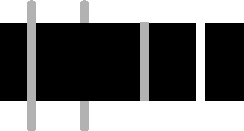
Figure 4. Composition modes-over, under, atop, erase
Erase mode removes any existing color and alpha, text, or image. Erasing an area with a low opacity clears it gradually. By setting the opacity to 100%, you can completely erase an area with a single stroke.
Erasing with a picture that includes different opacity levels results in both partially and completely cleared areas of the canvas
Replace mode substitutes new changes for any existing color, text, or images. With replace mode, the entire area is wiped clean before the new layer is applied so that nothing exists underneath it. If you are pasting a picture in this mode, any transparent areas of the image or cutout will be blank.
Replace mode is only effective with VizPaint2D's paste-up, flip, grade, and reflect tools. With the brush tool, replace mode produces the same effect as over mode.
Use fore and background modes when you want to achieve a "layered effect" within a single canvas.
These modes are similar to the over and under modes. The difference is the way that the alpha channel is handled.
Tip: We do not recommend using the fore and behind composition modes with the brush tools. |
Use fore (for "foreground") mode to apply color, text, or pictures in front of the existing layers.
Use behind mode to apply color, text, or pictures behind the existing layers.
The hue, saturation, value, and watercolor modes have no effect on a blank canvas. Use these modes only to change areas with existing color, text, or images.
Hue mode changes the hue or pure color of an existing layer. When working in hue mode, the color of the area changes to the chosen color. Any shadows or highlights remain intact.
When working in hue mode, it may help to use the HSV slider palette to see the selected hue.
Hue mode has no effect on the existing level of brightness or "saturation." Using hue mode on an area with very desaturated color has minimal effect. So, if you are working on a black and white picture, you cannot add color to it with hue mode.
Hue mode has little effect on very dark areas, because it does not affect the "value" component which makes things look dark.
Saturation mode changes the saturation or intensity of an existing layer. A completely saturated color contains no white, only pure hue; a desaturated color is almost totally white with no hue. The saturation mode would not change yellow to green, but it could make the yellow either more intense or paler.
When working in saturation mode, it is helpful to use the HSV slider palette to see the saturation level of the selected color. Using a very desaturated color in this mode changes a colored area to black and white.
Value mode changes only the value level or amount of black in an existing layer. Working in value mode affects only the shadows or highlights of the area. The hue and saturation remain the same.
When working in value mode, it is helpful to use the HSV slider palette to see the value level of the selected color. If the color is very light, value mode wipes out shadows. If the color is dark, highlights are eliminated.
By using value mode at low opacity levels, you can make subtle changes to the shadows and highlights in a picture. If you use value mode to paste one picture onto another, the resulting effect shows the shadows and highlights of the new layer on the color of the existing layer.
Watercolor mode changes two components of the existing layer: hue and saturation. With watercolor mode, only the highlights and shadows of the existing layer are maintained.
When working in watercolor mode, it is helpful to use the HSV slider palette to see both the hue and saturation level of the selected color. Unlike hue mode, you can use watercolor mode to add color to a black and white picture.
Compositing is the process of combining two (or more) pictures by placing one over the other. When you add backgrounds, text, and special effects to existing images, you can treat each element as a separate canvas, then composite the individual canvases to create the final picture.
VizPaint2D's unique layer tool lets you see how your completed composition will look as you work on each individual canvas. With it, you can:
When you place one image over another, the picture on the top must include some transparent areas or the bottom picture will not show through.
You use the alpha channel to control which portions of a picture are visible when composited and which portions are hidden.
You use the paint mode tool to access the alpha channel. For information on using the paint mode tool, see "Choosing paint and display modes" on page 386.


