|
|
Windows >
Information >
Render stats
|
Render Stats Window
|
|
|
|
|
The Render Stats (rendering statistics) window contains the Object Rendering Parameters, which control how individual objects will render.
To open the Render Stats window:
-
1
-
In the modeling windows, select the objects whose rendering parameters you want to edit.
-
2
-
Select Windows > Information > Render stats. The Render Stats window appears.
|

|
|
Object Names List
The names of all active objects.
To edit or change an object name, double click on its name, (press the Esc key to delete the entire name), type the new name and press Enter.
Use the horizontal scroll bar located below the object names list to view names that are longer than the window view area.
Use the vertical scroll bar located along the left side of the window to scroll through the list of object names when the list is too long to be viewed in the window as a complete set.
Editing Cells
The spreadsheet consists of several cells for each named object. Each cell can be edited when not dimmed. Most cells are can be toggled ON or OFF by clicking directly in the cell. When an option is toggled ON, the cell displays a check mark. When an option is toggled OFF, the cell displays a dash.
Some cells contain a numeric value. To edit a numeric cell, click directly in the cell and then type a new value. Values larger than six digits to the left of the decimal point are displayed in scientific notation. Pressing Enter confirms the entry. Pressing Enter or clicking the cell a second time aborts the edit.
You can perform mathematical computations on numeric cells using the `c' command. For example, say the current value for a field is 6. If you click in that field, type c*2 and press Enter, the value will change to 12. If you type c+7, the value will change to 13. If you type c-1, the value will change to 5. If you type c/2, the value will change to 3.
Selecting Rows
A single mouse click on an object name deselects all rows in the spreadsheet and then selects that particular row.
Holding the Shift key and single-clicking on an object name selects that row in the spreadsheet without affecting the current select state of any other row in the spreadsheet.
Holding the mouse down on an unselected name and then dragging it down the list selects the first row and all rows the mouse passes over. If one of the rows that the mouse passes over is currently selected, it remains selected. If the mouse is positioned in a currently selected row and then a mouse button depressed and a dragging operation performed, the rows the mouse passes over are deselected.
If multiple rows are selected, a change made to any one cell in any row automatically affects the same cell in every other selected row. This greatly reduces the time involved in making a change to multiple objects.
|
|
|
Menus
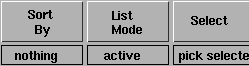
The Render Stats window menus contain tools to list and select objects. To display a menu, click and hold the mouse on a menu button at the bottom of the Render Stats window. The default active menu item is displayed below each button.
|
|
|
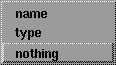
Sort By Menu
The Sort By menu contains tools to control how objects are listed in the Render Stats window.
nothing
-
- Objects are not sorted.
type
-
- Sorts objects alphabetically by surface type.
name
-
- Sorts objects alphabetically by name.
|
|
|
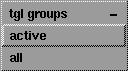
List Mode Menu
The List Mode menu contains tools to control which objects are listed in the Render Stats window.
all
-
- Lists all surfaces.
active
-
- Lists only active surfaces.
tgl groups
-
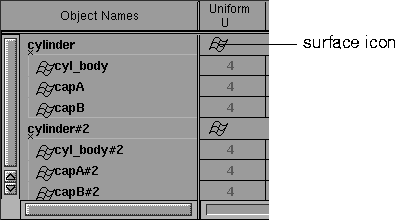
- Displays the hierarchy of groups of surfaces. If Sort By is nothing, and List Mode is tgl groups, object nodes with surfaces below in the hierarchy are listed as shown in the following illustration. A surface icon appears in the cell row for each group node displayed. Clicking this icon automatically selects all rows for cells which correspond to the surfaces below this node.
|
|
|
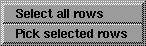
Select Menu
The Select menu contains tools which let you select objects in the Render Stats window and in the modeling windows.
select all rows
-
- Selects all objects listed in the Render Stats window.
pick selected rows
-
- Picks objects in the modeling windows that are selected in the Render Stats window.
Object Rendering Parameters
The object rendering parameters control how individual objects will be rendered.
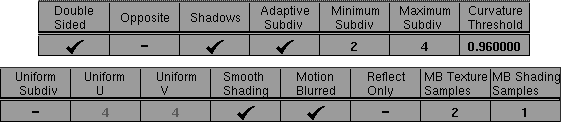
Double Sided
-
- Determines whether both sides of the surface will render. If Double Sided is ON, both sides of the surface will render. If Double Sided is OFF, only one side of the surface will render; the side that renders is determined by the direction of the surface normals and the setting of the Opposite parameter (see Opposite below). The default setting is ON.
-
- You may not want to render both sides of a closed object, such as a sphere, (for both performance and memory reasons) because only one side of the object will be visible when it is rendered. The Double Sided setting is ignored during raytracing (both sides of all surfaces must be active).
Opposite
-
- Determines which side of the surface will renders when the Double Sided parameter is OFF. If the wrong side of the object renders, toggle the Opposite parameter. The default setting is OFF.
Shadows
-
- Lets the surface cast shadows during raycasting or raytracing. If Shadows is ON, the surface casts a shadow. The default setting is ON.
|
|
See Subdivision Type on
page 400.
|
Adaptive Subdiv
-
- Subdivides surfaces (patches) into triangles based on surface curvature. (Faces cannot be adaptively subdivided.) Surfaces with high curvature are divided into more triangles than flatter surfaces with low curvature. The Minimum Subdiv and Maximum Subdiv values determine the subdivision triangulation. Setting Adaptive Subdiv ON automatically sets Uniform Subdiv OFF, and vice versa. The default setting is ON.
|
|
See Adaptive Minimum,
Adaptive Maximum on
page 400.
|
Minimum Subdiv, Maximum Subdiv
-
- The minimum and maximum number of subdivisions between CVs in both U and V directions. These values are only applicable if Adaptive Subdivision is ON. Valid values are 1, 2, 4, 8, 16, 32, 64, or 128. If you enter any other value between 1 and 128, the next highest valid value is used. The default value is 2 for Minimum Subdiv and 4 for Maximum Subdiv.
|
|
See Curve Threshold on
page 400.
|
Curvature Threshold
-
- The threshold for subdivision in both the U and V directions. The higher the Curvature Threshold value, the greater the number of triangles, and the more accurate the curvature. The valid range is 0 to 1. The default value is 0.96.
|
|
See Subdivision Type on
page 400.
|
Uniform Subdiv
-
- Subdivides surfaces into uniformly sized triangles (that is, without taking surface curvature into account). Trimmed surfaces must be adaptively subdivided. The Uniform U and Uniform V values determine the number of subdivisions. Only the Uniform U value determines the number of subdivisions for faces. Setting Uniform Subdiv ON automatically sets Adaptive Subdiv OFF, and vice versa. The default setting is OFF.
|
|
See U Divisions, V Divisions
on page 400.
|
Uniform U, Uniform V
-
- The number of subdivisions the surface will have between CVs in both the U and V directions, regardless of surface curvature. These values are only applicable if Uniform Subdiv is ON. The valid range is 1 to 256. The default value is 4.
Smooth Shading
-
- Gives polysets a smooth appearance during rendering. If Smooth Shading is OFF, one normal of each triangular facet is used as a representation of the triangle, giving surfaces a faceted appearance. The default setting is ON.
Motion Blurred
-
- Blurs the motion of the surface to produce smoother animations. To use this option, Motion Blur must be ON (see Motion Blur on page 408). The MB Texture Samples and MB Shading Samples values control the smoothness of the motion blur effect (see MB Texture Samples and MB Shading Samples below). The default setting is ON.
Reflect Only
-
- Determines whether the surface will be reflection raytraced only. If Reflect Only is ON, the object is highlighted and will only appear in reflections or refractions during raytracing, but will be invisible otherwise. The default setting is OFF.
MB Texture Samples
-
- The number of texture samples taken over the motion blur period (for motion blurred surfaces only). The valid range is 1 to 6. The default value is 2.
-
- If the texture on a motion blurred surface appears "jittery", or not smoothly blurred, increase the MB Texture Samples value by 1, test render, and repeat until the texture is anti-aliased to your satisfaction. The actual number of samples taken increases exponentially with the MB Texture Samples value. Increasing this value also increases rendering time, so keep it as low as possible.
MB Shading Samples
-
- The number of shading samples taken over the motion blur period in a pixel sample (for motion blurred surfaces only). The valid range is 1 to 5. The default value is 1.
-
- Generally, one sample is enough to represent the shade of a surface in each pixel sample. Thin specular highlights, bump maps, and displacement maps, however, can alias incorrectly with only one shading sample. When you use a bump or displacement map, MB Shading Samples will automatically increase to 2 (if it is set to 1). If a sample value of 2 is not sufficient to anti-alias your geometry, increase the MB Shading Samples value. Increasing this value can dramatically increase rendering time, so increase it with caution, and only for those surfaces that display aliasing with the default settings.
|


