|
|
5
|
Microsoft Direct3D
|
|
In This Section:
This section describes how to use the interface of the Direct3D-specific Direct Translator.
For information on how to run the translator, see Installing the MakeGame Plug-in on page 4 and Using Translators from the Command Line on page 14.
Converting to Direct3D Format
|
|
|
|
|
GetD3D Translator
GetD3D converts Alias wire models to special Direct3D file formats.
Special Features
- Hierarchical animation is converted for flat and full hierarchies.
- Keyframe sampling at fixed frame intervals or adaptive intervals within specified tolerances.
- Textures are saved in ppm format with lengths that are powers of 2 (required for proper viewing in Direct3D object viewers).
- Per-polygon shaders and textures are supported.
- Multiple characters are exported (each in their own files) if more than one MetaCycle character exists in the Alias wire file.
- MetaCycle information and polyset animations are exported as separate ASCII files.
- Triangles and Quadrilaterals are converted as primitives.
- Instances are converted intelligently.
- Binary file format support.
- Mesh vertex colors can be exported instead of materials.
Limitations
- Procedural textures with 3D parameterization are not converted. For solid and environmental textures, no texture is exported. For mountain, highlight, and curvature textures, the textures are converted to solid color.
- Colors are exported as RGB values. GetD3D does not currently support index colors.
- Texture repeats and texture offset are not converted. Use texture sampling instead.
- Lighting and camera information are not supported by the Direct3D file format.
- CV animations on surfaces are not translated. Use polyset vertex or cluster animation for similar effects.
Installing
|
|
See Setting Up the Demo
Viewer on page 72.
|
The Direct3D translator does not require any special installation. However, you must install the Alias|Wavefront Demo Viewer on a PC (or PC emulator) to view the output.
Using the Direct3D Translator
|
|
|
|
|
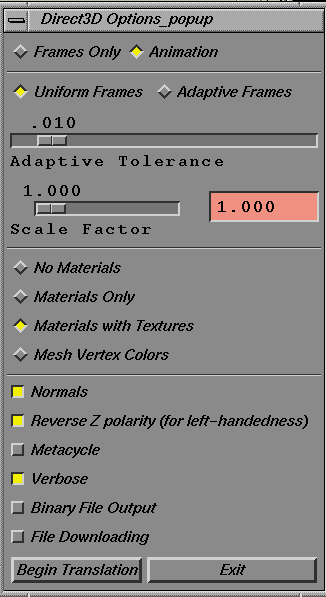
Options
When you run the translator from MakeGame, the Direct3D Options window appears. Use this window to set the options described below, then click Begin Translation
to start converting.
|
|
|
Frames Only
-
- Outputs frame hierarchy only.
Animation
-
- Outputs frame hierarchy with animation information.
Uniform Frames
-
- Outputs keyframes at uniform intervals.
Adaptive Frames
-
- Uses the Adaptive Tolerance value to reduce the number of keyframes required while preserving the original motion.
-
- Keyframe data is only exported for levels with animation. (For example, in a moving arm, only the animation data for the shoulder is exported if the elbow and hand are not moving)
Adaptive Tolerance
-
- The higher the tolerance, the more keyframes are removed and the lower the motion fidelity.
-
- Use a high number to eliminate a lot of keyframes if the original animation is much smoother than you need. Use a low number if you don't want to sacrifice smoothness.
Scale Factor
-
- The translator scales the whole model by this factor before conversion. (This is in addition to scaling applied by MakeGame or DtExport.)
No Materials
-
- Does not output any material information.
Materials Only
-
- Outputs material information but no textures.
Materials with Textures
-
- Outputs material and texture information.
Mesh Vertex Colors
-
- Outputs mesh vertex colors instead of materials and textures.
-
- If you rendered the model with pre-lit polygons in Alias, you can export the mesh colors instead of materials.
Normals
-
- Outputs normal information. If no normals are output, Direct3D calculates them using polygonal order.
Reverse Z Polarity
-
- Converts geometry, normals, and animation from right-handed (Alias) to left-handed (Direct3D) coordinates.
-
- If you turn this option off, the model will appear as a mirror image in Direct3D.
MetaCycle
-
- Outputs MetaCycle information. MetaCycle information is saved in a separate file (see Output on page 71).
Verbose
-
- Displays updates during the conversion process.
Binary File Output
-
- Saves the output as binary data instead of text. Binary files are usually much smaller than text files.
File Downloading
|
|
When using AWviewer 2.0,
this option is not necessary.
You can use File Monitoring
in the File menu instead.
|
-
- Saves the output under the name test.x in the directory specified by the $DT_DOWNLOAD_DIR environment variable. (If you are exporting multiple characters, only the last one is saved as test.x).
-
- Set $DT_DOWNLOAD_DIR to a directory accessible to the PC development environment and use this option to streamline the testing cycle. This directory must be world-readable and world-writable.
GetD3D Command Line Options
If you turn the GUI checkbox off in the MakeGame window, enter the following options in the Option field to control the conversion.
|
MakeGame options
|
Descriptions
|
|---|
-a n |
Use adaptive keyframe sampling with tolerance n (where n is 0 to 1).
The higher the tolerance, the more keyframes are removed and the lower the motion fidelity.
|
|
-b
|
Output binary data (instead of text).
|
|
-d
|
Use file downloading (save the output under the name test.x in the directory specified by the $DT_DOWNLOAD_DIR environment variable).
|
|
-g
|
Open the option window (GUI mode).
|
|
-n
|
Output MetaCycle information. MetaCycle information is saved in a separate file (see Output on page 71).
|
|
-v
|
Print updates during the conversion process.
|
-f |
Output frame information only (no animation data).
|
|
-m[0|1|2]
|
Material information. Use one of the following:
0 = do not output material data.
1 = output material information.
2 = output mesh vertex colors instead of materials.
|
|
-t[0|1]
|
Texture information. Use one of the following:
0 = do not output texture information.
1 = output texture information.
|
|
-N[0|1]
|
Normals. Use on of the following:
0 = do not output normals information.
1 = output normals information (default).
|
|
-s factor
|
Scale model by factor before converting.
|
The command line options duplicate controls in the GUI window. See Options on page 68 for a description of the GUI interface.
Alias Environment Variables
$DT_DOWNLOAD_DIR
|
|
Direct 3D requires all frames
and meshes in a scene to
have unique names. If there
are duplicate names,
geometry may become
mixed up.
|
-
- The shared destination directory where files are placed for downloading to a PC for testing. (This variables is used when you use File Downloading or -d).
- Parameters - a valid path to a directory
Output
|
Filenames
|
Contents
|
|---|
<scene>.x |
Geometry, hierarchy, materials, textures, normals, and animation information.
|
<scene>.x.metacycle |
MetaCycle information (if any).
|
<scene>.x.vanim |
Vertex animation information (if any).
|
<texture file>.ppm |
Portable pixmap (PPM) versions of textures.
|
You can export mesh colors instead of material definitions. This is a good alternative if your rendering engine can't calculate lights fast enough. The trade-off is that the lighting effects will be static throughout the scene.
Binary files are much smaller and load faster than text files. Only use text files when you need mazimum portability (since plain text files can be moved to any platform), for you want to visually inspect the files.
>
|
Note:
|
If you convert a scene with several characters with their own
MetaCycles, GetD3D outputs each character's geometry and
materials into separate files named <character>.x and
<character>.x.metacycle (the name is taken from the
MetaCycle definition).
|
Testing the Output
|
|
|
|
|
Setting Up the Demo Viewer
The Direct3D demo viewer (AWViewer) is distributed in source code and executable form. To use it you must first copy it to your PC.
-
1
-
Copy the PC viewer files and directories from $ALIAS_LOCATION/ODS/Games/source/GetD3D/tools/AWViewer/* to the PC.
-
2
-
On the PC, double-click the AWViewer.exe icon in the AWViewer/Release folder.
Customizing the Demo Viewer
You can use the source code to customize the viewer, or use it as an example of how to use MetaCycle and vertex animation data. To rebuild the viewer with revised source code:
-
1
-
Recompile the AWViewer source code.
-
This is easiest if using Microsoft Visual C++, since you can
use the project file, AWViewer.mdp. You may need to
change your Build settings to point to the correct include
and library paths.
-
2
-
Use a text editor to add the following line to your autoexec.bat file:
-
SET AWPATH=<directory>/app-models
-
(Replace <directory> with the path of the directory you
copied the files to.)
-
If you do not want to edit the autoexec.bat file, copy
the files pointlight.x, dirlight.x, movie-
camera.x, and arcball.x from app-models into the
same directory as the executable.
-
3
-
Double-click the icon for the new AWViewer.exe, or run it from an MS-DOS prompt.
Using the Direct3D Demo Viewer
|
|
|
Before You Begin
The Demo Viewer is designed for use with a three-button mouse. Please note the following when using the mouse:
- Many PC mouse drivers let you simulate the middle mouse button by clicking the left and right mouse buttons at the same time. Consult the manual for your mouse.
- If you have a three-button mouse, check the mouse driver to make sure the middle mouse button is active (some drivers map the middle mouse button to a macro or key combination).
|
|

|
Viewing the Model
-
1
-
Make sure the Camera tool in the toolbar is selected. If it is not selected, click it with the left mouse button.
|
|
You can also switch the
Camera tool on or off by
double-clicking the left
mouse button, pressing the
space bar, or using the Edit
menu.
|
-
2
-
Drag with the left mouse button to tumble the camera around the center of the view.
-
3
-
Drag with the middle mouse button (if your mouse has one) to pan the camera around the viewing plane.
|
|
When Auto-center (in the
Interface menu) is off, you
can drag along the sides of
the view to twist around the
line of sight.
|
-
For convenience, the speed of the pan is scaled to the
distance to the camera. When you are far away you pan
quickly, but when you are in close you pan slowly.
-
4
-
Drag right with the right mouse button to zoom in. Drag left with the right mouse button to zoom out.
Selecting and Manipulating Geometry, Lights and Cameras
-
1
-
Click an object with the left mouse button to select it.
-
2
-
Drag with the left mouse button to tumble around the selected frame's origin. The origin is shown as a red-green-blue rotation manipulator.
|
|
When Auto-center (in the
Interface menu) is off, you
can drag along the sides of
the view to twist around the
line of sight.
|
-
3
-
Drag with the middle mouse button to move the object around the viewing plane.
-
4
-
Drag with the middle mouse button while pressing the Ctrl key to move the object's rotation pivot point.
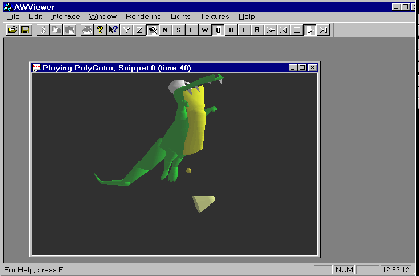
Using MetaCycle Controls
There are several ways to control MetaCycle animation in the Demo Viewer:
|
Snippet
|
Toolbar
|
Keyboard
|
Four-button Gamepad (*)
|
|---|
|
Up
|
U
|
Cursor Up
|
upper button
|
|
Down
|
D
|
Cursor Down
|
lower button
|
|
Left
|
L
|
Cursor Left
|
left button
|
|
Right
|
R
|
Cursor Right
|
right button
|
|
North
|
N
|
Numeric Pad 8
|
direction pad up
|
|
South
|
S
|
Numeric Pad 2
|
direction pad down
|
|
East
|
E
|
Numeric Pad 6
|
direction pad right
|
|
West
|
W
|
Numeric Pad 4
|
direction pad left
|
(*) Four-button Gamepads (such as the Gravis GamePad Pro) are configured as Joystick 1.
Viewing Vertex Animation
If you created a vertex animation file (.vanim) for the scene with the translator, the Demo Viewer will automatically load the animation.
Use the VCR controls in the toolbar to view the animation.
Tips for Increasing the Frame Rate
There are several ways to improve the playback rate:
- In the Interface menu, choose Hide Manipulators. This reduces the number of objects the viewer must redraw.
- Reduce the size of the view window.
- Zoom out so the model appears smaller.
- Close all view windows except the one you are using.
- Select less complicated rendering options in the Render menu (for example, use fewer lights, turn on flat-shading).
- Turn off Recalulate Normals in the Rendering menu to speed up vertex animation.
AWViewer Reference
|
|
|
|
|
Toolbar
|

|
|
To hide or display the Toolbar, choose Toolbar
from the
Interface
menu.
Open
|
|

|
-
- Click this button to open an existing document.
Help Buttons
|
|

|
-
- Click the question mark button to view help instructions.
-
- Click the pointer-question mark button for context sensitive help. The mouse pointer changes to an arrow and question mark. Click anywhere in the Viewer to get help.
Camera Buttons
|
|

|
-
- These buttons control the camera. Y and Z provide YUP and ZUP camera orientations of the scene. The camera button toggles between
Camera and Object selection mode.
Metacycle Buttons
|
|

|
-
- Click these buttons to view MetaCycle snippets.
Animation VCR Buttons

|
|
|
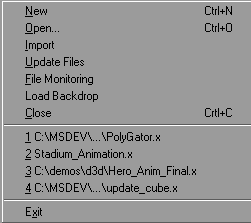
File menu
New
-
- Creates a new scene using a default model.
Open
-
- Opens a Direct3D scene.
Import
-
- Imports a Direct3D object into the current scene.
Update Files
-
- Reloads all documents that have changed since they were opened (useful when testing).
File Monitoring
-
- When file monitoring is on, the viewer automatically updates the files at regular intervals.
Load Backdrop
-
- Loads a Windows bitmap (.bmp) or Portable pixmap (.ppm) file as a backdrop for the scene.
Close
-
- Closes the current scene. Any other view windows of the scene will close also. If you have made changes to the scene since it was last saved, the viewer will ask you if you want to save the changes.
1, 2, 3, 4
-
- The file menu displays the filenames of the four most recent scenes. Choose the filename to open the scene.
Exit
-
- Closes all scenes and quits AWViewer.
Edit Menu
|
|
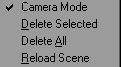
|
Camera Mode
-
- Switches the Camera tool on or off.
|
|
See Viewing the Model on
page 74.
|
-
- Alternately, you can switch the Camera tool on or off by double-clicking the left mouse button, pressing the space bar, or using the toolbar.
Delete Selected
-
- Deletes the currently selected object or light.
Delete All
-
- Deletes all objects and lights in the scene.
Reload Scene
-
- Reloads the files of all the objects in a scene (useful for resetting objects to their saved positions).
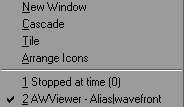
Window menu
|
|
|
New Window
-
- Opens a new window with another view of the current scene.
Cascade
-
- Arranges the windows so that their title bars are visible.
Tile
-
- Arranges the windows in tiles.
Arrange Icons
-
- Lines up minimized windows.
1, 2, 3
-
- A list of open windows. Click on the name of a window to bring it to the front and make it active.
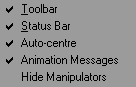
Interface menu
|
|
|
Toolbar
-
- Shows/hides the toolbar at the top of the window.
Status Bar
-
- Shows/hides the status bar at the bottom of the window.
Auto-Center
-
- When this option is on, clicking in a view window centers the view on where you clicked.
-
- Turn this option off to twist around the line of sight by dragging along the sides of the view.
Animation Messages
-
- Shows/hides animation information in the window titlebar and frames-per-second display in the status bar.
Hide Manipulators
-
- Turns off light, arcball and camera manipulators.
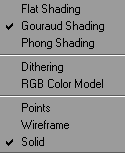
Rendering menu
|
|
|
The Rendering menu controls the shading, dithering, geometry and color model parameters of the active view in a scene.
Flat Shading
-
- Shades the objects with flat colors.
Gouraud Shading
-
- Shades the objects using the Gouraud shading model.
Phong Shading
-
- Shades the objects using the Phong shading model.
Dithering
-
- Turns dithering on/off.
RGB Color Model
-
- Uses RGB color model.
-
- When this option is OFF, the scene is rendered in monochrome.
Recalculate Normals
-
- Recalculates the normals of surfaces as they move during vertex animation (turn this option off to increase the speed of vertex animation).
Points
-
- Draws only the points of the scene (fastest).
Wireframe
-
- Draws the scene in wireframe (faster).
Solid
-
- Draws the scene using solid polygons.
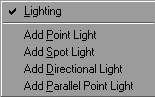
Lights menu
|
|
|
Lighting
-
- Turns lighting on/off.
Add x Light
-
- Adds a new light to the scene.
Textures menu
|
|
|
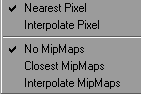
Nearest Pixel
-
- Uses the nearest pixel in the texture to decide color.
Interpolate Pixel
-
- Interpolates the pixels of the texture to decide color.
No Mipmaps
-
- Does not use MipMaps for texture mapping.
Closest Mipmaps
-
- Uses the closest Mipmap for texture mapping.
Interpolate MipMaps
-
- Interpolates the MipMap for texture mapping.
Help menu
|
|
|
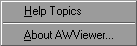
Help Topics
-
- Displays an index of help topics.
About AWViewer
-
- Displays the version number and copyright information of the viewer application.
|


