|
|
Xform > Local > Set
pivot

|
Setting Local Pivots
|
|
|
|
|
Moves the rotation and/or scaling pivot points of objects.
Every object has an associated rotation pivot (for rotational functions) and scale pivot (for scale functions).
By default, both the rotational and scale pivots are located at the point of origin for most objects. The point of origin in the case of a primitive corresponds to its centroid. In the case of curves and surfaces, the point of origin is (0, 0, 0) in the world space (X, Y, Z) coordinate system.
With this tool, you can move an object's pivot points to any location in world space, enabling you to rotate around a specified pivot location or to scale based on a specified pivot location. You can specify this location using either the mouse or keyboard input (in absolute or relative addressing mode).
|
|
For information, see Pivot
Options on page 195.
|
By default, both the rotation and scale pivots move together. However, they can also be moved independently of each other with Xform > Local > Set pivot- . For example, you can rotate a piece of geometry based on a specified rotational pivot location while maintaining the scale pivot at its point of origin. . For example, you can rotate a piece of geometry based on a specified rotational pivot location while maintaining the scale pivot at its point of origin.
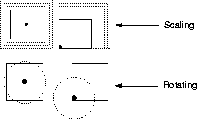
The following diagram shows rotational and scaling effects of two different pivot locations. The broken lines represent the scale size and rotational paths respectively.
Notes
- You cannot preserve construction history when using this tool. If you try to transform an object that was built from an operation that used construction history (such as Surfaces > Revolve), a confirmation box appears asking if you want to continue.
-
You must select YES to continue the operation (and the
construction history is deleted). If you select NO, the
operation is cancelled and the construction history is
preserved.
- Transforming the rotate pivot will also transform the selection handle, unless the Move Selection Handle option is toggled OFF
(see below). You can move the selection handle (independently of the rotate pivot) using Xform > Local > Move selection handle.
How to Use
-
1
-
Before invoking the function, select the geometry whose pivot points you want to move.
|
|

|
-
2
-
Select Xform > Local > Set pivot, or click its icon.
-
The system prompts:
-
Enter PIVOT MOVE values (x, y, z) (ABS):
|
Tip:
|
To move only particular pivot points, use Xform > Local >
Set pivot-. See the next section for details.
|
|
|
For information on using the
mouse, see How to Use the
Mouse on page 8.
For information on
addressing modes, see Using
Absolute and Relative
Addressing Modes on page 12.
|
-
3
-
Move the pivot points by either:
- Clicking and dragging in the modeling window
- Entering the X, Y, Z coordinates of the new pivot location, in either absolute or relative addressing mode, from the keyboard.
Select Xform > Local > Set pivot- to display the Pivot Options window.
|
|
Pivot points are shown only
when an object is selected
(active). If they are located at
the same location, they
appear as a light green
circular icon.
|
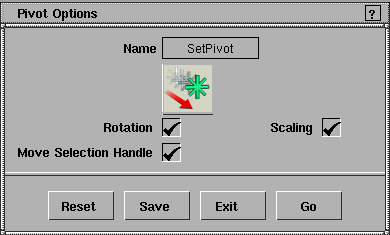
If a pivot option is toggled ON (indicated by a check mark), the pivot is affected by the Set pivot tool. By default, all pivots are selected. To deselect a pivot so that it is not affected by the Set pivot tool, uncheck it in this window.
>
|
Note:
|
Pivots cannot be set for CVs or curve-on-surface elements.
|
Rotation, Scaling
-
- The Rotation Pivot is displayed as a circle with a dot at the center, while the Scaling pivot appears as an asterisk.
|
|
For information on selection
handles, see the Animating in
Alias manual.
|
Move Selection Handle
-
- Available if the Rotation
pivot is toggled ON
. When a selection handle is created, it appears at the location of the rotation pivot and by default moves along with it. If you deselect this check box, you can separate the selection handle from the rotation pivot.
|


