|
|
File > Output > Plot
|
Plotting Wireframe Models
|
|
|
|
|
Purpose
Creates a hard-copy plot of a wireframe model.
How to Use
-
1
-
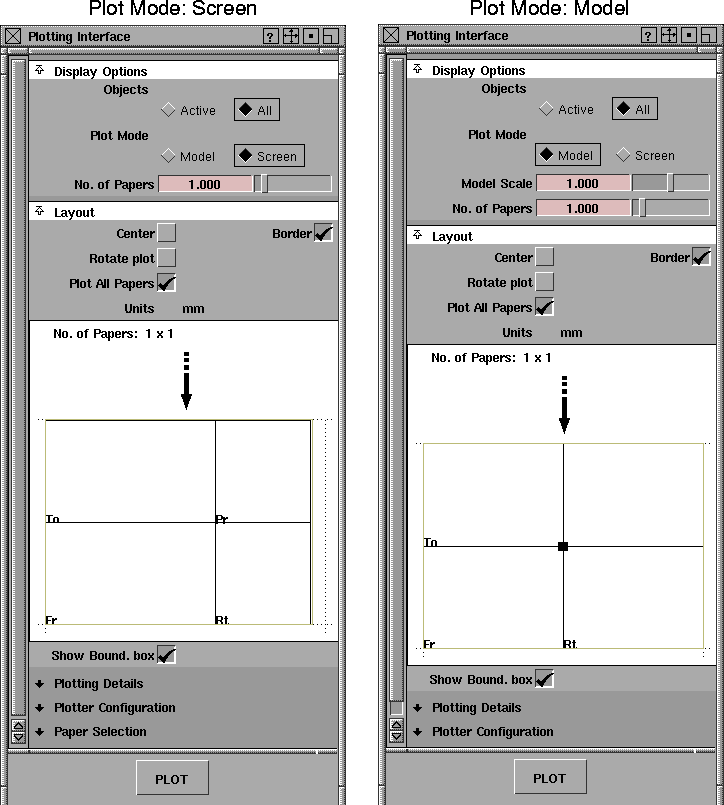
Select File > Output > Plot. The Plotting Interface window appears.
-
The Plot Mode control determines the view and scaling of
the plot. The plot, and the controls available, are
determined by its Model or Screen options.
|
|
|
-
2
-
Adjust the parameters in the Plotting Interface window to suit your needs, and then click the Plot button. Output can be sent to a plotter, or saved in a file.
Display Options
Objects
-
- Objects can be set to either ACTIVE (only picked wire-frames are plotted), or ALL (to plot all wireframes).
-
- The default is ALL.
Plot Mode
-
- Controls whether the plot will be:
- a scaled drawing of the entire model (select Model)
- a snapshot of only what you see on the screen (select Screen)
-
- The default plot mode is Screen
.
|
|
For information on the
Current/All Windows display
setting for locators, see the
Create locator section in
NURBS Modeling.
|
-
- For both plot modes, grids and locators will be plotted if they are visible. The model is shown in the views of the plotting interface as a filled bounding box. (In Model
mode, you can adjust the plot scale so that the bounding box fits inside the plot views in the Layout window.)
-
- Screen
-
- All visible views or windows showing the model are printed as seen on the screen, with the exception of the SBD window and title bars. The overlapping windows are also plotted in the same manner, obscuring the invisible parts of the model.
-
- This mode is designed to create a picture or snapshot of the wireframe model as it is seen on the screen, allowing you to compose the layout of the plot by arranging the views on the screen.
-
- Model
-
- Allows you to plot a scaled drawing of your entire model. The scale of the model can be adjusted. For example, a model 1 meter in width can be plotted on a 20 cm paper with a scale of 0.2.
|
|
For information on the
Layouts menu, see Layouts
for the Modeling Windows on
page 433.
|
-
- Model
mode
draws the model without reference to the views in the Alias modelling window. You can, however, set the layout of the orthographic views.
Model Scale (available for Model Plot Mode)
-
- By default, Model
Scale
is 1.0 and the model will be plotted full size. If the model is too big for the paper, either reduce the scale of the plot or increase the number of pieces of paper over which the plot is spread out.
-
- There is no automatic scaling of your model to fit the paper, because of the option to spread the plot over more than one piece of paper. (See No. of Papers below and Plot All Papers on page 592 for information on how to arrange the scaled views on paper.)
No. of Papers
-
- This option controls the number of sheets of paper the plot is spread over.The behavior is different depending on the plot mode:
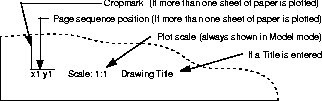
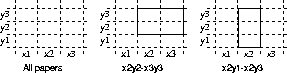
- In Screen plot mode, windows from the screen can be scaled to fit the chosen number of sheets of paper. By default, the plot fits on one sheet of paper of any chosen size. Increase the number of sheets by typing or dragging the slider (2 is twice the length and width, or four sheets, and so on). When plotting to more than one sheet, crop marks and the XY position in the set of plotted sheets are labelled. (See the diagram below.)
- In Model plot mode, the default plot is one sheet of paper of any chosen size. (See Paper Selection on page 595.) The plot area can be increased or decreased over several sheets of paper, if needed. As the number of sheets of paper increases, the bounding boxes seem to get smaller in the view, because as the paper area increases, the model appears smaller.
|
|
|
Layouts
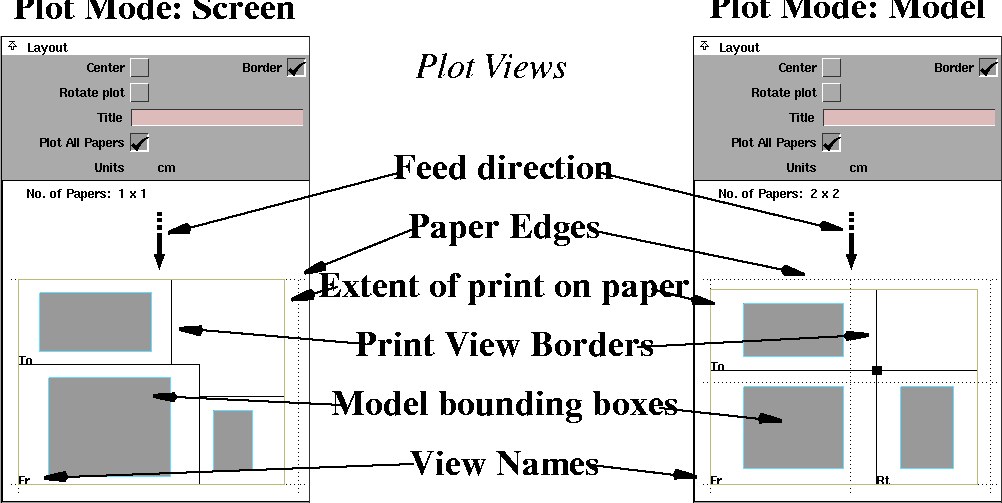
The plot can be interactively centered, or rotated using the options in the Layout section in conjunction with t
he plot views.
As shown in the following, the plot views vary for the Model and Screen plotting modes.
|
|
|
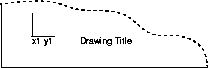
The dashed border represents the extent of the paper area the plotter's pen can access. This corresponds to one sheet of paper. The solid outlined rectangle represents the edge of the plot view. This will always appear inside the paper area. The filled grey areas are bounding boxes describing the size of the model in each view. The plot size on the paper can be changed by adjusting the Model Scale,
Number of Papers, or
Rotate
options, or by using a larger paper size.
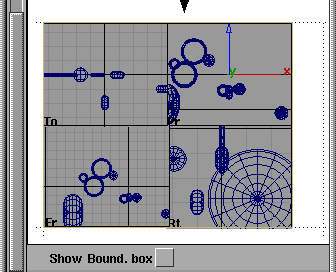
For Screen Plot Mode:
In the Screen mode, the layout shows the modeling windows as they appear on the screen. Each window is identified in its bottom left corner:
To	Top

Fr	Front

Rt	Right

Pr	Perspective
The model that will be drawn is shown in each window as a filled bounding box, except in the perspective window.
For Model Plot Mode:
|
|
To see the model itself
instead of its bounding box,
turn off the Show Bound.
box option (see page 592).
|
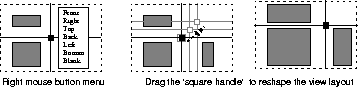
In the Model mode, the layout shows 3 orthographic views (by default Top, Front, and Right). Each orthographic window is identified in its bottom left corner. The model that will be drawn is shown in each window as a filled bounding box. This feedback window offers the following interaction to modify the plot view.
- Left mouse button
- click on the small square in the center of the plot view and drag it to change the size of the individual window views.
- Right mouse button
- click inside the plot views to open a pop-up menu to change the view of the window. For example, one can change the view from Front to Right through the pop-up menu.
|
|
|
Other Layout Options
Center
-
- Moves the plot image to the center of the number of sheets of paper when toggled ON (indicated by a check mark).
Border
-
- You can choose to have a border around the plot views, by selecting either ON or OFF. The default is ON. If set ON, a single line border is plotted around each of the window boundaries.
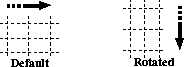
Rotate
-
- Controls the orientation of the plot on the paper.
-
- Selecting this option does not change the drawing on the screen, but shows it by indicating the feed direction with a heavy black arrow in the layout window. The plot is resized to fit the new orientation of the paper.
|
|
|
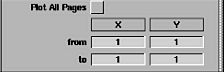
Plot All Papers
Allows you to plot all the pages or only specific ones. The default is ON
. If set OFF
, a table appears for you to specify the pages to plot by entering their position using X and Y positioning.
|
|
|
Show Bound. box
-
- If this option is set to ON (default), the model that will be plotted is shown as filled bounding boxes. If it is set to OFF, the model itself is drawn, showing exactly what will be plotted (see below).
Plotting Details
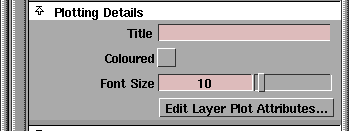
Title
-
- Add a title to your plot. The title will be drawn in the bottom left corner of your plot.
Colored
-
- Turn this option on to produce a color plot (if using a color plotter).
Font Size
-
- Control the size of the plotted text by specifying a scale factor in this text box.
|
|
|
Edit Layer Plot Attributes
-
- Click this button to open a window (similar to the Layer Stats window) where a line width can be specified for the geometry of each layer.
-
- The default width is 5. Click on this value to bring up a pull down menu from which you can select a different line width. The width for the default layer cannot be changed.
Plotter Configuration
|
|
|
|
Output
-
- These options specify the output destination for the plot.
-
- You can choose to send the output to the PLOTTER (either a HP/GL plotter, IBM plotter, or a POSTSCRIPT printer) or save it to a file in PostScript, HP/GL2, or HP/GL format.
-
- When sending the plot output to a file, the File Browser
is displayed when you click the PLOT
button. You can specify the file's directory and filename. The default directory is your current project's plot directory.
-
- A suffix is added to the filename, indicating the format of the output:
|
File type
|
name
|
suffix
|
|
PostScript
|
<filename>
|
.ps
|
|
HP/GL or HP/GL2
|
<filename>
|
.hp
|
-
- When the plot is spread over several sheets of paper, the output to a file is saved under the <filename>xNyM
with the suffix.
-
- For example, an HP/GL file with user given filename `plotOutput
', spread over four sheets of paper will generate the following four files -
>
|
Note:
|
When sending the output to a plotter which is not of the
type postscript, the output format is HP/GL2
.
|
Format
-
- Specify file format independently of Output. Choose Postscript, HP/GL or HP/GL2.
-
- Postscript plots can now be done on any paper size (see Paper Selection below).
|
|
|
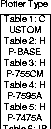
Plotter Type
-
- This option only appears if Format is set to HP/GL or HP/GL2.
-
- It is initially set to the corresponding field in the Alias Preferences
window.
-
- A list of the possible plotter types is given on the left.
Plotter Name
-
- Specify the name of the plotter or laser printer to which your plot will be sent. By default, the plotter name in the Alias preferences window (Preferences > User Options > Alias preferences) will be used.
Plotter Correction - X/Y
-
- These multiplicative correction factors are applied to the size of the plot to correct plotter inaccuracies in one or both directions. These correction factors range from 0.8 to 1.2.
-
- If these values are already specified as plotter options in the Preferences window, they are used as the initial defaults in the Plotter Configuration window.
>
|
Note:
|
These are for minor corrections to the plotter setup, and
should not be used to scale the plot on the paper.
|
Paper Selection
This section is used to change the paper size or paper standards of your plot. Paper size can be changed for any Plotter Type, including postscript. Remember, you can plot onto more than one sheet of paper.
For Postscript plots, paper sizes not present in the interface can be added by editing file postscript.cfg.

If a valid paper size option has been set in the Plotter options text box of the Alias preferences window, it is initially used as the default.
The following shows the options available in this section:
Paper Standards
|
Metric ISO (A)
|
|
ANSI
|
|
Architectural
|
-
- The list of paper sizes that appears in the menu depends on the paper standards and plotter selected. The paper size is followed by either HORIZONTAL or VERTICAL, specifying the orientation of the paper in the plotter.
Size & feed dir.
-
|
ISO A
|
ANSI
|
Architectural
|
|
AO
|
E
|
E
|
|
AI
|
D
|
D
|
|
A2
|
C
|
C
|
|
A3
|
B
|
B
|
|
A4
|
A
|
A
|
-
- The following are international standard page sizes:
- Metric ISO A
|
|
millimeters
|
inches
|
|
AO
|
841.0 x 1189.0
|
33.11 x 46.81
|
|
A1
|
594.0 x 841.0
|
23.39 x 33.11
|
|
A2
|
420.0 x 594.0
|
16.54 x 23.39
|
|
A3
|
297.0 x 420.0
|
11.69 x 16.54
|
|
A4
|
210.0 x 297.0
|
8.27 x 11.69
|
|
A5
|
148.0 x 210.0
|
5.83 x 8.27
|
|
A6
|
105.0 x 148.0
|
4.13 x 5.83
|
|
A7
|
74.0 x 105.0
|
2.91 x 4.13
|
|
A8
|
52.0 x 74.0
|
2.05 x 2.91
|
|
A9
|
37.0 x 52.0
|
1.46 x 2.05
|
|
A10
|
26.0 x 37.0
|
1.02 x 1.46
|
- Architectural
|
|
inches
|
millimeters
|
|
A
|
9.0 x 12.0
|
228.6 x 304.8
|
|
B
|
12.0 x 18.0
|
304.8 x 457.2
|
|
C
|
18.0 x 24.0
|
457.2 x 609.6
|
|
D
|
24.0 x 36.0
|
609.6 x 914.4
|
|
E
|
36.0 x 48.0
|
914.4 x 1219.2
|
- American ANSI
|
|
inches
|
millimeters
|
|
A
|
8.5 x 11.0
|
215.9 x 279.4
|
|
B
|
11.0 x 17.0
|
279.4 x 431.8
|
|
C
|
17.0 x 22.0
|
431.8 x 558.8
|
|
D
|
22.0 x 34.0
|
558.8 x 863.6
|
|
E
|
34.0 x 44.0
|
863.6 x 1117.6
|
Tips:
- The simplest method of plotting is using PLOTTER
output with a postscript plotter, or writing an HP/GL2 output file.
- Plotter output is valid for all Alias geometric objects. This includes curves, surfaces, faces, text, instances, grids, and locators (dimensions). Hulls, CVs, and TV safe areas do not appear on the plotter output.
- Near and far clipping planes are used in the production of plot if set, but only in plot screen mode.
- Plotter output is not produced for graphical objects that have been made invisible or templated. Objects that have been replaced with their bounding box are plotted as that outline.
- The HP7475A and the IBM 6182 plotters require the power ON
and paper inserted for each new plot. Ensure that one plot has been completed and paper is changed before sending another file to the plotter.
- When plotting, if the smooth curves or surfaces are drawn facetted, they can be smoothed by selecting the problem objects and increasing their curve precision (this applies to curves and surfaces).
-
The maximum curve precision is 129, but you shouldn't
need to go to this extreme. Try increasing it ever so
slightly. This is more noticeable with models that are quite
large on the paper.
-
Be aware that the higher you make the curve precision, the
larger the plot file will be and the longer it will take to
plot. Also, when plotting is completed, it is best to return
the curve precision to the original values because the high
curve precision will degrade the interactive performance.
See also
|


