Cameras > World move camera > Track

Tracking Around in a View


Purpose

To slide a view horizontally or vertically.

How to Use

To use the Track tool, select Track from the Cameras > World move camera cascading menu in the Tool Palette, or click this icon.

Example

1
Select Objects > Primitives > Sphere to place a primitive sphere and click in any window. The sphere is displayed in all windows.
2
Select Cameras > World move camera > Track.
3
Click in any window with the left mouse button and drag. As you drag the mouse, the view moves from side to side or up and down.

Using the Mouse

To track the view in a window horizontally, click and drag the middle mouse button.

To track the view in a window vertically, click and drag the right mouse button.

>
Note: When working with a large model, the speed at which the screen is redrawn during a Track operation can be increased by decreasing the Motion Precision in the Preferences > Performance options window. See Setting Performance Options on page 519 for details.

Using the Keyboard

You can also specify the track values in absolute or relative terms.

>
Note: The terms in effect depend on whether the Keyboard Entry option has been set to REL or ABS. Absolute or relative terms are predefined in the Interface Options box (Preferences > Interface > Interface options-), or you can change these defaults by typing an a or r on the prompt line in front of your values. For more information on using absolute or relative terms, see Using Absolute and Relative Addressing Modes on page 12.

Type track values from the keyboard when the tracking prompt appears. The prompt that appears depends on the active window.

  • For an orthographic or SBD window, the prompt is:
Enter tracking amounts (right, up) (ABS):
  • For a perspective window, the prompt is:
Enter tracking amounts (x, y, z) (ABS):

Type the numbers separated by spaces or commas, and press Enter. The view is moved by the amounts you entered. If a perspective window is in Absolute mode, the eyepoint moves to the given location. The view and up points move the same amount.

Using Cursor Keys

You can also use the four cursor keys (arrows pointing up, down, left, and right on the keyboard) to track incrementally. The amount moved depends on the arrow size set in the Interface Options box (Preferences > Interface > Interface options-).

The default value of 1 means that pressing an arrow key once moves the cursor one pixel in the corresponding direction.

  • Moving the left arrow moves the view to the left.
  • Moving the right arrow moves the view to the right.
  • Pressing the up arrow moves the view upward, and the down arrow moves the view downward.

Be careful to keep the red cursor positioned within the window when using the cursor keys.

Track Options
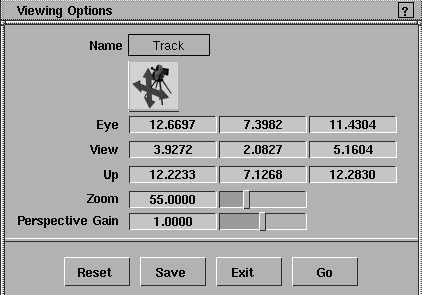
Select Track- to display the Viewing Options box.

Eye/View/Up

These sliders let you define a view by positioning the camera. The view is determined by the eye position, view point position and up vector end point. These nine fields contain floating-point values. They represent, from left to right, the X, Y, and Z coordinates for each of the three camera parameters. To see the camera as you modify it, use DisplayTgls > Object Toggles > Camera.

Zoom

The Zoom slider also takes a floating-point value which defines the extent of the camera's field of view. Values must be positive in the range of 0.2 to 179.
>
Note: For windows other than the perspective window, two of the three Eye and View values must be the same, and two of the three Eye and Up values must be the same. If they are all different, or are all the same, the results are unpredictable. This is because viewing operations on orthographic windows are performed on the window rather than the camera of the window.

Perspective Gain

Lets you enter values that increase or decrease the rate of dollying or tracking when working with a very large or very small view.
>
Note: Perspective Gain and Zoom values are only used in perspective windows. Zoom gives a zoom effect by changing the field of view of the camera.


Copyright © 1998, Alias|Wavefront, a division of Silicon Graphics Limited. All rights reserved. Please send questions or comments regarding the documentation to:
[email protected]