|
|
6
|
Working with the MetaCycle Window
|
|
In This Section:
|
Animation >
MetaCycle window
|
Separating Animated Models into Components
|
|
|
|
|
The MetaCycle window is used primarily by the games industry. It lets you load individual character movements (snippets), such as kicks and punches, arrange them in any order, and assign keys for each move. The window creates blends (transitions) from one move to another. The keys make it easy to load the data into a game box.
The production industry uses the MetaCycle window for its blending and rendering technology. It lets you create the transitions between motion capture files and compose a single animation sequence.
First, some definitions:
- Characters represent an animated entity in the scene or interactive piece. A character's geometry is specified as a set specified in a stage.
|
|
|
- Snippets represent a single basic movement or cycle that a character may perform, such as a walk cycle. A snippet is specified by a character's range of frames in a specified stage.
|
|
|
- Transitions are procedurally defined blends that link snippets together. They are displayed as lines between snippets. Transitions can be specified in the MetaCycle window.
What you can do in the MetaCycle window
The MetaCycle window can be used for interactive applications, rendered applications, and motion capture.
Interactive Applications
You can break up an animation into the component parts that are required for an interactive title.
For example, a metacycle character might have a walk cycle, a run cycle, a kick move, and a punch move defined for a fighting game. These movements are the required animation sequences. The MetaCycle window lets you graphically define and organize these movements, or snippets. You can also define transitions between the movements. For example, the way in which a walking character initiates a punch can be automatically calculated using the window options.
You can mark a path through the various snippets and transitions at any time, and either preview the resulting animation or record the resulting animation starting at a specified frame. In addition, individual procedural transitions between snippets can be converted into animation snippets using a recording process for subsequent manipulation.
You can request a complete database of all animation snippets and transitions to be either previewed or recorded for eventual downloading to the following game platforms:
|
|
For information on APIs, see
the on-line reference help.
|
- translators built on the OpenAlias/OpenModel API,
|
|
For information on games
translators, see Games Data
Transfer in Alias.
|
- Alias|Wavefront Sony Playstation
- Alias|Wavefront Nintendo64
- other Alias|Wavefront translators available either generally or to authorized game developers.
The benefit of using Alias|Wavefront translators is that gamepad controls can be specified for each transition in the MetaCycle editor allowing you to define very simple test gameplay for previewing and testing the snippets and transitions once the animation database is downloaded onto a supported game platform.
>
|
Note:
|
This functionality is available from the OpenAlias/
OpenModel and Dt APIs.
|
Rendered Applications
The MetaCycle window can be used for more traditional rendered, or non-interactive applications. The resulting animation database can be rendered or raytraced to use sprite-based interactive applications, or the defined characters can be used along with the record functionality to create sequences of character movements for film or video.
Motion Capture
MetaCycle can be used to blend sequences of motion capture. Since motion capture sessions are generally a set of animation files, one per recording session, the MetaCycle window can be used after loading all sessions into stages to blend these together and create a single animation sequence.
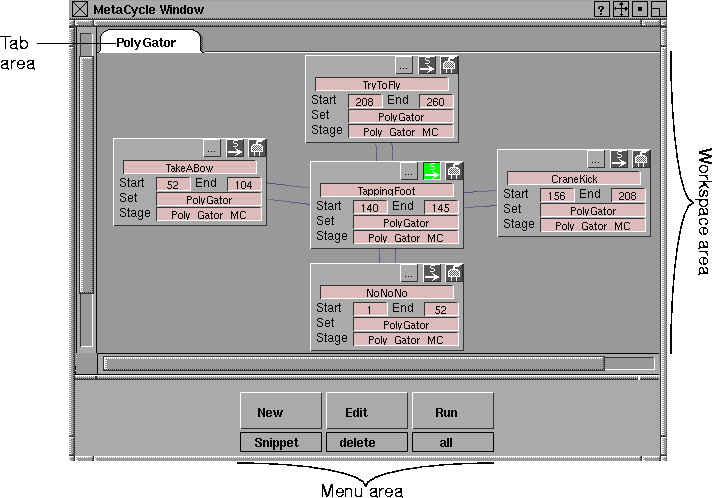
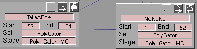
MetaCycle Window
The MetaCycle window has three basic areas; the Tab area, the Workspace area, and the Menu area.
|
|
|
Tabs

Each tab represents a character that has been defined.
You can switch between characters by simply clicking on a tab with the left mouse button. The active character's tab appears on top of the deck.
You can open the Character Detail editor to specify detailed properties of a character by double-clicking on the character's tab. The following window appears:
Character Detail Editor
|
|
Double-click the tab to open
the Character Detail editor.
|
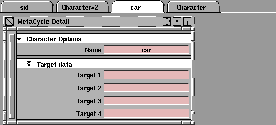
Character Options - Name
-
- This box displays the name of the current character.
-
- You can change this name by clicking in the box and typing a new name. The new character name is displayed on the character's tab.
>
|
Note:
|
This name is also assigned by default to the Set
field of new
snippets. By naming the character the same as the set that
represents the geometry the character contains, you can
minimize the amount of retyping you have to do when you
create Snippets.
|
Target Data
-
- These boxes allow you to specify text that will be transferred to game platform translators. These boxes are not related to the Alias application, but can be used by translators to control platform-specific behavior.
|
|
See the Transition Detail
Editor on page 224 for more
information.
|
For example, the Alias file converters use the Target 1 field in the Transition detail window to specify which gamepad button should be used to cause a character to follow a particular transition.
The MetaCycle Menu Area

The menu area contains the menus you use to manipulate items in the MetaCycle workspace.
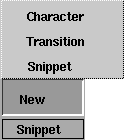
New menu
|
|
|
Character
-
- Creates a new character and its associated tab and workspace.
-
- If a set is selected in the set lister window when this menu item is chosen, the new character will be assigned the same name as that set.
>
|
Note:
|
This new character's name and the current stage, will be
assigned by default to the set fields and stage of all snippets
created as part of this new character.
|
Transition
-
- Provides an alternate means of creating a transition between two snippets (instead of clicking and dragging). The transition is created from the first snippet you select to the second snippet you select.
Snippet
-
- Creates a new snippet for the currently selected character. This snippet is positioned in the center of the window and has the stage and set name from the current stage and character.
-
- By default, the range of the snippet will be set to frame 1 through 100. Change these values to indicate the range of animation required for this particular movement of the character.
|
|
|
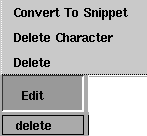
Edit menu
Convert to Snippet
-
- Converts a transition to an animation that can be modified using the standard Alias tools. This tool is useful in situations where the automatically generated transition animation is not satisfactory.
-
- The system prompts you for the frame to create the resulting animation at, and then records the transition starting at that frame number. A snippet box is created that refers to the new animation, and new zero-length transitions connect this new snippet to the start and end points of the original transition.
Delete Character
-
- Deletes entire characters from the MetaCycle window. The current character (indicated by the highlighted tab) is deleted when you select this menu item.
Delete
-
- Deletes selected snippets or transitions.
- Select a snippet by clicking on the plug icon. A red plug icon indicates that the snippet is active.
- Select a transition by clicking on the arc that represents the transition. Active transitions are represented by red arcs.
|
|
|
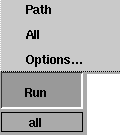
Run menu
Lets you run a character through a sequence of snippets and transitions, or through all possible snippets and transitions.
Path
-
- Runs the current character, with current options, from the active snippet (indicated by its highlighted Start icon) through all possible transition chains from that snippet.
|
|
A transition chain is a path
through contiguous selected
transitions.
|
-
- If multiple transition chains are possible, then each of the chains are run in succession.
-
- You can specify run options by selecting the Run > Options choice (see the next section.)
All
-
- Runs the current character through all possible snippets and transitions exactly once. The first snippet that runs is the snippet with its Start
icon selected.
>
|
Note:
|
All animation contained at the specified frame, and in
frames greater than the specified frame, will be deleted
when the Run Path or Run All tools are invoked with Record
Mode set to RECORD.
|
Options
|
|
When you choose Options
under the Run menu, this
editor appears.
|
The Options menu item opens the MetaCycle Detail editor.
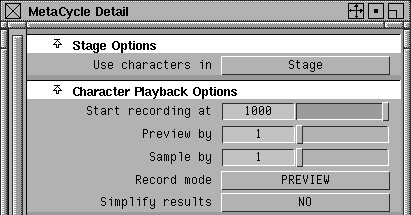
In this editor, you can set various parameters to control how the character is run through snippets and transitions.
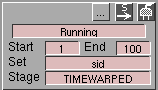
Stage Options
Use characters in
-
- Because MetaCycle can work across multiple stages, this control lets you specify which stage will contain the MetaCycle characters. Its pop-up menu lists all existing stages, and lets you select the Alias stage that contains the characters you want to work with.
-
- Changing the current stage switches the contents of the MetaCycle window to the characters in the new stage.
Character Playback Options
Start recording at
-
- Use this slider to specify the frame where recording will start when the Run Path or Run All tools are used.
>
|
Note:
|
All animation contained at this frame, or in frames greater
than this frame, will be deleted when the Run Path or Run
All tools are invoked with Record Mode set to RECORD.
|
Preview by
-
- This value
should normally be set to 1; however, you may want to use larger values for a quicker preview of a simulation (for example, if you have a large model with only a small part of it in the simulation). Quick previews are useful when you are trying to establish a rough feel for the various dynamic parameters.
Sample by
-
- Specifies how often a keyframe should be created. A higher setting causes fewer keyframes to be created; however, the resulting animation is less faithful to the calculated simulation.
|
|
If you have a very low
Sample By
value, the
resulting animation curves
could be very dense with
keyframes. In this case, set
the Simplify Results option
to YES to minimize the
number of keyframes
created in your animation.
|
-
- The lower the Sample By value is, the more accurate the simulation.
Record Mode
-
- This popup menu lets you specify whether you want to PREVIEW the animation before recording it, or RECORD the animation when ready.
>
|
Note:
|
All animation contained at the specified frame, and in
frames greater than the specified frame will be deleted when
the Run Path or Run All tools are invoked with Record
Mode set to RECORD.
|
Simplify Results
-
- If set to YES, the number of keyframes is reduced, resulting in reduced memory requirements. The accuracy of an animated simulation is not affected. If set to NO, the final resulting recording has a keyframe at every frame in the path.
Workspace Area
The workspace is the area directly below the tab area. If no characters or snippets are defined, this area is displayed as a blank grey area. As characters, snippets, and transitions are defined, they are displayed on the workspace.
The workspace may be larger than the window that contains it. For this reason, it has horizontal and vertical scroll bars to help you navigate around. You can also click and drag on a blank section of the workspace to drag various parts of it into view.
>
|
Note:
|
Only the workspace of the uppermost (or active) character is
displayed at any one time.
|
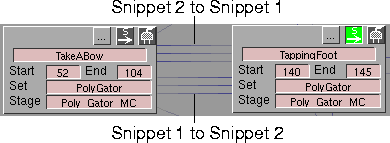
Snippets
|
|
|
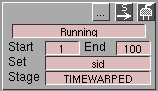
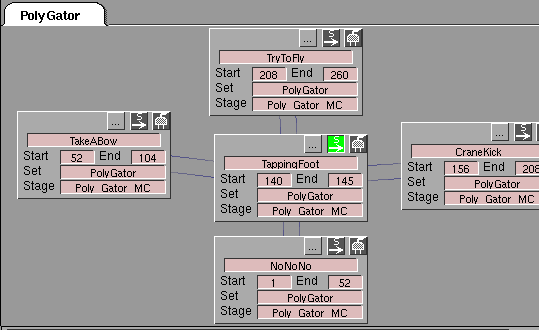
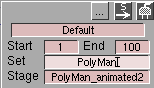
Snippets are displayed as small boxes containing the name of the snippet, and the Start, End, Set, and Stage boxes.
How to use a Snippet
The Start and End box values determine the range of animation represented by the snippet. For example, if a character had a walk cycle that took place from frame 50 to frame 75, you would set the start value to 50 and the end value to 75 in the Walk snippet.
The Set box displays the name of the set that makes up the geometry for this Snippet. The set represents the tops of the hierarchies that make up the character. All nodes below the DAG nodes in the set are interpolated during a transition.
The Stage box displays the stage that the particular snippet is located in. Many wire files can be loaded at the same time (see the Stage editor in Basic Tool in Alias for more information).
You can change the position of the snippet in the workspace by clicking and dragging its title bar.
Snippet Icons
Along the top of the snippet is a title bar containing three icons.
|
|

|
Snippet Detail Icon
-
- Opens the snippet's MetaCycle Detail editor. (See page 222.)
|
|

|
Start Icon
|
|
When you click on this icon,
it highlights in green. The
start icon is turned OFF in
any other snippet.
|
-
- Lets you preview one or more snippets. You can either indicate the start point in a preview through the various snippets and transitions, or specify the snippet that should be started initially after downloading.
-
- You typically download to run a metacycle model for a game translator. For a download, the marked snippet is processed first when generating an animation database using the Run > All menu item.
-
- You can also create a Transition between two Snippets by selecting the start icon with the middle mouse button and dragging the mouse to another snippet. See Transitions on page 223 for more information.
|
|

|
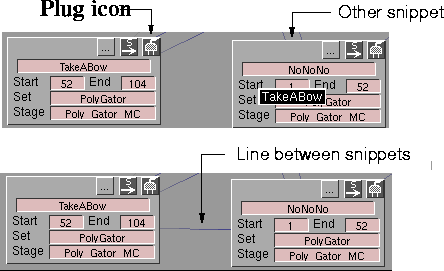
Plug Icon
-
- Click this icon with the left mouse button to select or deselect a snippet so you can delete it using the Delete function from the MetaCycle Edit menu. A snippet is selected when it appears in red.
|
|
For information on
transitions, see Transitions on
page 223.
|
-
- Click this icon with the middle mouse button and drag the mouse to create a transition between two snippets. The name of the snippet appears when creating a transition.
|
|
With the middle mouse
button, click the plug icon
and drag to the other snippet
to create a transition. Let go
of the mouse button. A line
is displayed between the
snippets.
|
MetaCycle Detail Editor
The MetaCycle Detail
editor lets you change Snippet details, and also lets you specify options that are not available in the Snippet.
Snippet Options
These options are the same options as shown in the snippet.
Preview Options
Specify length by
-
- This popup menu lets you choose to set the length of the preview.
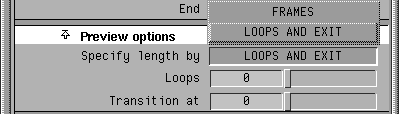
- FRAMES - You specify the number of frames to be used in a particular snippet during a preview operation. The Frames slider appears, where you can specify the number of frames to perform (requiring looping if necessary).

- LOOPS AND EXIT
- The number of frames to be used in a particular snippet during a preview is specified by the number of whole loops to perform, and the frame number of the frame at which to exit the snippet. Two sliders appear: the Loop slider, where you can specify the number of whole loops, and the Transition at slider, where you can specify the frame number after which a transition to exit can occur.
Transitions
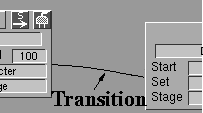
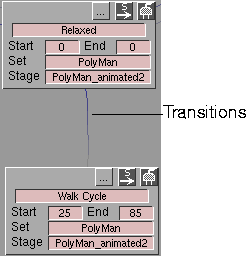
Transitions are represented by lines (arcs) running between snippets.
|
|
The lines between the
snippets are transitions.
|
Create transitions by clicking and holding the plug or start icon of one snippet with the middle mouse button, dragging the mouse to another snippet, and then releasing the middle mouse button.
Transitions are uni-directional. A transition represents a blend from one snippet to another, and not vice-versa. To obtain transitions in both directions between two snippets, you must create two transitions, one in each direction.
Notes on Transitions
- The direction of a snippet is indicated in two ways:
- The color of a transition intensifies from a neutral grey to either blue or red in the direction the transition is running.
- All transitions between two snippets are oriented on the same side of an imaginary central line connecting the two snippets. Transitions traveling in the opposite direction are on the opposite side of that line.
- An unlimited number of transitions can be defined between two snippets. Additional transitions are simply bulged out to avoid overlapping other transitions.
- Moving a snippet also moves all transitions that start or end at that snippet.
- Transitions can be selected (made active) by clicking on them with the left mouse button. Selecting with the left mouse button toggles the selected transition between active and inactive, selects only that transition, and deselects all other transitions. All selections can be removed by selecting on the background with the middle mouse button.
- Active transitions are displayed as arcs that range from grey to red in color. Inactive transitions range from grey to blue in color. Transitions should be made active if they are part of the path to be previewed or recorded, or if you want to delete them using the MetaCycle Edit > Delete menu option.
Transition Detail Editor
To change transition options, double-click on a transition line in the workspace.
|
|
Double-click the transition
line to display the
transition's options. The
MetaCycle Detail window
appears.
|
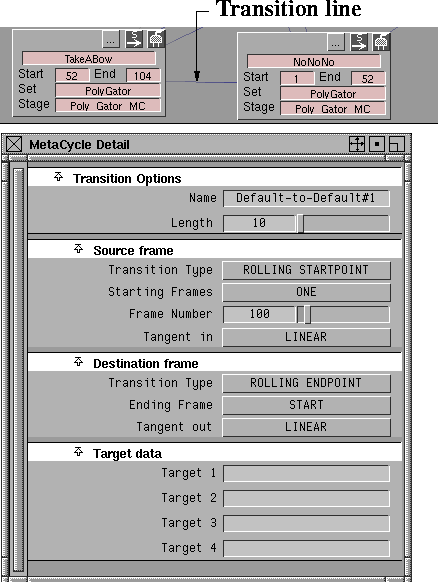
Transition Options Section
Name
-
- This box lets you name the transition. By default, the name is composed of the names of the source and destination snippets when the transition is created.
Length
-
- This slider lets you define the length of the transition in frames. This is the length of time it takes to blend fully from the source snippet to the destination snippet.
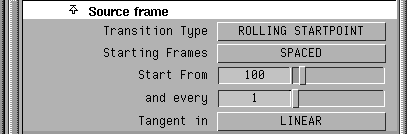
Source Frame Section
|
|
|
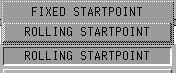
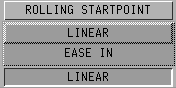
Transition Type
-
- These options determine the characteristics of the blending used to create a transition.
- ROLLING STARTPOINT- during the transition (or blending) process, the system continues to cycle the source snippet through its frames.
- FIXED STARTPOINT- during the transition (or blending) process, the system blends the single source frame of the transition with the destination of the transition.
|
|
|
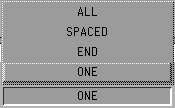
Starting Frames
-
- These
options determine when the transition starts in the source snippet.
- ALL - the transition from the source snippet to the destination snippet can occur at any point in the source snippet.
- SPACED - the transition from the source snippet to the destination snippet occurs at the frame specified in Start from
field, and thereafter by every number of frames specified in the and every field. For example, every 1 frame, starting with frame 100.
|
|
With Starting Frames set to
SPACED, the Start From and
"and every" sliders appear.
|
- END
- the transition from the source snippet to the destination snippet occurs on the last frame of the source snippet.
- ONE
- the transition from the source snippet to the destination snippet occurs at the frame number you specify in the Frame Number
slider.
|
|
With Starting Frame set to
ONE, the Frame Number
slider appears.
|
|
|
|
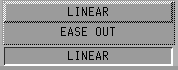
Tangent In
-
- The Tangent In options determine the type of blend that will be generated during the transition.
- LINEAR
- the transition will be a straight linear interpolation into the destination snippet.
- EASE IN
- the transition will ease into the destination snippet.
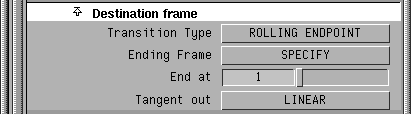
Destination Frame Section
|
|
|
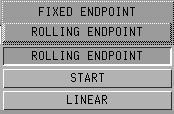
Transition Type
-
- The Transition Type
options determine the characteristics of the blending used to create a transition.
- FIXED ENDPOINT- during the transition (or blending) process, the system blends the source of the transition with the single destination frame of the transition.
- ROLLING ENDPOINT- during the transition (or blending) process, the system continues to cycle the destination snippet through its frames.
|
|
|
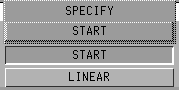
Ending Frame
-
- These options determine how the animation is displayed at the end of the cycle.
- START- lets you specify that the transition should end on the first frame of the destination snippet.
- SPECIFY- lets you specify which frame the transition should end on, in the destination snippet. If you select this option, the End at slider is displayed, where you can specify the end frame.
|
|
|
Tangent Out
-
- These options determine the type of blend that will be generated during the transition.
- LINEAR- the transition will be a straight linear interpolation out of the source snippet.
- EASE OUT- the transition will ease out of the source snippet.
Target Data
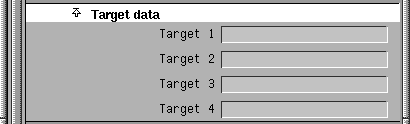
These boxes allow you to specify text that will be transferred to game platform translators. The information in these boxes is not related to the Alias application, but can be used by translators to control platform-specific behavior.
For example, Alias file converters use the Target 1 field to specify which gamepad button causes a character to follow a particular transition.
An Example of Using MetaCycle
The following example shows how you can use MetaCycle to convert an existing character animation into snippets for use in a gaming environment.
I. Create snippets
-
1
-
Select all objects associated with the character's animation (that is, objects, skeletons, constraints, etc.).
-
2
-
Select Edit > New Set.
-
3
-
Select Windows > Sets > Set lister to open the Set Lister. Your set is automatically given the name set
.
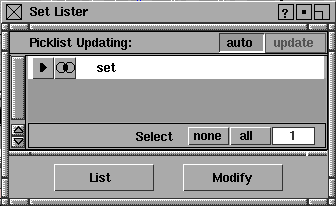
-
4
-
In the Set Lister, double click on the name field and give your set a meaningful name (for example, PolyMan).
-
5
-
Select Animation > MetaCycle window. The MetaCycle
Window appears.
-
6
-
From the MetaCycle window menus, select New > Character. A tab appears in the MetaCycle Window with the same name as the set.

|
|
|
-
7
-
From the MetaCycle window menus, select New > Snippet. A new snippet is created and placed in the center of the MetaCycle workspace.
>
|
Note:
|
The Set field in the snippet's window is automatically
assigned the name of the selected character. If you do not
define the set name in the set editor, you must manually
enter the set name for each snippet.
|
-
8
-
Click on the snippet's name field, and give the snippet a name (for example, Walk Cycle).
-
9
-
In the Start and End fields, enter the frame numbers of the animation that you want to correspond to the start and end of the snippet.
-
10
-
Test the snippet by selecting Run > All. Edit the Start and End fields, if necessary.
-
11
-
Repeat steps 7 to 10 to create additional snippets, and arrange them in the MetaCycle workspace.
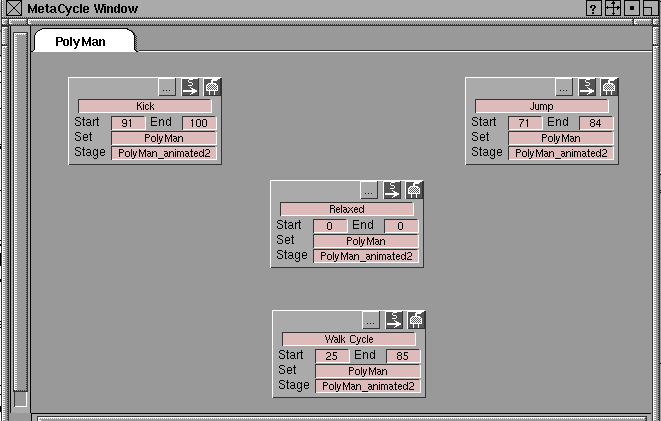
-
The following example shows four snippets representing a
relaxed state, a walk cycle, a jump and a kick.
|
|
|
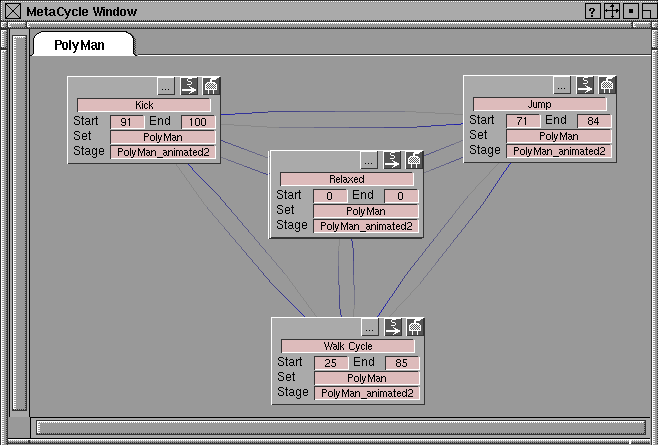
II. Create transitions
The next step is to blend the animations together into transitions that link the snippets together.
|
|
|
-
1
-
Click the middle mouse button on the plug icon (in the upper right corner) of the source snippet, drag the cursor over the destination snippet you want to establish a transition with, and release the mouse button.
-
A line now connects the two snippets, indicating that a
transition exists between them. The line starts light grey at
the source snippet and ends in dark blue at the destination
snippet.
-
2
-
Continue to create transitions between all snippets.
|
|
|
III. Preview snippets
You can now preview the transitions. Either:
- To preview all snippets and transitions, select Run > All from the MetaCycle menus.
- To preview individual transitions or a specific series of transitions, create a path which determines the order of playback for the snippets:
|
|

|
- First, select the S > icon (start) for the snippet that you would like to preview first. The icon will turn green once you have selected it.
- Secondly, select the transition that the path will continue along (that is, the transition going to the snippet you would like to preview last). Make sure that the direction of the transition is pointing from the start snippet; otherwise the path will be invalid.
- Lastly, select Run > Path from the MetaCycle menus.
IV. Edit snippet options
At this point you might want to change the playback options for specific snippets, or adjust the style or duration of transitions.
|
|

|
-
1
-
Select the snippet detail icon located on the top border of the snippet. The MetaCycle Detail editor appears.
-
2
-
Adjust snippet parameters as desired
>
|
Note:
|
The default snippet option for loops is 0. This results in the
last snippet in the path not previewing. If you want the last
snippet in the path to preview, set this value to at least 1.
|
V. Edit transitions
-
1
-
Double-click on a transition line. The MetaCycle Detail editor appears.
-
2
-
Adjust transition parameters as desired.
VI. Convert transitions to snippets
If you want your transitions to be actual keyframes, you can change transitions into snippets. This gives you the ability to further modify the transition.
-
1
-
Select a transition.
-
2
-
Select Edit > Convert to Snippet from the MetaCycle menus.
-
The system prompts you to enter the frame Start Point for
frames generated from the transition. This value sets the
new keyframe range for when this snippet will begin.
>
|
Note:
|
When converting snippets, make sure that you are not going
to overwrite any needed keyframes.
|
Example of Testing Snippets
You can test how certain snippets and transitions work together by interactively selecting them using a gamepad or a mouse in real-time. (The MakeGame plug-in must be installed.)
You can use the game translators to preview the animations and/or export to game-specific files. For the following example, the OpenGL viewer is used since it does not require extra peripherals.
I. Define transitions target data
-
1
-
In the MetaCycle Window, double-click on a transition to open the transition detail editor.
|
|
Note that you only need to
assign a text string in
Target 1 for it to work.
|
-
2
-
Expand the editor's Target data menu and enter a text character or a small text string into the Target 1 field. The text string will represent this transition in the OpenGL viewer.
-
3
-
Continue to assign appropriate text strings into all of the transitions' Target 1 fields.
-
There should be at least one transition leading into each
snippet and at least one transition leading out of each
snippet.
II. Generate MetaCycle data table
-
1
-
Select Run > Options.
-
2
-
Under Character Playback Options, set Record mode to RECORD. This will record keyframes from the current value in the Start recording at parameter the next time you select Run > Path or Run > All. (All existing animation in these keyframes will be destroyed.)
-
3
-
Set Start recording at to a value that will not destroy any previous keyframes.
-
4
-
Select Run > All. This will automatically generate the data table for everything in the MetaCycle Window.
III. Testing snippets
-
1
-
Select Utilities > Mgame.
-
2
-
Set Translator to OpenGL.
-
3
-
Set Properties to Animation.
-
4
-
Select Use Metacycle
so it is highlighted.
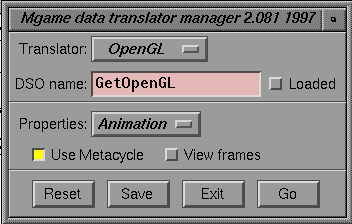
-
5
-
Click on Go. The OpenGL viewer will load along with your geometry and the MetaCycle data.
-
6
-
Zoom out and/or pan around to find your character.
-
The target data you have defined will be reflected on the
transition buttons found on the MetaCycle control panel.
-
7
-
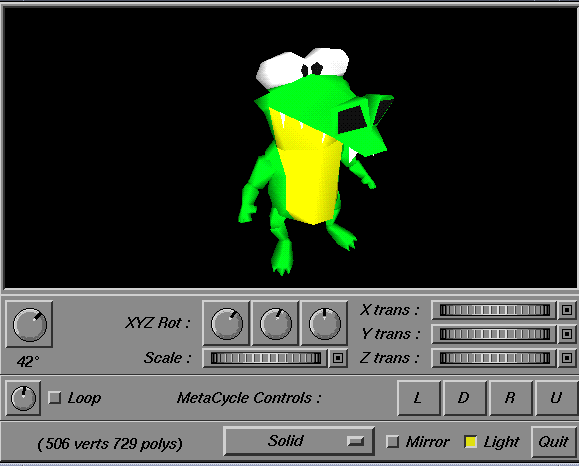
Select a transition button. The window will update in real-time, and the buttons will update to show any transitions that are leading out of that snippet (for as long as there are transitions leading out of the current snippets).
-
You have now used MetaCycle to build the beginnings of
a gaming character. With more complex moves and well-
planned transitions, your results will be surprisingly
interactive.
|


