| Home |
| Tutorials |
| Exercises |
| About Us |
Lessons:

Lesson 1
Lesson 2
Lesson 3
Lesson 4
Lesson 5
Lesson 6
Lesson 7
Lesson 8
Lesson 9
Lesson 10


Let me know your comments, opinions, suggestions and questions!

Username:
Comment:


Words of Encouragement:

Practice Makes Perfect, Perseverance makes it wonderful, Enthusiasm makes it the best. - Anonymous


You'll never get what you want if you always let people step over you. - Plankton


Mistakes are meant for learning, not repeating. - Anonymous


Your beliefs don't make you a better person, your behavior does. - Anonymous


Life isn't about waiting for the storm to pass, It's about learning to dance in the rain. - Anonymous


It takes only one person to change your life-you. - Anonymous


Without the rain, there would be no rainbow. - Anonymous


Always forgive, but never forget. Learn from your mistakes, but never regret. - Anonymous


The next lesson is about electronic forms. Also known as E-Forms. Do you have an account on at least one social-networking site? Have you noticed the comment form on the side bar? Those are the so-called electronic forms. Now, how do you decode an electronic form on your HTML? Look at the image below.

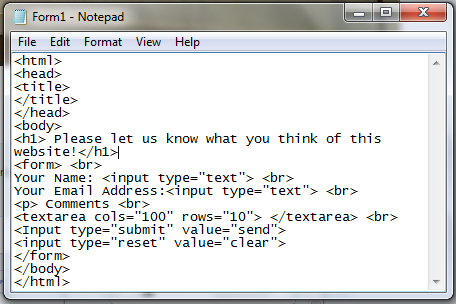
See my output here .

You still don't know how those tags work? Just continue reading.

  1. "Input type" - The main tag used in forms.
      Values of Input Type Tag:
    • "text" - It displays a horizontal textfield.
        Attributes of Text Value:
      • "Name" - set the name of the form element. It is the semi-transparent text found inside the text field. It's value can be any name that won't duplicate on the other elements in the same form
      • "Size" - determines the size of the textfield. Its value can be any positive integer.
      • "maxlength" - specifies the number of characters the user can input in the textfield. Its value can be any positive integer.
    • "password" - Similar to the "text",it also displays a horizontal textfield but makes the input of the user dots.
        Attributes of Password Value:
      • "Name - The definition is located here
      • "size" - It makes the size of the textfield precise. The value can be any positive integer.
      • "Maxlength" - It specifies the maximum amount of character that a user can input in the textfield. The value can be any positive integer.
    • "checkbox" - It creates a checkbox.
        Attributes of Checkbox Value:
      • "Checked" - It makes the checkbox to be checked by default. As long as this attribute is written inside the tag, the checkox is automatically checked.
      • "Name" - The definition is located here
    • "radio" - It creates a radio button.
        Attributes of Radio Value:
      • "checked" = It is the radio button which is 'ON.'
      • "name" - The definition is located here
    • "submit" - If this button is clicked, then the form will be sent.
    • "reset" - If this button is clicked, then the form will be cleared and you have to fill the form again.
  2. "textarea" - This creates a textfield.
      Attributes of Textarea
    • "rows" - Defines the height of the textarea.
    • "cols" - Defines the width of the textarea.

      Yet, the form doesn't still have a destination

      In order tohave a destination, the tag form will have these special attributes.

      • action="mailto:[email protected]" - This attribute will determine the email address the form will be sent.
      • method="get" - This attribute will send it in one request.
      • enctype="text/plain" - This attribute makes the elements in your form readable when you send the email.

      Lesson 7 is done! Are you ready to move on to the next lesson? Click Here to move on to the next lesson.