| Home |
| Tutorials |
| Exercises |
| About Us |


Lessons:

Lesson 1
Lesson 2
Lesson 3
Lesson 4
Lesson 5
Lesson 6
Lesson 7
Lesson 8
Lesson 9
Lesson 10


Let me know your comments, opinions, suggestions and questions!

Username:
Comment:


Words of Encouragement:

Practice Makes Perfect, Perseverance makes it wonderful, Enthusiasm makes it the best. - Anonymous


You'll never get what you want if you always let people step over you. - Plankton


Mistakes are meant for learning, not repeating. - Anonymous


Your beliefs don't make you a better person, your behavior does. - Anonymous


Life isn't about waiting for the storm to pass, It's about learning to dance in the rain. - Anonymous


It takes only one person to change your life-you. - Anonymous


Without the rain, there would be no rainbow. - Anonymous


Always forgive, but never forget. Learn from your mistakes, but never regret. - Anonymous


Welcome to the fifth chapter of my HTML tutorials.

This chapter will teach you on how to make a table in an HTML. If you had already encountered Microsoft Excel, you should be familiar with a table. Also, a table can be made in Microsoft Word, Powerpoint and Publisher.
Did you know that this website mainly uses table to separate its content?

A table is used to organize a set of data using a model of vertical columns and horizontal rows to organize the given data.

Now, how do you insert a table on your HTML? Simple. Look at the image below.


Notice that it starts with the tag "table" which indicates that the data between the opening and closing tags of table will be included inside it. Note that there are also tags inside the table tag.
  1. th - It means "Table Heading." It is located at the top part of the table
  2. tr - It means "Table Row." It means that everything input between the opening and closing tags of "tr" is included in one row.
  3. td - It means "Table Data." It is used to separate the data in one row into different columns that match the heading.


Now, look at the image below. That is the output I created using the codes above.


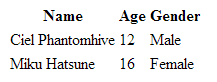
There's no borders, right? Because a table also has attributes.
    Here are the attributes you can use:
  1. border - It changes the thickness of your border. The value can be any positive integer.
  2. bordercolor - It changes the color of your border. The value can be a 6-digit code which may contain a letter, a number or both or the name of the color. Although I suggest you to use the codes since it is more accurate than the name of the color.
  3. cellpadding - It changes the space of your cell. The value can be any positive integer.
  4. cellspacing - It changes the space between two cells. The value can be any positive integer.
  5. bgcolor - It changes the color of the cell, the row, or the entire table depending on where you put the attribute. The value is similar to the bordercolor.
  6. rowspan - It merges the cells horizontally. The value can be any positive integer.
  7. colspan - It merges the cells vertically. The value can be any positive integer.


Lesson 5 is done! Are you ready to move on to the next lesson? Click Here to move on to the next lesson.