|
|
||||
|
Destination: 2001 Iron Butt Rally -- 11 Days / 11,000 Miles |
||||
|
Volume 2, Number 1 May 2001 ============= Special for Rollin' readers
|
Butt
Wait! --
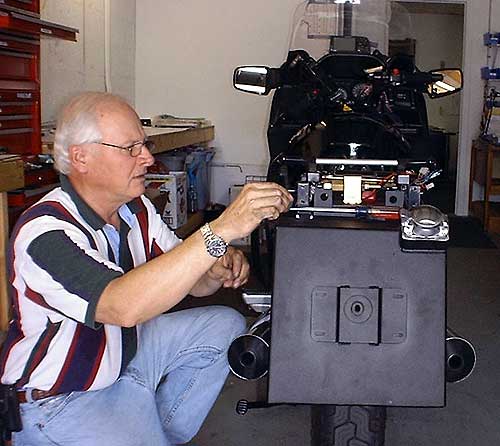
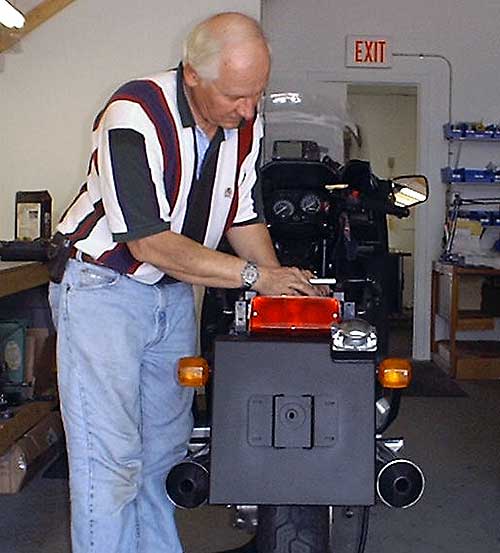
Photos by Larry Buck & B2 Get the Rollin' Dude Wallpaper As you'll recall from this segment last month, we were in the finishing stages of actually fabricating the auxiliary fuel cell and the auxiliary light mounts for the BarfRocket. No one is more surprised than I at the amount of work that has been accomplished in the past four weeks since we went on-line with last months article.
In a nutshell, both the cell and light mounts have been completed and have been fully installed. The timing of all this has worked out particularly well, the installations were complete with almost two full weeks to spare before I was to depart for the 2001 Waltz Across Texas LDR rally in Longview, TX. According to "IBA Rule #5", one shall not make modifications to one's bike immediately prior to a rally or event, it's just simply asking for trouble. The two weeks prior to departing for the rally would allow plenty of time to ensure that everything was sorted out. From departure for the Waltz on Thursday, 4/26 until arriving home on Monday evening 4/30 the odometer on the BarfRocket will spin over approximately 3,500 more miles, this will prove a most excellent test to how the new fuel cell and lights have worked out. In this month's segment we'll attempt to tell and show you just a bit of the work that went into getting the BarfRocket ready for this trip. When 7.4 Gallons is Just Not Enough By the end of the first week in April, Terry Smith of Sampson Sport Touring Products had completed the final cosmetic touches remaining on the cell and had shipped it via priority mail to Larry Buck's shop at his business, Surface Conditioning, in Boca Raton, Florida. Larry had also finished the first 2 prototype sets of his now somewhat famous "Buck Mounts" and had already installed one pair of them along with his set of Hella FF200 lights on his Concours. All that remained was for me to get my butt down to Boca and for the two of us to get to work. Tuesday, April 17th found me on my way down South before sunup and pulling into the stall at Larry's (remarkably for me) right on time at 8:30, this would prove to be a smart move getting there early as we were in for a long day. The installation of the cell was not really that difficult, anyone with a medium level of mechanical expertise could accomplish it, I suspect most any "real motorcycle mechanic" would have no problem at all even if they have never done a cell install before. I myself however, on a good day, have the mechanical aptitude of a small appliance bulb. My only possible redeeming mechanical "skill" is to know when "if I go any further, I'll screw the whole thing up beyond any possible repair". With his immense knowledge of Connies and adeptness at things that go whir and can hurt you, I'd be hard pressed to find anybody better to tackle these tasks with me than Larry Buck.
Larry had e-mailed me earlier and told me that I was really in for a surprise when I got there and saw the new cell. While I was already fully aware of the quality of work put out by Terry and Ron of Sampson, "surprise" was really not the right word. I was STUNNED. Lemme tell you folks, this fuel cell was an absolute work of ART, and I do not use that word lightly. It looked just like something that would have been sent out as a stock part from Kawasaki, all the welds had been ground down since the last pics I'd seen of it and it had been powder coated a beautiful satin black. As I picked it up a turned it all around, gawking with mouth agape, I could not believe the engineering that had gone into it, unlike his other cells, this one would be completely replacing the entire rear fender assembly of the bike and this had greatly increased the work involved with the fitment and fabrication. Larry had already printed off the full and most complete written installation instructions available at the Sampson web site and after a quick scan of them, we rolled up our sleeves and got to work.
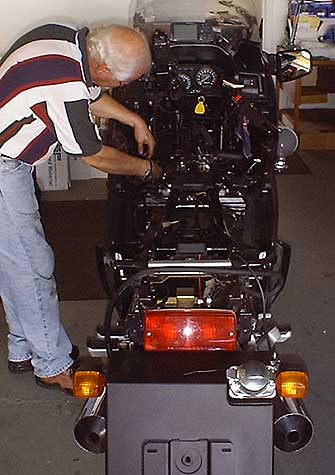
The bodywork on a fully faired bike has always scared the bejeebers out of me, butt Larry walked me through the removal of the tail section and the hardware associated with the mounts for the Connie hardbags. We also removed the side panels along with the whole rear fender and stripped off the tag holder, and tag light, along with the rear turn signals, as the signals would be installed into the side of the cell. Next we actually mounted the fuel cell to the bike with 4 bolts that went into the already threaded holes in the rear sub frame with a additional nut on each that backed out against the sub frame for extra security, (there are actually 2 more mounting bolts in addition to these 4) all these fasteners were also "blue locktited". Terry had provided us with all the hardware needed for the cell install, the fuel lines and electric transfer pump butt had not sent us the pump switch as different folks may want different styles of switches.
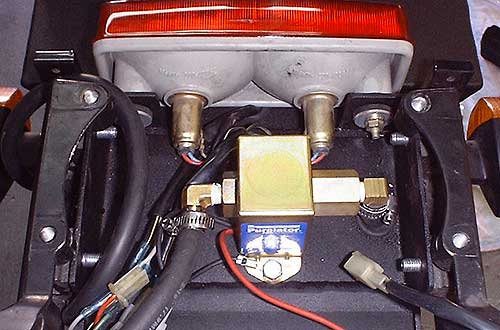
Next we lightly attached the Purolator 42-S fuel pump to the spot under the rear cowling and on top of the cell that had already been predrilled for it. We Teflon taped the brass nozzle fittings for the outlet and vent on the tank, screwed them in and began to route the fuel line, (all also included with the cell) being careful to firmly attach the fuel lines with regular hose clamps.
We routed the vent line up and over part of the rear cowling area, creating a somewhat uphill situation for any venting liquid to travel and routed the vent line down alongside the inner rear of the fuel cell, almost completely out of normal view. We pushed the rubber grommets for the turn signal wires into the already predrilled holes for them and tightened the signals up against the side of the cell. Though there was still much left to do, the cell was already looking as if it had come stock on the bike. Simply amazing.
Next, we routed the fuel transfer line from the outlet on the cell up through over the frame of the bike along the right side to the rear of the main bike tank and removed the tank from the bike.
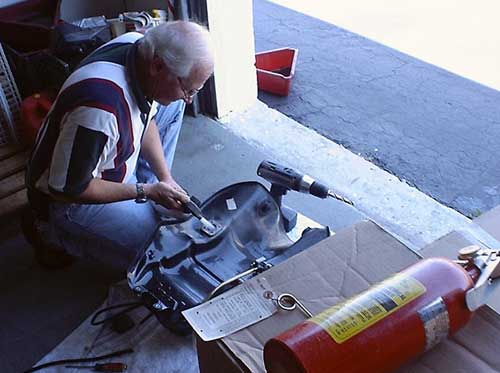
Now comes perhaps the trickiest part of the whole install and that's to drill a hole into the main Connie gas tank for the inlet from the fuel cell. Perhaps, this section should be subtitled "How Not to Blow Yourself to Kingdom Come in Two Easy Steps". It is also very critical that you drill precisely the correct sized hole in order for the inlet nozzle to fit properly and to be leak free. You'll get no second chance, drill too big of a hole and you are either looking at patching that one and re-drilling another OR springing for about a $700 new Connie gas tank. Needless to say, Larry and I sat back and gave careful thought to the "Not Blowing Ourselves Up" part. Terry had suggested filling the gas tank with water and flushing it out. Even though I had arrived with almost no gas left in my main tank, try as we may, we could shake all butt around maybe 1/4 cup of the remaining gas out of it due the plethora of nooks and crannies inside the Connie tank. This was not good, sports fans. My first thought was, if we can't all the gas out, we'll never get all the water out either, and since water and gas the twain don't mix, I was not willing to take that chance resulting in a crappy running bike. My idea was to go to Publix and score 1/2 lb of dry ice and allow it to vaporize within the gas tank dispersing the gas fumes and creating a most non-combustible environment. Larry did me even one better in the idea department when he remembered he had 2 Halon fire extinguishers. Halon is at least as good in the non-fire permitting department as the CO2 from the dry ice; the use of either would also ensure no remaining residue to cause any bike misfiring problem.
Larry had also carefully checked out his cordless drill motor and sure enough, there were visible sparks around the armature area when it was turned on. Here, he came up with his second brainstorm and duct taped over all the air vents on the drill motor into which any pesky gas fumes could find their way, thusly sending B2, Larry, and the BarfRocket, up, out of the shop, and into the sky. (Thanks Frank Zappa) While this was not the way drill motors are intended to operate, we would be drilling through fairly thin metal, thus not using the drill long enough to cause any overheating damage. Larry daubed some Vaseline around the area he was drilling, and on the very small drill bit (to catch any metal shavings and prevent them from falling into the tank) and prepared to drill a pilot hole. I stood back at a safe distance, armed with another extinguisher with the pin PULLED, thank you very much. I didn't just fall off the melon truck yesterday folks and it'd be a lot harder putting a Larry fireball out if I was also a B2 inferno. Just before Larry started drilling, he stuck the Halon nozzle into the tank and filled that sucker up 'til it was just a fuming with the "good stuff". Wham-bam the little pilot hole was through and he began drilling the main hole. In just a couple seconds, that was finished and we both let out a big sigh. Whew. I must admit my hands had dampened a bit holding that extinguisher. Next Larry got out his Dremel tool, taped it's air slots up too, applied a little more Vaseline to the hole and did a real nice job of cleaning up the surface of the hole so the bulkhead fitting would have an especially secure and leak free fit.
We then removed the plate covering the fuel tank level sending unit along with the plunger so Larry could get his fingers inside the tank and get the nut started on the threads of the fitting. He only dropped the nut once and had to fish it out with a mechanics magnet before the threads were started. We then reached into the top of the tank with an extension and socket and really torqued down on the nut pressing it securely against the o-ring seal of the bulkhead fitting. Finishing this most important, critical task, Larry and I sat back and smiled real big at each other, a "Good Job!" was synonymously voiced by both of us. With this hand-dripping and -wringing part accomplished, we were on the downswing portion of the cell install. Next, Larry drilled a hole through the BarfRocket inner fairing just above the fairing pocket for the red-lighted toggle switch for the transfer pump. I think he was getting a little kick out of watching me visibly cringe every time he drilled another hole in my bike, I have never let anyone do that before. If there was anyone to cause BarfRocket shavings to fly, I can't think of anyone else I rather let do it than Larry. We laid out the wiring from the pump to the switch, connected it to a switched power source, the pump and switch and zip-tied the wiring into place. Lastly, we positioned the check valve that would prevent gas from flowing in reverse from the main bike tank back into the auxiliary cell in place along the right frame rail, cut that portion of the transfer fuel line and clamped the check valve into place. At this point, we were basically finished with the cell install, all that remained was the All Important integrity and operational test, cosmetically cleaning things up a bit and buttoning everything back up and together. The test part was almost anti-climatic, hell, everything so far had been an absolute cakewalk even with us never having done such a thing before. As complete as Terry's instructions had been, along with the extremely accurate fitting of all the various fasteners, hoses and fittings, I would have been surprised if it all hadn't worked as advertised. We poured 3 gallons of gas into the auxiliary cell and flipped the lighted toggle, and maybe I held in just a little bit of a breath. The toggle lit, and the pump started with a hollow thrumming which deepened in tone as the gas was drawn through the lines and pump and made it's way to the bike tank.
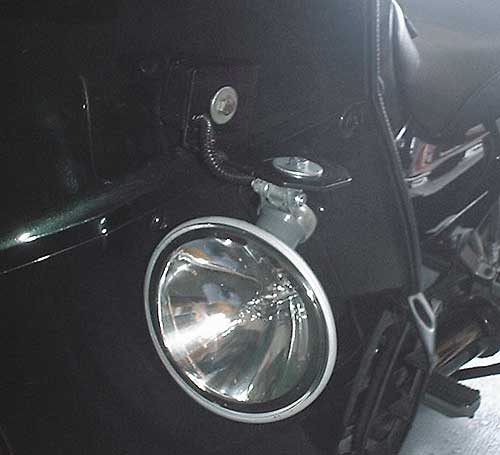
Larry and I both smiled real big as we noticed the bike's gas gauge begin to move to the right signaling that the main tank was indeed filling with gas. I grabbed my handy dandy Larry buck suggested Walgreen's gooseneck flashlight and started tracing over every inch of gas lines and fittings, searching, butt searching in vain for any sort of a leak, there was not even one single drop of errant petrol. Somehow, though I was really happy to see that, I wasn't even really surprised. The excellent job done by Sampson Sport Touring had made a pretty complex job about as easy as it could have gotten. As the tone of the pump switched back to the hollow thrum signaling that the aux. tank was empty, I flipped the toggle down and Larry and I both gave each other a well-deserved high-five! To further illustrate that Terry has indeed thought of everything, we next installed a small piece of insulation he had provided, wrapping it around the check valve, to insure the metal valve would not rub against anything nearby and zip-tied it into place. It took us butt a few more minutes to attach the provided new huge red tag light (provided with the cell) to the rear of the cell along with my license plate and IBA tag holder, route and connect the new wiring into the salvaged stock pigtail from the original rear tag light. A quick turn of the key and everything lit up exactly as it should have. One additional benefit was the increased size and brightness of the red tag light Terry had provided. Between this and the huge original Connie taillight, if anyone rear-ends this eye searing display, they need to get themselves a new seeing-eye dawg. With a quick double check of the fit between the new cell gas lines and the bodywork of the bike, and zip-tying the lines securely into place, our first install of an auxiliary fuel cell was complete. And High Lord Hella Saith, "Let There Be Lots More Light!" After much checking around with other LDR's and doing some research on the web, I had selected the Hella FF200 lights for the BarfRocket, the only question remaining was what type of mount. As mentioned last month in this segment, there is only one other mount commercially available for the Connie and that is the CBT mount that goes for about $100 a set and mounts the lights above the mirrors. (There is one other mount that goes under the main headlight butt handles only very small lights, the Hella FF200 Is Not a "very small light".) One main problem with the CBT mounts is there is probably an hour and a half or so involved with the install, as you have to strip things down, and remove the mirrors. Other folks have made their own mounts, which replace the side reflectors on the Connie, and this is the angle Larry and I chose to work from. Some states require that auxiliary driving lights be mounted on a line below the level of your main headlight. Another advantage to using this reflector area for a light mount is it satisfies that requirement.
As you'll recall from last month, Larry Buck had pretty much finished two sets of the mounts short of painting them. The production models will be powder coated, butt since these "beta units" may require some modification, a nice gloss black paint job will do for now. (Well, it was a nice paint job, butt we'll get to that in a minute.) Larry had told me via email that making these mounts had been a real bear. Sitting 170 miles North sipping on a frosty Ole Mil Light, I said to myself, "Self, how can that be? Get yourself a strip of aluminum, bend it 'til it's pretty much the right shape, slap some gasket goo on the back of it (wouldn't want to scratch than magnificent Kawasaki Barf Metallic Green bodywork, doncha know) and bolt that sucker on. What can be so tough about that?" Luckily for me, Larry's idea of a professional job and mine are not even in the same galaxy. The main problem had been the curvature of the front side of the Connie fairing, butt Larry had even managed a way around that. (so to speak J) He hand laid an epoxy mold to duplicate the curvature of the fairing and produced these exquisite black epoxy wedges that fit perfectly against the body work and backed these up with some rubber gasket material. The Hellas were already mounted to his Connie and boy did they look sharp!
Unfortunately, this didn't work as well as expected due to the fact that you can't really torque down on the nylon set-up without stripping it out, so we reverted back to the metal fasteners. I'll just have to be all the more careful that no tip-over occurs. We laid out the wiring loom, attached it to the lights, and a switched power source and began to stash the mass quantity of excess wiring before zip-tying everything into place. We had taken a short BBQ dinner break, (WOW! First time I've ever seen a $7.50 sandwich with fries…butt remember this is BOca) and now it was just dark enough to give the lights a test and aim them. It had taken less than 30 minutes to mount the lights, a substantial reduction from what it would have taken with the CBT mounts.
Here is where our first real problem of the whole day cropped up. We originally had mounted the lights above the mounts, butt as soon as I turned on the lights, we saw this was a definite NoGo. There was massive light splash back straight into the mirrors that would make them basically unusable at night. A solution to this problem was a quick as remounting the lights under the mounts. In doing this, we also noticed that we had slightly scuffed up Larry's nice paint job when we had attached the lights to the top of the mount. Oh well, these are only the initial test, pre-production units anyway. We aimed the lights against the back wall of Larry's building, double checked everything again outside and sat down with a couple of cool ones to celebrate a most full, complete and successful workday. We had accomplished everything we had planned and although it had taken a little longer than we expected, we were finally done. Larry gave me a set of his most excellent "Tailbright" reflectors for the rear of the Connie hardbags to install when I got home, I suited up and was soon heading back Northward to Melbourne. Epilogue The ride back to Melbourne proved that we had made the right choice with the Hellas and the "Buck Mounts". The Hellas did a great job of fully lighting up the area between the low and high beams, just the effect I was looking for. I also was only getting an occasional flick of the high beams from oncoming drivers and I'm pretty sure the angle of lighting from the higher CBT mounts would have been much more offensive to oncoming traffic. It was later in the following week before I was able to fully test the new Sampson Sport Touring fuel cell and the results were at least as satisfactory as the lights/mounts combo had been. After topping off both the main bike tank and the cell, I ran almost all of the gas through at "Rally-Big Peach Nominal" speeds save the last 50 miles, which I did around town. This yielded 350 miles to the fill-up! Fantastic! This would mean that I would be able to do more than a thousand mile day with just 3 gas stops. As I finished running through this first full fill-up, another unexpected benefit to Terry's engineering surfaced. As the bike chugged from almost running out of gas, I reached down and to my shock discovered that I had forgotten to switch the petcock back to Reg. from reserve when I had filled up. Oopps. (Only I could run out of gas with almost 4 gallons of auxiliary fuel onboard.) I pulled over to the side of the road, put the bike on its side stand and thought for a minute or two. KerDing!
It's then that I remembered that on the center stand, the cell had about a half inch of gas remaining in it when it had been pumped "dry" down in BOca, the fuel pick-up for the cell was also at the lowest part of the cell when the bike was on it's side stand. (Way to Go Terry!) I flipped the switch for the cell pump on and got more than enough gas into the main tank to make it another 10 miles down the road to the next gas station, great!, kinda like a reserve, reserve! In conclusion, I cannot begin to express my thanks to Terry and Ron of Sampson Sport Touring and to Larry Buck. I could and would not have been able to do all this without them and their help and support. With not the slightest exaggeration, these mods they have provided for me could easily be Real Lifesavers. Being able to only stop 3 times for gas in over 1000 miles will allow me possibly as much as another hour of additional sleep a night during the Butt, and that folks, is worth more than gold. During the Butt, we will be riding into the early morning hours in areas that are brimming with wildlife like deer, bear and worse yet, Moose. The addition of the highly effective Hellas and associated mounts will make spotting these extreme dangers much easier. Do not think that Sampson Sport Touring Products and Larry Buck's Surface Conditioning only offer products that are attractive to just Long Distance riders. They both offer other products that will benefit the average rider on a multitude of other non-LDR type bikes and rides. I highly suggest that you stop by their web sites and see what is there that strikes your fancy. I heartily recommend their products, and can sincerely say that not only am I very proud to call myself one of their customers, I am most proud to call these gentlemen my friends! 'Til next month, B2 is outta here Stay tuned during the next couple months as the finishing touches are made to these light mounts and auxiliary fuel cell and they are installed on the Team Rollin' Mag Barfrocket. We'll also be bringing you some of the other preparations being made for this year's Iron Butt Rally. |
|||
|
|
||||