Tutorials
Weight Maps
Alternative Methods
of using Bones and WMaps
Advanced IK Setup
Set Driven Key Basics
Assigning Motion Capture
Customizing Lightwave
Lightwave Basics

Gallery

Links
Flay
VisualFX Pro
The Lightwave Mailing List
Lightwave Tutorials on the Web
About me
This tutorial covers the basic steps of setting up a humanoid model with Weight Maps to be used with Bones. Before starting, find the following plugins under OBJECTS > ADDITIONAL and assign them to either a keyboard shortcut or menu button (or both) so you don't have to keep searching for them under that long list.
Set Vertex Map Value...
Clear Map from Vertices
VMAP-Copy
If you don't have these plugins, visit http://www.flay.com and download them. If you don't know how to assign keyboard shortcuts or new buttons, click here.
It helps to know in advance what your skeleton is going to look like. For example, knowing if you are going to bone each finger or use Endomorphs to animate the hands will cut down on unnecessary work. Setting up your skeleton before you make weight maps will also help determine how many Weight Maps are necessary. Don't make a Weight Map for an area that can be handled with Bones.
Setting up Parts on your object will also help speed up Weight Map assignments (if you don't know what a Part is, shame on you!). You should get into the habit of assigning Parts as you model to things like arms, legs, accessories like sunglasses, etc. This makes selecting sections of your object a snap.
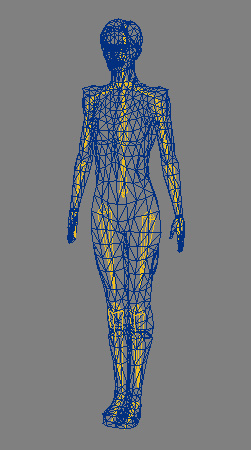
Figure 1 shows the completed model with the skeleton in Layout. For reasons I won't get into right now, I chose to make my skeleton in Layout rather than use Skelegons.
 Figure
1
Figure
1
You may notice that the legs are not spread apart and the arms are hanging at the character's sides. Using Weight Maps lets you break away from the standard DaVinci pose.
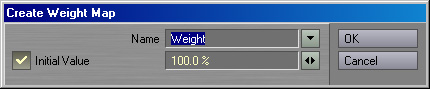
OK, now we're ready to start assigning Weight Maps. Load the object into Modeler and select the polys associated with the body (you can select using points, polys, or volumes). Switch to Weight Maps mode (click on the button with a "W" on it at the bottom right corner), click and hold on the pulldown menu and select (new) at the bottom of the list. Figure 2 shows the Create Weight Map dialog box.
 Figure
2
Figure
2
Type in something like "Torso" or "Body" for your Weight Map's name and hit OK. You should now have something that looks like Figure 3 (make sure your view is set to Weight Shade). If you don't know how to change your view to Weight Shade, shame on you!
 Figure
3
Figure
3
Follow the same steps to create a Weight Map for the head and for either the left or right arm and leg. Note: make sure when you name the arm and leg you have a "L" or a "R" in the name to signify which side it belongs to, you'll need it next.
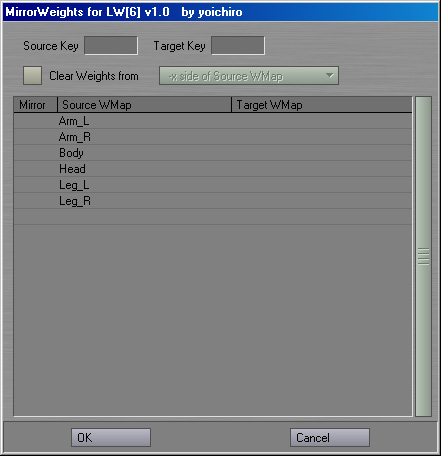
After you have a Weight Map for the body, head, an arm and a leg, its time to mirror over the arm and leg. To mirror over a Weight Map, activate the .YO_MirrorWeights plugin (It doesn't matter which Weight Map is currently selected). Figure 4 shows the .YO_ MirrorWeights plugin interface.
 Figure
4
Figure
4
Your list of Weight Maps appears in the center (you can see I've already mirrored over my Weight Maps). At the top are two entry fields, Source Key and Target Key. Let's say I had assigned the right arm and leg first. I would type in _R into the Source Key and _L into the Target Key. This tells the plugin to take the Arm_R Weight Map and make a mirror of it called Arm_L. After you enter the Source and Target Keys, you need to click on the Arm and Leg Maps in the list. You'll see a "V" appear next to the name to let you know this Map will be mirrored over. That's it, hit OK and check your pulldown list of Weight Maps to see your two new Maps. Note: your character MUST be symmetrical, and the center of the object MUST be centered on the X-axis for MIrrorWeights to work.
Now its time to test out your Weight Maps in Layout. Note: from my own experience, I've found it's necessary to close down Lightwave, open a fresh Layout and Modeler, load the object into Layout and send it to Modeler to get the two programs to synch up properly. We're going to be doing a lot of switching between Layout and Modeler as we refine the Weight Maps.
The first thing we need to do is tell each Bone what Weight Map it belongs to. "p" is the default shortcut key to open the Bones Properties Dialog box shown in Figure 5.
 Figure
5
Figure
5
Go through the Bones in your skeleton and assign them to the appropriate Weight Map using the pulldown menu found in the middle of the dialog box. Ignore the "Use Weight Map Only" checkbox (I'll get into that in a later tutorial). After you're done with that, start at the root Bone and activate all your Bones. Now you can try out your character! Move around the legs, you'll notice that even though they are right next to each other, the Bones do not affect the opposite leg. However, you'll notice quite a mess at the joints where one Weight Map ends and another begins like at the hips and shoulders. Now it's time to get your hands dirty.
It's very important at this stage to make sure your Modeler and Layout are synchronized. Any changes you make in Modeler will automatically take effect in Layout when you switch back over. I like to work by placing Layout and Modeler side by side (I run my desktop at 1600x1200), and posing my character in a position where I can see where I need to modify the Weight Maps.
There are a variety of ways to edit Weight Maps. Since I work with low-poly real time models, I prefer to edit the Maps on the vertex level. You can use the Weight brush, but it's slow and not very precise.
A quick note, it's important to understand the difference between a point that has a Weight Map value of 0% and a point which does not belong at all to a Weight Map. As a general rule of thumb, if I don't want a point to be affected by a Weight Map, I use the Clear Map from Vertices plugin rather than entering a value of 0%.
Where the point lies on your object will determine (most of the time) what method you use to edit the values. To begin, let me show you the difference between what we started with and what we are aiming for. Figure 6 shows a Weight Map before and after tweaking.
 Figure
6
Figure
6
As you can see, the area around the hip has been extended and softened. Since we'll be mirroring over any changes we make, you should only worry about one side of the character.
Appending points to an existing Weight Map is easy. If you want to add some points to the Leg_L Weight Map, just select those points, go down to the Weight Map pulldown menu and choose (new), but when the dialog box pops up, instead of typing in a name, just choose the appropriate Weight Map from the pulldown menu. You also set an initial value for those points instead of accepting 100%.
Removing points from a Weight Map is straightforward. Again, just select the points you wish to remove and use the Clear Map From Vertices plugin.
Now that you know how to add and remove points, lets start editing the values for each point. The Set Vertex Map Value plugin (Figure 7) will let you define a value for all the points you have selected (Make sure you have the Weight Map you want to edit selected otherwise you will have to select it from the pulldown menu).
 Figure 7
You can quickly soften an edge by picking all the points along the edge of a Weight Map and changing the value to something like 50% or 25%. Symmetry mode will let you very quickly edit Weight Maps such as the Torso or Head which are centered on an axis. As you edit your Maps you should constantly be checking your progress in Layout. Setup a simple animation of the limb rotating about and scrub through it to see how your changes affect the model.
Another way to edit your Weight Maps is to use the Info Dialog Box (Figure 8). The default keyboard shortcut for the Info Box is "I". It's useful for comparing the strengths of two or more Weight Maps over a single point, or for when you want to know what the current value is for a point before you edit it (Set Map Value always has a starting value of 0%).
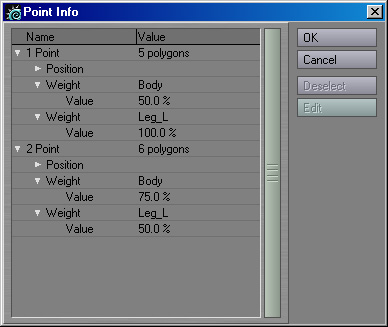
In Figure 8, you can see 2 points, both of which are being affected by 2 Weight Maps (Body and Leg_L). You can also see the point's values on each Weight Map. You can edit those directly. The trick is to click on the Weight Map NAME not on the value itself. Once you click on the Weight Map Name, the Edit button on the right will be available and you can change the value.
In the case of an asymmetrical model where you changed one shoulder but wanted to make the other shoulder match as closely as possible, you could select the 2 points and check the value of the edited vertex against the unedited vertex and update the unedited vertex.
Once you get your character looking good in Layout, its time to mirror over the new and improved leg and arm Weight Maps. The process is exactly as before. Open the Mirror Weights plugin and follow the same steps to generate new Maps for the other side (you old maps will be overwritten).
Taking Weight Maps Further
Lets say you're not really happy with the way the thigh and calf interact. You can easily split the Leg Weight Map into upper and lower Maps, assign them to the leg Bones and get that little extra control you can't quite seem to get with Bones alone. Splitting a leg Weight Map is easy. First we're going to use the VMAP-Copy plugin so we have a copy of our original Weight Map just in case. Activate the VMAP-Copy plugin (it doesn't matter which Weight Map is selected) and choose the Leg Weight Map from the pulldown menu. Type in a new name for the copy (Call it something like UpperLeg_L since this will become the Weight Map for the Thigh).
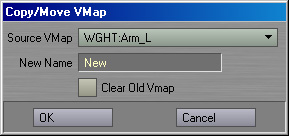 Figure
9
Figure
9
Select the UpperLeg_L Weight Map and select the points below the knee. Create a new Weight Map called LowerLeg_L. Then clear those points from UpperLeg_L. There you go, now you have 2 new Maps for the left leg. All you need to do now is mirror those 2 new Maps over and reassign the leg Bones in Layout with the updated Maps. Since none of the Bones in Layout will be referencing the original Leg Maps, they won't do any harm.